Create Sparkling Text with Heavy Weave Texture in Photoshop

After you implement the full instructions given in this Photoshop Tutorial for Beginners level users, you will learn the whole process of creating Beautiful Sparkling Text Effect in only fifteen short steps. The glamorous look of the Text is a result of using lots of Layers Styles work and especially default Heavy Weave Texture which will make the inside part of the Text to resemble traffic light. You will achieve this glossy effect with one Text layer only.
You can create this Text Effect with any version of Adobe Photoshop program.
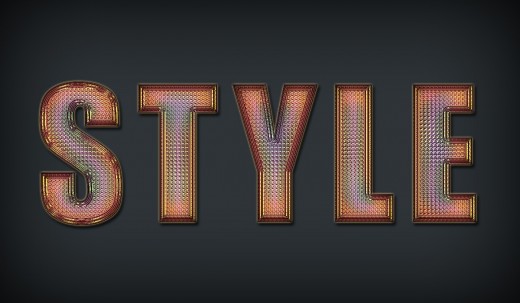
This is the final result you should get after following all steps:


STEP 1
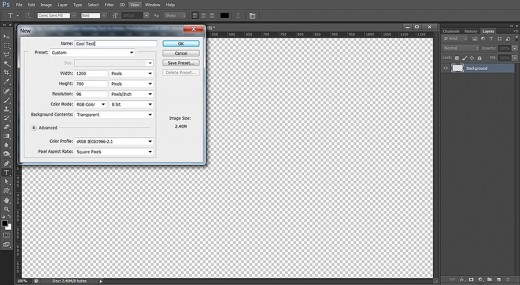
Firstly create a new Adobe Photoshop .psd file of 1200px Width and 700px Height. Set its Resolution to 96 Pixels/Inch (for those who intend to print the final result, the Resolution should be set to 300 Pixels/Inch) and select Transparent for Background Contents so that your first layer to become editable. I have set my Color Mode option to RGB as I won't print the text, but if you need to print it, choose CMYK. As you can see on the screenshot below, I have called my .psd document Cool Text but you can choose another name.
Rename also Layer 1 to Background.
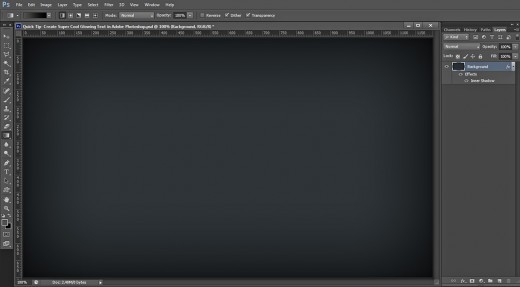
Colorize the Background with Paint Bucket Tool and Add Shadow to the Canvas Borders
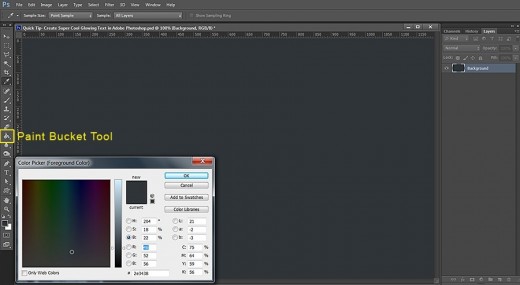
In the following two steps you have to fill your first layer with grayish navy blue color. You should set the Foreground Color to #2e3438 then with the help of Paint Bucket tool you have to colorize the Canvas. For the purpose you can also use Edit, Fill, Foreground Color.
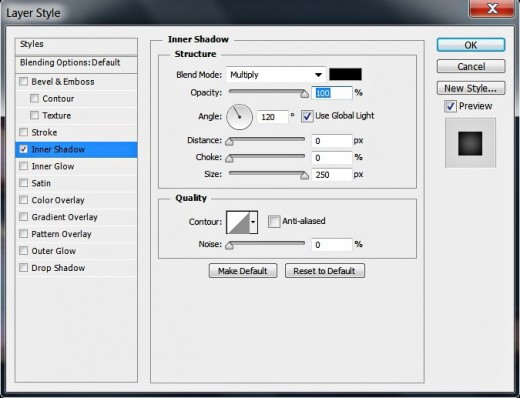
Your next action is to apply Black Inner Shadow of 100% Opacity to create vignette effect and make the canvas borders darker.
STEP 2
While your Background layer is highlighted, navigate to the Tools bar and firstly change the Foreground color swatch to #2e3438. After that you should select Paint Bucket Tool and drag with it anywhere on your canvas to colorize the Background with the chosen dark grey color. The other way to fill your Background layer with color is to use Edit, Fill, Foreground Color.
STEP 3
You should now double click on the Background layer or go to Layer, Layer Style, Blending Options and check Inner Shadow in Layer Style dialog box which will appear on your screen. Change the settings as follows:
Blend Mode: Multiply
Color of Shadow: #000000 (black by default)
Opacity: 100%
Angle: 120 degrees
Use Global Light: ticked
Distance: 0px
Choke: 0%
Size: 250px
Contour: Linear
Anti-aliased: unchecked
Noise: 0%.
Press OK button to apply the effect and to close Layer Style dialog box.
This is how your Background layer will look after you have darkened its borders:
Type the Text and Apply Layer Styles to Create Awesome Color Combinations, Gloss, Texture and to Make it Look more Embossed
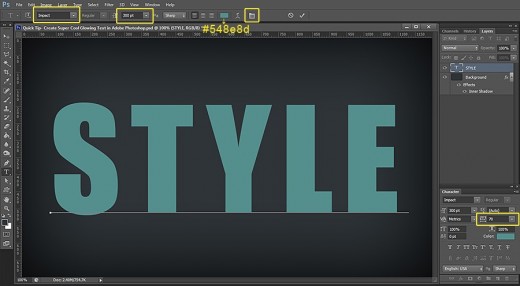
In Steps 4-14 your first task is to type the Text using thick default Font of blue color.
When you have finished your work with Type tool, you should start applying the Blending Options. Firstly you have to add Shadow, ochre colored Outer Glow, purple Satin with changed Contour and orange Inner Glow. The next layer styles you have to add are dark Inner Shadow effect, thin Stroke, Bevel and Emboss with green to brown color blend and modified Contour, and the most important- Heavy Weave Texture which will create the cool relief of the Text.
STEP 4
Navigate to the Tools bar and select Horizontal Type Tool. Click on Font Family drop down menu and choose the default Impact Font. Of course, you can use another Font but you will probably need to adjust the Blending Options settings because their appearance depends on the size and shape of the object they are applied on.
Select also #548e8d for Text Color then type Style using Capital Letters.
As you can see, I have set the Tracking Option to 70. For the purpose I just highlighted the Text after I typed it, clicked on Toggle the Character and Paragraph Panels icon in the Options bar and then inserted my Tracking value. The default Tracking of 50 is not bad too. You can use lower or higher value. The purpose is not to type the letters too close to one another in order to avoid overlapping.
STEP 5
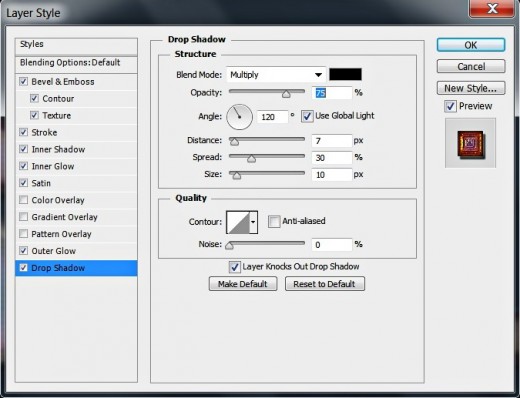
Now highlight your Style Text layer, right click on it, choose Blending Options and firstly tick Drop shadow. Change its settings as follows:
Blend Mode: Multiply
Color of Shadow: #000000 (black by default)
Opacity: 75%
Angle: 120 degrees
Use Global Light: checked
Distance: 7px
Spread: 30%
Size: 10px
Contour: Linear
Anti-aliased: unchecked
Noise: 0%.
Layer Knocks Out Drop Shadow: checked.
Don't close Layer Style box. We have more Blending Options to add in the coming steps.
STEP 6
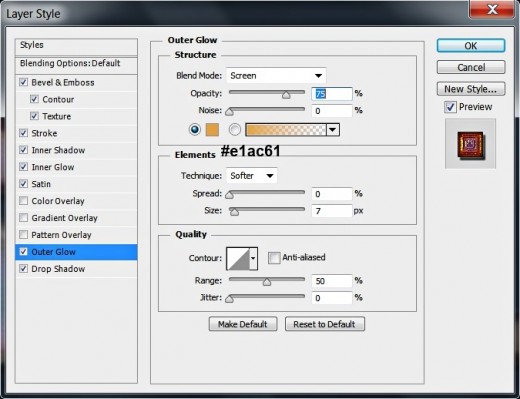
The next Blending Option to be ticked in Layer Style dialog box is Outer Glow. Change its settings like this:
Blend Mode: Screen
Opacity: 75%
Noise: 0%
Color of Glow: #e1ac61
Technique: Softer
Spread: 0%
Size: 7px
Contour: Linear
Anti-aliased: unchecked
Range: 50%.
Jitter: 0%.
STEP 7
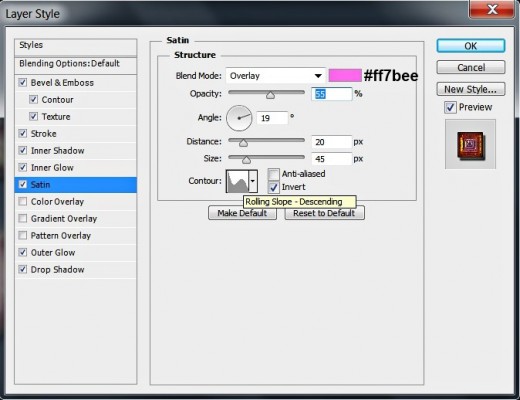
The third Layer Style to be added to our Style Text Effect is Satin. Insert the following settings:
Blend Mode: Overlay
Color of Effect: #ff7bee
Opacity: 55%
Angle: 19 degrees
Distance: 20px
Size: 45px
Contour: Rolling Slope-Descending
Anti-aliased: unchecked
Invert: checked.
STEP 8
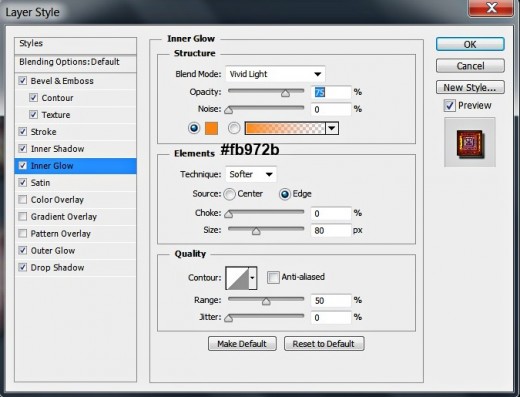
Now add Inner Glow Layer Style with these settings:
Blend Mode: Vivid Light
Opacity: 75%
Noise: 0%
Color of Glow: #fb972b
Technique: Softer
Source: Edge
Choke: 0%
Size: 80px
Contour: Linear
Anti-aliased: unchecked
Range: 50%.
Jitter: 0%.
STEP 9
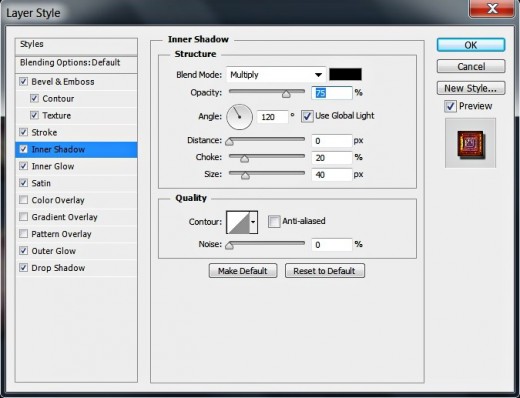
Now tick Inner Shadow to add dark shade and more volume to our Text Effect:
Blend Mode: Multiply
Color of Shadow: #000000 (black by default)
Opacity: 75%
Angle: 120 degrees
Use Global Light: ticked
Distance: 0px
Choke: 20%
Size: 40px
Contour: Linear
Anti-aliased: unchecked
Noise: 0%.
STEP 10
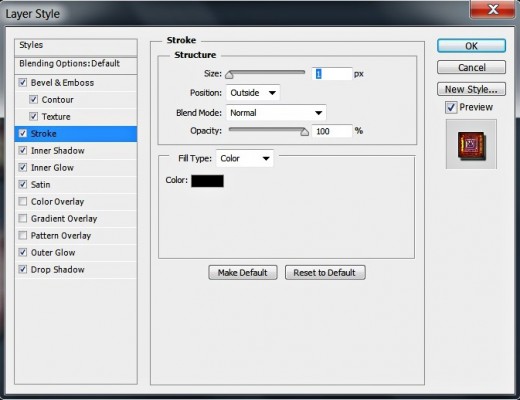
The next Layer Style to be added is Stroke. Insert these settings:
Size: 1px
Position: Outside
Blend Mode: Normal
Opacity: 100%
Fill Type: Color
Color: #000000 (black by default).
STEP 11
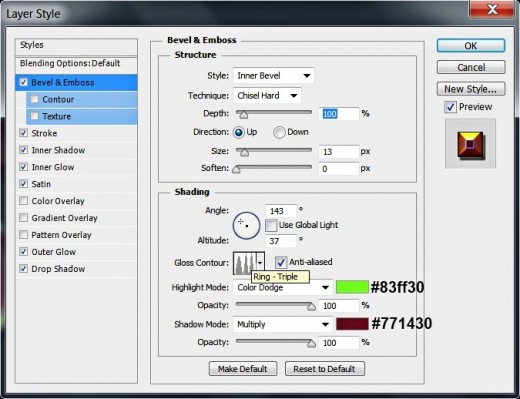
Let us add in this step slight 3D look to our Style Text. Check Bevel and Emboss Layer Style and apply these settings:
Style: Inner Bevel
Technique: Chisel Hard
Depth: 100%
Direction: Up
Size: 13px
Soften: 0px
Angle: 143 degrees
Use Global Light: unchecked
Altitude: 37 degrees
Gloss Contour: Ring-Triple
Anti-aliased: checked
Highlight Mode: Color Dodge
Color for Highlight: #83ff30
Opacity: 100%
Shadow Mode: Multiply
Color of Shadow: #771430
Opacity: 100%.
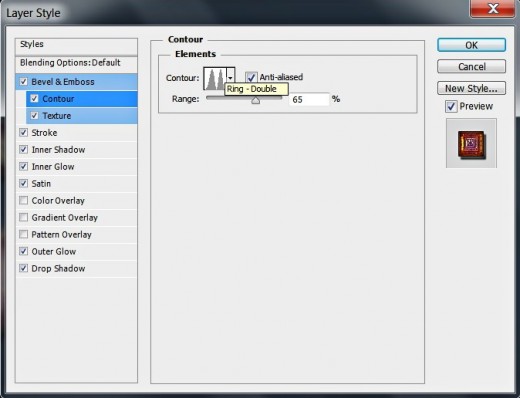
STEP 12
Now tick Contour Layer Style which is below Bevel and Emboss and change its settings as follows:
Contour: Ring-Double
Anti-aliased: checked
Range: 65%.
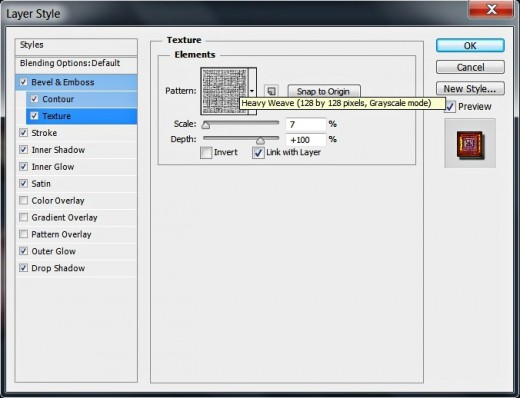
STEP 13
The last Layer Style to be applied is Texture. Insert the following settings:
Pattern: Heavy Weave (128 by 128 pixels, Grayscale mode)
Scale: 7%
Depth: +100%
Invert: not checked
Link with Layer: checked.
Press OK button to apply the Blending Options and to close Layer Style dialog box.
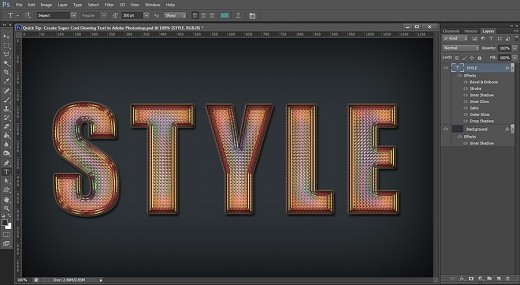
STEP 14
It is time to take a deep breath because there is no more work. Your gorgeous sparkling Text Effect is ready. As you can see on the screenshot below, you should have only two layers in Layers pane- Background and Style Text layer.
STEP 15
This is my Sparkling Text Effect saved in .jpg format. Hope you find this short Photoshop tutorial easy and useful. Thank you very much for reading and God bless!
If you find some difficulties while following my steps, please leave a comment below so that I can help you. :)