How To Create A Facebook Cover Image GIMP Tutorial

This is the completed cover image I created using the following steps and template.

Step One
Start With A New GIMP Image
Why start from scratch?
- If you want to use a different frame design (there are several to choose from at Pixabay).
How can I skip this step?
- Create The NEW GIMP 851x315 and then go to the template section to download a template.
- Download the templates I have provided in the section just before STEP FOUR on this page.
STEP ONE has a few parts. If you start from scratch Start Here. If you want to start with a template follow the first three items on this list and then go to STEP FOUR.
- Open GIMP
- Create a NEW image
- Select dimensions 851 x 315 (September 2014 best size for Facebook Cover Images) IMPORTANT: IF you are using a Template stop here and scroll down to the template section. I've provided two optional templates on this page. Look just above Step Four on this page. IF YOU ARE AMBITIOUS, and have your own ideas for creating the framed photo design, please Continue here...
- Open your 'border' image. It should be a png with transparent background. There are several amazing transparent images, such as frames and borders in a variety of styles, on Pixabay . com Make sure the image is a .png and has a transparent background so it can be easily layered on top of your photos.
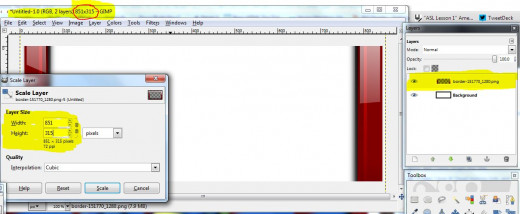
- Scale the border image to 851x315 so it will fit the background size. BE Sure to click the ''scale'' button after you select the size.
NOTE: The 'Scale Layer' area of the screen shot shows a broken link (near the right edge of where I have highlighted). It is easy to scale (re-size) any layer to exact dimensions when you click that so it is disconnected. Then type in the dimensions you would like for your layer.
In this step the layer is the same size as the background. Width 851 Height 315 Pixels
Step Two

 The Layer")
Duplicate and Scale The Copy
The next step is to create the smaller frames. We are going to use a copy of the border frame we already created.
- Click on the layer (mine says 'border-) in "Layers" (see to the right of first screen shot).
- Click on the icon at the bottom of the "Layers" dialog box (I've highlighted it). This will create another copy of that layer.
- Right Click on the new copy and select "Scale Layer" another dialog box will open.
- Make sure the chain icon is disconnected.
- Type in 200 in width and 200 in height.
- Click on the "Scale" button (I've highlighted it on the "Scale Layer" dialog box). See left side of the second screen shot.
Now you have one small frame image. For this project we will have three. So go now to STEP THREE to continue.
Step Three

Duplicate Copies
This section will show you how to duplicate the smaller frame image.
- Click on the copy in the Layers Dialog.
- Click on the icon at the bottom of the Layers Dialog box (as you did in Step Two).
- Click on the icon again. This will mean you have Three Small Frames.
The three small frames are likely stacked on top of each other so in the next section we are going to use the GRID tool to line them up.
Line Up Frame Images With The Grid Tool
I've highlighted the Grid lines and the background (on the Layers dialog box).
- Click on the 'eye' icon to the left of the 'background' layer shown in the "Layers" dialog box. This will make that layer invisible. This will make it easier to use the Grid tool and the checkbox background of a transparency.
- Do the math. The full project is 851 pixels x 315 pixels. So the center of the project is 425.5
- To use the Grid. Hover your mouse over the edge of the ruler on top. HOLD DOWN the left button of your mouse. Drag your mouse to 50 pixels below the top. This creates your horizontal line.
- Next: Hover your mouse arrow on the edge of the side ruler. Click the left button on your mouse and HOLD IT DOWN while you drag it to the center 425.
- Now you will drag the images. First the center image. Line it up with the center and top Grid line. There will be a small 'cross' to show you center down the middle (the vertical line) and the top area of your frame will rest on the horizontal line.
- Now. Drag the other two frame images. One will set on the left of the center and the other will rest on the right of center. As shown in the screenshot.
Note: I have used the checkbox pattern to create even spaces on each side of center. Approximately 1.5 boxes.
TEMPLATE SECTION: If you have completed all of steps 1-3 you do NOT need a template. YOU have made your very OWN. :-)


Let's Add Photos -- Or Replace Photos In The Template
At this step we are ready to add the photos we want to put in the design. I'm going to add three images. You can use this section of instructions to:
-
Add Photos, or
-
Replace Photos included in your Template (if you use the template).
Step Four
Open Photos As Layers
Each of the three photos you want to use will need to be Scaled (re-sized) to 198x198 so they will fit into the project. The objective is to have the edges of the image 'hide' behind the frame designs. So... The frames are square. How did I make odd sized images all square?
You will repeat this section three times (once for each of the photos you add).
- Open a photo as a new layer. Click "File" then "open as layers" and find the photo on your computer which you want to use in this project.
- Right Click on the new copy and select "Scale Layer" another dialog box will open.
- Make sure the chain icon is connected this time
- Type in 198 into the width OR height CHOOSE the one which is smaller to start with.
- Click on the "Scale" button.
Step Five

Crop
- Your image is 198 x something. We need to make it square.
- Use the knife icon tool (highlighted in the image above to the right.
- Note the 'Size' section of the Tool Options (highlighted toward the left of the image).
- You want to leave the 198 as it is and make the larger side exactly 198 as well. (The image says 200 x 200 where I have highlighted. But, we want the photos to be just a little smaller than the frame design so we can tuck the edges behind the design elements).
- This next step will crop it. Some computers I've used want this step to be finished by clicking on the ENTER key. Others want me to double click the left button on my mouse. I'm not sure why this is. So...
- You have the image size how you want it.
- The area is centered where you want it.
- Hit the Enter key and if that works great! If not then double click the left button on your mouse.
REPEAT THE ABOVE STEPS FOR EACH OF THE THREE IMAGES.
Shadows And Embellishments
Now it is time to add shadows and embellishments to your project. This is a great way to give it depth and a photo real 3-D effect.
First The Shadows:
- Go to your tool bar (above the image) and click on 'Filters'
- A drop down will appear. Scroll down to "light and shadows"
- Another menu will appear. Click on "Drop Shadow"
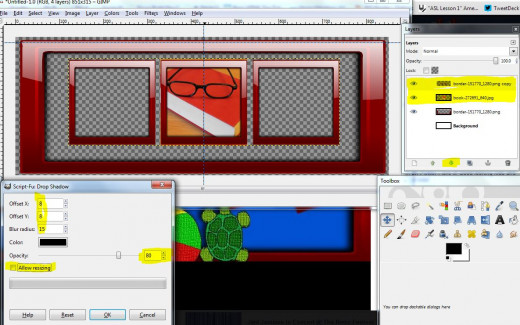
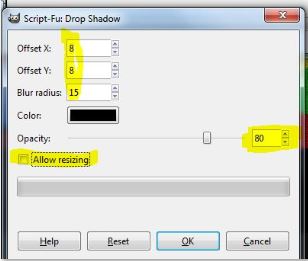
The screenshot to the right is the Tool Options dialog box which will open when you have selected 'drop shadow' so now you will need to select the settings as I have highlighted in the screenshot. Be sure the "Allow Resizing" box is UN-checked.
Click OK when the settings are correct.
REPEAT FOR EACH FRAME ELEMENT.
Design Tip: Add more embellishments and shadows (note the beach ball, turtle, and ballerina shoes in the tutorial example). I found all of the transparent images on Pixabay. Each has a transparent background so it can be layered and not have any edges.
Have Fun!
Shadow and Embellishment Poll
How Do You Feel About The Look of Shadows and Embellishments On Internet Graphics?
How Am I Doing?
I Create Tutorials Step-By-Step
Each of the tutorials I create is a process of me learning and then taking you through the steps I take. I haven't used any manuals. I see them and wonder... but, I might really like trying a lot of different things without instructions. I am showing you this GIMP book because I know everyone learns differently. My tutorial style may not fit your learning style. OR, you might like to learn a lot faster than I can create tutorials. So.. Have Fun and let me know what you create.
GIMP Manuals
© 2014 Deb Bryan


