Make Your Own Clasp for Jewelry

Easy-to-Make Jewelry Clasps
Clasps are an important jewelry component. Unless your necklace, bracelet, or anklet is stretchy or long, you need some type of closure in order to get it on or off. You can purchase clasps, but if you are creating a handcrafted jewelry project, it makes sense to make your own clasp, too. Don't worry! It's very easy to make your own clasp. There are many different types of clasps you can make, but I think one made using wire, pliers, and wire cutters is a good clasp to get you started.
Materials for Making a Clasp
Tools for Working with Metal
Wire
Dead soft (my preference) or half hard. Do not attempt to make clasps using full hard wire, as they will be very brittle and susceptible to breaking. If desired, you can anneal wire to regain its malleability. Gauges 18, 16, and 14 are most commonly used for clasps. I used 18 gauge wire for this project, which required a small clasp. See this table if you need millimeter equivalents.
Wire Cutters
I used my trusty flush cutters.
Pliers
No teeth! I used a pair of roundnose pliers and a pair of chainnose pliers. You want smooth jaws or else you risk marking the wire.
Skill Level
Easy. As with other techniques, you'll get better with practice and experience.
Time Required
A few minutes.
If you want absolutely reproducible handcrafted clasps, I recommend using a jig to make your components. However, it's often nice to have handmade components that look the part and are unique to the piece for which they are designed.
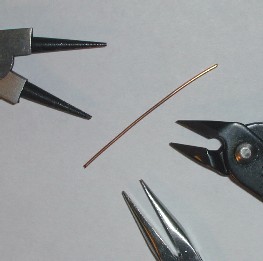
The photo shows the materials I used to make my clasp. Actually, I hammered the clasp pictured above (which is small... maybe an inch long) after I photographed it, so the finished piece looks a bit different from the photo and used additional materials. Be creative when making your clasp! You can string large-hole beads onto your wire before bending into its form. You can wrap a clasp with fine gauge wire. You can make elaborate loops and swirls and lots of different shapes.
Find Materials for Making a Clasp
You can find wire at many different types of stores. If you are making a clasp out of copper, try a building supply store. Copper wire that is used to hang pictures or for wiring tends to be 99.9+% pure. You can get craft wire or precious metal wire from bead or craft stores. Be careful using coated craft wire, since its coating may be damaged when you hammer your clasp in the final step.


Handcrafted Clasp - Step 1
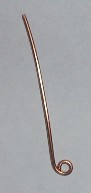
Use a piece of wire that is a bit longer than you think you will need. My wire was around 3 inches in length. The first thing I did was to use the tip of my roundnose pliers to form a small loop at one end of my wire. You can use loops (larger than mine) as points of connection for jump rings or chains. My loop is small, since its purpose is simply to prevent my chain from slipping off.

Handcrafted Clasp - Step 2
Next, use your fingers to bend the half of the clasp near your loop into a pleasing shape, such as the lower curve of an 'S'. The curve in my clasp is where I attached my chain. You can use pliers to form the curve if you prefer. I like to use my fingers to help prevent weird bends in the wire.

Handcrafted Clasp - Step 3
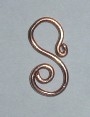
Now, work the other side of the wire. Make another loop using your roundnose pliers or bend the tip of the wire back upon itself using flatnose pliers (which is what I did). Again, use your fingers to bend the wire into a pleasing shape. I went for a rough 'S' shape. It's up to you whether the loops or bends at the ends of the 'S' are facing the inside or the outside of the curves. You can use a file to smooth rough edges, should you have any. One caution: make sure your loops/bends are small enough so that the clasp will fit in the connecting end of your jewelry!
You can hammer your clasp or press it firmly using your flatnose pliers to harden and flatten it. If you are using a coated or plated wire, such as goldfilled wire or a colored copper, be careful not to damage the coating. Goldfilled wire hammers well, but some plastic- and glass-coated copper wires are not meant to be worked in this manner. You can use jump rings to connect your new clasp to your jewelry or you can make loops in your jewelry that accommodate the curves of the clasp.
Hammer to Harden
While it's easier to form the curve of a clasp using soft wire, you don't want the clasp to come un-bent when you use it in your jewelry creations. Gently hammering the clasp will harden the metal. You want to hammer the clasp until it is stiff, but don't go crazy or you'll make the metal brittle. The perfect clasp retains a little flexibility, yet won't stretch out of shape.
Learn to Make More Jewelry
Do you have questions or comments about this project or about the lens? Here's the place for them!
Related

Chainmail 101.5: Beginner’s Chainmail with Advanced Topics

Exploring The Variety Of Clasps Used In Handcrafted Jewelry
 for Jewelry or Armor: A How-To")
Making Chain Mail (Maille) for Jewelry or Armor: A How-To

★ How to Make Puppets for Stop-Motion Animation | Jointed Limbs and Clay Art Doll Figures ★

★ Jewelry Metalsmithing Techniques | Beginner's Tutorials For Sheet Metal and Wire Working ★


