How To Draw the Head and Face

Take a Crack At Drawing Faces
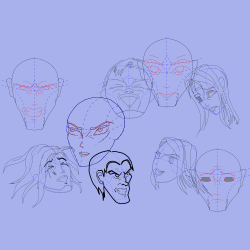
It's widely considered difficult to draw the human head, especially when considering they normally don't stay still. The skull is a bony mass, full of intricately woven muscles that all work in concert to contort themselves into all manner of appearance. There's twists, turns, angles and expressions that can all change the entire dynamic of the head to the viewer.
So, I began this comprehensive guide. It includes head-turns, facial expressions and other variations, such as head sizes, shapes and head tilts, all mixed together. As a bonus, I've also added a section on phonemes, which is a drawing style to demonstrate the mouth for lip-syncing words in animation.
It's a lot to take on in one sitting, but if you take your time, you can handle it. And if you do a good job, there'll be cake at the end.
Photo Credit: All images in this article were drawn by me, unless otherwise expressed.

Get Started With Heads
Tackling the male and female head shapes can be a tough place to start. It's good to have some reference. To the right is an example of two heads. Both should look similar to eggs set upon their thinner sides. This is the basic head shape.
The one on the left is an example of a man's head, while the one on the right, is an example of a woman's head. Neither are fleshed out, or at all accurate. They are just examples of starting points to give a reference point on drawing heads.
Below are two articles that can shed some more light on this.
Here's What You're Going To Need - It's all in the right tools


How To Get Heads Turning
Turning a head is a simple process of laying down guidelines, and sticking with the turn. Then make sure the head shapes get handle properly. It's enough to stick with basic shapes like triangles, circles and squares, but more importantly, keep them in line with the facial features.
This one's all about the guidelines. Get a good sense for how each one lines up, and draw each head, and face, along the guidelines.
Time required: Any time at all
Difficulty: medium
Cost: Nothing
Tools:
- pencil
- paper
- sharpener
- eraser
Instructions:
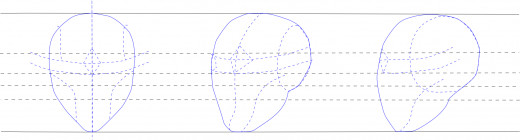
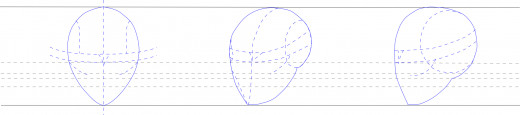
1. Drawing any face, especially one that will be turned, begins with laying down some guidelines. Some things change in the turn, but to get it right, most things will stay the same. So, lay down some guidelines, and get the head shapes to start with.
In the turn, it's important to understand that the skull is a circle, that's flattened at the temples. Feel your own temples to get an understanding of this. Draw a smaller circle for this to demonstrate that the head isn't a complete circle.
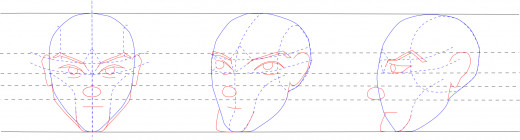
2. Lay out the facial features next, keeping with the guidelines. Add the eyes, eyebrows, nose, mouth and ears.
Of all the features, make sure the ears accurately demonstrate the turn. The chin should also do this.
In the front view, the chin just breaks from the cheeks in a flat pattern. In the 3/4-view, it begins to angle out of sight on one side, and begin the display of the cheek depth on the other. And in profile, it becomes a shape that juts from the mouth, and up into the cheek.
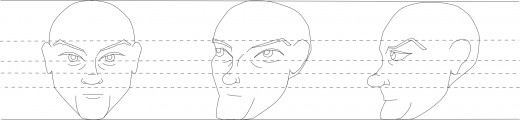
3. Finally, finish off the facial features, soften some of the edges, and erase any lines that are unnecessary.
4. The female face begins much the same way as the male. Start with the guidelines. Then, draw the heads, but make sure they are more petite, and prepare for more curves and less straight jagged lines.
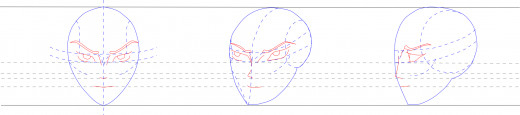
5. Just like before, begin to lay down the facial features, staying with the guidelines. One thing of note, is in the 3/4-view, the closer eyebrow begins to stretch, while the other begins to disappear. This will continue in the profile.
The eye in the profile, is only the outside of the eye, and the point that is near the nose disappears entirely. This can take some work to get right, but always give the eye a curve, in profile, so that it isn't just a ball pointing forward, it's an eye wrapping the side of the head.

6. And, finally, clean up the lines. Make sure the contours of the face are appropriate for each of the views. In front view, the head should be kind of an egg-shape. In the 3/4-view, the brow and cheek bones should jut out a bit, demonstrating an eye-socket cavity, and a tapered chin. In profile, there's always a dip just before the nose, and the lips will jut out in women.
Take the Poll!
What makes a head turn?
How to Draw the Head from Any Angle - Tutorial On Drawing the Head Using Andrew Loomis' Techniques
This is a drawing lesson from Stan Prokopenko. Click the link to find more of his tutorials.
Some Of the Best Books For Drawing Heads and Faces - These were written by the pros


How To Draw Facial Expressions - Facial Expressions

Make sure to get the guidelines in place. Facial expressions are drawn mainly in the eyes, eyebrows and mouth. Get the line up first, before trying anything. Also, any time the mouth is open, the chin drops.
Drawing Facial Variations - It's all in the angles and shapes

Once you've nailed down a certain amount of head turns, facial features and all the rest that goes with it, it's time to add some new variations to the mix. This is when it's time to turn a head, and make it angry or happy or sad. Try turning on to the 3/4-view, and then tilting it upwards on its axis. Next try changing the shape of the head to more of a ball, then a triangle, then a square. Next, try to do something with the hair. Hair always follows gravity, and bends and flops to wild degrees, so enjoy that.
Anyway, at this point, it's time for the real fun. Don't be afraid to try anything and everything. How about a top view with the nose hiding the mouth, or what about a 3/4-view from the back. Get creative, and have fun.
Take the Poll!
What facial variation do you like best?
Facial Expression Drawing Links
- Quick Tip: How to Draw Facial Expressions to Show Emotion
A great step-by-step guide to facial expressions, and how they move from one to the next. - Lackadaisy Expressions: Notes on Expressions
A comic artists view of facial expressions, using some fantastic squash and stretch to demonstrate emotion. - Emotions and Facial Expressions
An amazingly well thought out diagram of facial features.

About Animation Phonemes
Or, how to get the mouth moving
In the animation world, it's become a common practice to try and simplify the facial features, and expressions that are demonstrated while mouthing words. Animators, over time, have toiled in front of mirrors demonstrating sounds to get just the right expressions. Preston Blair, a Disney animator, refined the process, and came up with his own version, called his Phonemes Series.
The Phonemes Series, is a series of just ten expressions, each one assigned sounds. They include A and I, O, E, U, L, W and Q, M and B and P, F and V, others that include the remaining sounds called ETC, and finally the rest expression. This series has been adopted by almost all animators as the defacto standard.
Animators will link these expressions together, to make an animation appear to be speaking sentences, using lip-syncing.
Animated Dialog Example Using Phonemes
This is a brief animation I did myself, using the techniques I've learned. It's very basic, and was only created as a test to demonstrate the usage of Preston Blair's Phonemes series.
Animation Phonemes Links - These guys literally wrote the book on this subject
- Extended Preston Blair phoneme series
This is Gary C. Martin's take on Preston Blair's series. He demonstrates both the front and profile view of the series, using clay sculptures. - Lip-Synching For Animation: Basic Phonemes
This is a good take on the phonemes series, that has a pencil drawn example, along with some great explanations of its usage. - Angry Animator Dialog Tutorial
The angry animator has his own take on this topic. His tutorial demonstrates an alternative to Preston Blair's Phoneme series, that has only six facial expressions to demonstrate words.
Animation From the Words of Pros - Get these books, of you want to hear how the pros have done it for years


