Breeding Baby Dragons At Home

Creating Dragons Out Of Polymer Clay
One of my favorite creatures to create in Polymer Clay is a baby dragon. Breeding baby dragons is about creating these delightful creatures in sculpture.
If you came here to get a biology lesson on dragons, I am sorry to have disappointed you.
This original design was a blue ribbon winner when I entered it in a county fair. That first baby dragon was a bread dough creation inspired by my youngest daughter when she was just a tiny infant. She was curled up sleeping one afternoon with her hand neatly tucked up under her chin. This adorable scene gave me an idea for a newly hatched dragon baby sleeping on a forest floor.
I have since lost that sculpture but have repeated a similar dragon when I get in the mood to work with clay. The current creature is formed out of Polymer Clay, a sturdier design material. You may use bread dough or salt dough if you wish. The process is the same for any of these clay materials. The results may be a bit different. Salt and bread dough tends to dry with cracks in it where a Polymer Clay figure should be smooth if you work the clay finishing techniques correctly.
Original Images and designs by RiaB [M Burgess], please , do not copy, thanks!
Polymer Clay - For Sculpting
Polymer clay dries solid and is easy to manipulate into hand made figures or beads. This clay forms to the shape you want with out much hassle and hardens to a solid state within a few days. Touch drops of water to it while you are working if it starts drying out.
The surface of is smooth in its finished form so it can be painted and glazed. I let my clay creations sit for a few days or weeks to insure they are dry before completing the decorating process. Use up the excess clay quickly as it does not store well.


Using Polymer Clay
For Figurines
When I first set out to create this figurine in Polymer Clay, I cut away a chunk of the material a little larger than the body section. I cut a bit more clay than I need as it will form the neck, head, and tail sections of the dragon as well. The leftover clay I place back in the sealed storage bag so it will stay moist for later. Once these bags are opened the clay must be used soon or discarded. It does not keep for long term and will dry out in a few days. You may want to place a wet cloth in the sealed bag to help keep it moist.
I shape the body by rubbing this piece of clay back and forth in the palms of my hands in a gentle motion until I have an egg shaped form in the center of the clay for the body section. I let elongated pieces develop as the tail and neck from that same piece of clay. By forming the tail and neck from this solid mass of clay, the sections are stronger than attaching a separate piece of clay to the figure.
I have had these pieces break in former figures because they were attached separately. They did not form a solid bond and the connection was flimsy. We want the creation as solid a figure as possible so it will not break easily. Your friends and family will surely want to handle your creation. There is nothing more embarrassing for artist and admirer to have a tail piece come off during inspection!

Using Sculpting Tools
For Forming The Appendages - Legs And Arms
The next step in creating your figure will be using sculpting tools for forming the appendages -- legs and arms. These are made from tubes of clay you have rolled in your hands just like you did when you formed the body, neck, and tail. These should be an even width throughout the clay tube.
They will be cut in equal lengths and attached to the body in the appropriate spot. Take the flat side you just cut away from the formed tube and work this into the top of the body section.
I used a tool to set the edges of the arm or leg and press it gently into the area where the shoulders or hips may be. Dip your fingers into your water dish and smooth out the joined piece. This helps smooth the appendage into its place.
Because the arms and legs on this figurine will not be hanging off the sculpture I can add them later on. They will not be at risk of breaking off because they will be set into the clay that forms the body section.
Sculpting Tools - For Clay Creations
A set of sculpting tools will help you create just the right texture you are thinking about. You can use them to carve away excess clay or set in the details.
The serrated tool I use for cutting and for pressing a piece of clay into my form's foundation. I use it to create a rough texture, then smooth it in using one of the clean edged tools. The surface of your clay creation can be enhanced with textures in the skin and details by pressing the edges of various tools into the clay with a delicate touch.
Experiment with your favorites and produce just the look you want.
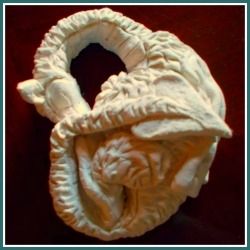
Blown Up Image - Sleeping Baby Dragon

In order to show more details in this baby dragon, I have converted it to black and white and made the image larger.
I love to incorporate heart shapes where I can into most everything I do. You can see the figure is laying coiled up in a pretzel heart shape and there is a heart under the tip of the tail.
From this perspective you can see the added details like the scales and the lines for the face. There are plates along the belly. The image also indicates where to place the ears and wings.
I used one of the rounded edge tools for creating the dragon's scales. I start at the top and slightly lift the clay then alternate a line of scales underneath this area and stagger it all the way to the tip of the tail.
When this dragon "grows up" she will look very much like the image in the sketch below. You can see the design I like for dragon wings in this drawing and some of the detailing that can't be picked up in the photos.
The Grown Up Dragon Sketch

Creating Dragon Wings - This Is Delicate Work
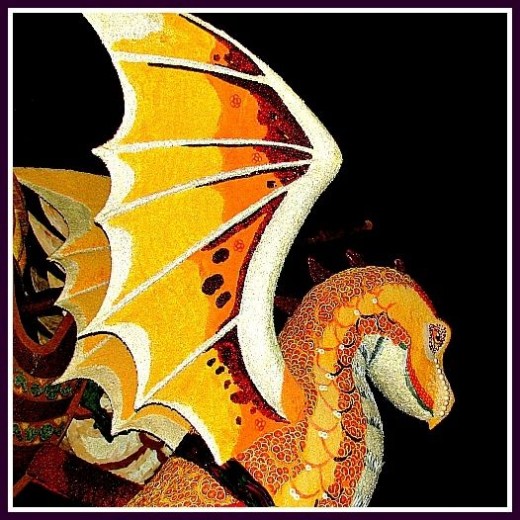
The dragon's wings are delicate work. The ones I like on my dragons are knobby like the fingers of a hand and I want the knuckle sections to form around the interior of the wing. This part gives me the most trouble but is an attractive detail.
The wings are formed with tiny tubes and clay rolled flat then cut. I assembled them carefully and placed them on the back shoulder area of my dragon. With nimble fingers I folded them tenderly to fit the body form then delicately worked them into the figure without disturbing the details I want to keep. I then smooth out the clay with wet fingers for a seamless appearance.
Spray Clear Coat Before Painting

Painting With Acrylics - For Long Lasting Finishes
Paints like Acrylic can accent and decorate your figurine for a long lasting finish. A figure that you are very fond of is a life long keepsake and you want it to look nice and be a timeless treasure. A great set of paint for hand made figurines like this baby dragon are Acrylic. There are a range of colors you may use to decorate. Using an inexpensive paintbrush set is a good idea because you will probably put the brushes through some wear and tear trying to get into all those crevices.
Me? I am using a combination of greens, purples, and glitter to decorate because this is a Vegas dragon and she is going to want some bling!
Breeding Baby Dragons At Home featured this sleeping dragon baby but I have other pieces on the way soon. Polymer Clay reflects the spirit of this baby dragon in fine form. When I display this piece I know that it will be sturdy and colorful and a neat conversation piece. While my favorite Polymer Clay figure in my gallery is this baby dragon there are loads of other pieces I could create and enjoy.
What would you like to sculpt in clay?


