DIY Vintage Typewriter Sign

Gathering Ideas to Create a Wooden Typewriter Sign
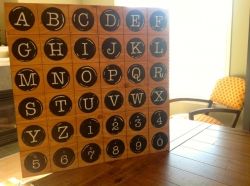
I first saw this sign online and fell in love with the vintage look and feel of the sign! The black circles are reminiscent of typewriter keys, the white lettering, the dark stain...I just had to re-create it! With Christmas just around the corner, I knew it would make the perfect gift for my mother-in-law.
This particular sign is a Pottery Barn knockoff. From the information I gathered online, the original artwork was available for over $300. Such a beautiful item but such a hefty price tag! I perused other peoples variations of this sign before deciding on a course of action.
Supplies and Tools Used
Supplies Needed
- 2' x 2' plywood, 1/2" thick
- sandpaper (120 or 150 grit)
- acrylic paint - black and white
- wood stain of your choice
- circle template (a drinking glass)
- word processing computer program (I used Microsoft Word)
- printer
- picture hanging kit (saw tooth hanger or D rings and picture wire)
Tools Used
- dremel or chisel or sharpie
- pencil
- long ruler/guide
- clamps optional if using a sharpie
- measuring tape
- small (artist size) paintbrush
- wood burning tool or use a Sharpie or a hammer and nail
- wipe-on polyurethane
- hammer

Choosing Wood and Creating Lines
Choose the Wood
Home Depot had some 2'x2' plywood pre-cut. I choose 1/2" thick plywood as I find 1/4" plywood warps easily. The piece I chose happened to be 1/4" shorter then it was supposed to be, so I had to make some adjustments in my measurements for drawing the lines.
Drawing the Lines
To get 36 squares, divide the plywood into 6 columns and 6 rows and draw the lines with a pencil using your long ruler.
Option 1: Draw the lines with a Sharpie and leave it at that.
Option 2: Clamp down a ruler/guide along the lines and drag a chisel along the guide to create a small groove.
Option 3: Clamp down a guide and use a dremel to groove out the lines.
I wanted an excuse to use my Dremel and groove out the lines. After attaching the Dremel guide cutting attachment, I clamped down a guide along the penciled lines. Being new to the Dremel, it was a small learning curve. I had to make a shallow swipe first, followed by a deeper cut. Being a bit of a perfectionist, I also sanded inside the lines lightly to get rid of any splintering.
Sanding
Using sandpaper, a sanding block or an electric sander, lightly sand the top of the board using 120 or 150 grit paper.
Why I Bought a Dremel (and Insist on Using it)
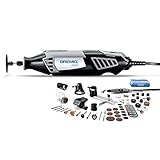
My Dremel Kit

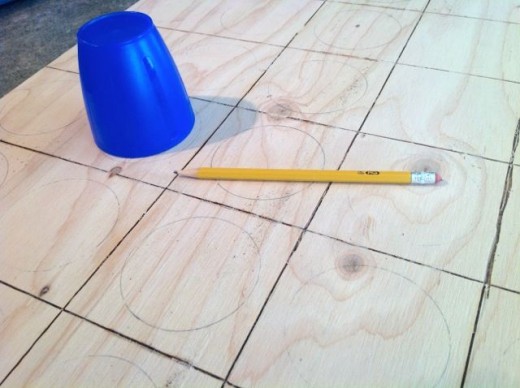
Draw Circles for the Typewriter Keys
My kids Ikea cups were the perfect size for what I wanted. After tracing around the rim of the cup, I filled them in with black acrylic craft paint.
Stain now or Stain later
You can stain your board at this point if you want - I waited until the end.
Mistakes:
As you can see by the photo on the right, I messed up the far right line on this board while learning to use a new Dremel bit. Thanks to some YouTube videos, I found I was taking too deep a pass through the board. After this initial mistake, I got a new board and used two passes through the board to make my groove: One shallow line, then adjusted it a tiny bit deeper.
Make Letters
After you have painted in your drawn circles, it will be time to trace your letters.
Find a font you like and in Microsoft Word, type out your sign. I measured my circles and used the ruler in Word as a rough guide to size my letters. Print it off, cut out a letter, see if it's the right size, then make any adjustments you need before printing off your final copy.
Get Ready to Trace
I forgot to take photos of this next step, so I made a sample for you below on my "mistake" board of how to trace your letters on.
To trace your letters, graphite paper is preferred over carbon paper, but I prefer the old fashion way. Scribble on the back of the paper with pencil, tape it into place on the board, then trace the outside of your letters with a ballpoint pen.
How to Trace Letters onto your Wood Sign *Don't forget to paint your circle black first!
Click thumbnail to view full-size


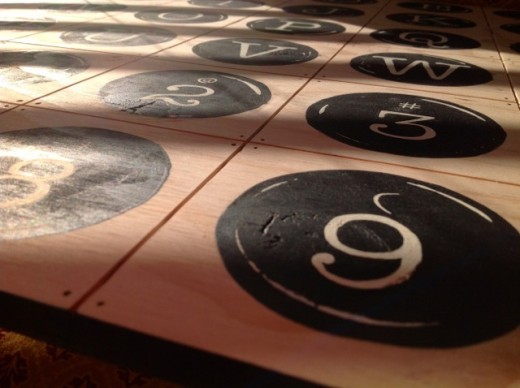
Adding the Details
Accents with White
With some white acrylic craft paint and a cup just a bit smaller than my black circle, I dipped small sections of the cup rim into the white paint. Then I put the cup in the black circle to get that half moon look you see. Do several random circles at a time, rotating the cup, then wipe the rim clean and dab new portions of the cup rim into the paint and repeat for a random pattern.
Nails in the Corners
I also wanted a nail effect in the corners of each square, so I took out my "borrowed" (it's my brothers - it's been a year and he hasn't asked for it back. That makes it mine.) wood burning tool and burned tiny dots into each corner of the squares. You could easily just use a hammer and nail, or use a Sharpie and make faux nail holes.
Wood Burning Kit

There's Love in the Details!
Click thumbnail to view full-size


Almost Done!

The Finishing Touches
Staining
I saved the staining for last - usually I like the antique effect it gives and to take away the sharp contrast of white on black. I used some Pecan coloured stain with a small paintbrush to get in all the cracks. I used as little stain as possible, removing it right away with a good rub down.
Mistakes:
As it turned out, this was the one time I did not like the stain effect over top of the letters I had painted! I simply used some coconut oil on a rag and quickly rubbed the black circles down to remove the stain. As well, with the board being plywood, I found some parts took too much stain, so using a fine grit sand paper ripped to small pieces, I quickly sanded a few random spots, being sure not to sand the paint, as I find acrylic paint smudges with a sanding.
Finishing Touches
Paint the outside edges black and add picture hangers to the back!
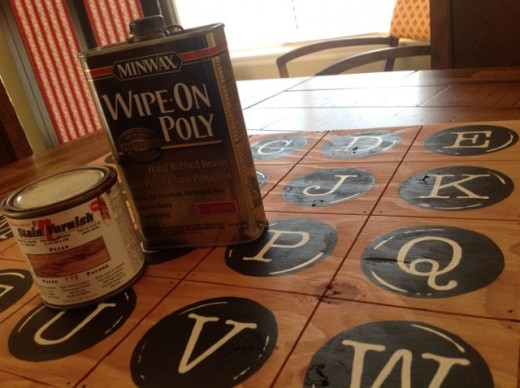
Seal It
Wipe-on Poly is my go-to for sealing almost all projects! A clean rag and two or three coats and you are done!
Do you have a sealing preference?
What do you prefer to protect your DIY projects?
Tips on getting rid of the little dust bumps in your finish before your final coat:
All Done!

My First Sign Inspiration


