How to Master a Track in Logic Pro 8

Various DAWs
- Logic Pro
- Ableton
- FL Studios
- Audacity
- Garageband
- Renoise
- Reason
Software
To start mastering in the Logic, you need Logic, of course. Any version after 8 will work. I prefer working with Logic Pro 8 or 9 instead of 10 as do most producers. I also use only native to Logic Pro plug-ins but you can also use third-party processors/plug-ins, which in some cases do have better results, but of course they do cost a certain amount of money. All the mastering techniques I use are however generic and can work in both FL Studios and Audacity, or any other more sophisticated DAW (Digital Audio Workstation)
Logic Pro 8 Stereo Track


Step 1 - Importing the Track
Add a stereo track to import the song, which will be mastered. When importing you complete mix/track it has to have the highest bit rate possible, normally at 24 bit. To allow for the best results their should be no plug-ins on the master of the original exported mix. The rule to remember is "Add processing but don't delete it!"
Step 2 - Headroom Check
Play the Track at the loudest at its loudest point and check you master output level. ( Try to keep it under 3-4db. This is important as if the track's headroom is too high it will not sound as clear in the end as it should. Also if mastered so and played in a club at full volume it also is a risk for the speakers and the audience.
Logic's Low Cut Filter
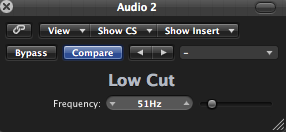
Step 3 - Low Cut Filter
To make sure that the following plug-ins do their work correctly all low frequencies have to be removed. I usually remove all those under 50Hz. This reduces any heavy bass and extra rumbling sounds. I used Logic Pro's native plug-in for this. No need to spend extra cash for a simple Low Cut Filter
Logic's EQs


Step 4 - Equalization
Most tracks require slight equalization. In this case not much was needed a few dips at the low and middle frequencies and slight high increases. Equalization is process of trial and error but the rule here is to keep the changes to a minimum never increase or decrease the specific frequencies but too much. Always use the analyzer button on the bottom right. This allows you to see the different frequencies of the track and by not adding too much you can keep the different elements of the song together, sounding as one whole. Logic Pro has both Channel EQ and Linear Phase EQ (slightly better to change the independent elements) so no need to spend extra dollars.
Logic's simple Compressors


Step 5 - Compression
Together with the EQs, this is probably one of the most important steps to having a well mastered track. Every mastered track has mastering chain, and a few compressors are always welcome. Start out with Logic's simple Compressor, under dynamics. This compressor is to make sure the dynamics are the same during the entire duration of the song and for a clear sound. Compressor basically function as sticky elements between all the different parts to make them into one unified track. The important elements of compression are Long Attack Times, Long Release Times, Low Ratios and a High Compressor Threshold. I also use Logic's Silver Compression sometimes to strengthen the effects of the initial compressor, depending on the genre of my track.
Logic's Multipressor
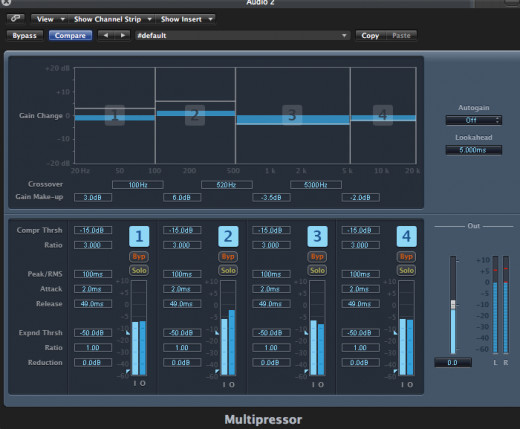
Step 6 - Multipressing
Often there are parts of the track which still sound too quiet or too loud. These ares can definitely ruin the entire song. To sort these issues out, I use Logic's Multipressor to do what I call multipressing. Basically this allows to do the actions of a compressor on the different frequencies. It is technically a Multi-Band compressor. If you are planning on investing into any plugin for Logic or any other DAW, the first thing I would get would be a Multipressor or a Buss Compressor. Native Instruments would be the best bet.
For this track, which has an unique soft beat, yet melodic bass, I simple increase the gain and attack times of the lower frequencies, while lowering the gain of the high-pitched sounds to ensure for a great sounding bass filled track.
Logic's Limiter
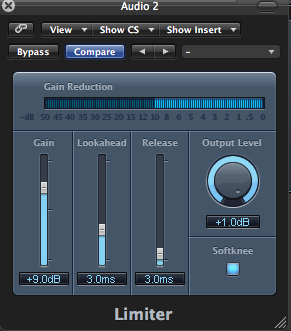
Step 7 - Limiting
Limiting, although it sounds the opposite, is done to increase the perceived volume of the final track. The most important part is to add a gain on the input to ensure a dense maximized sound, so everything seems louder without ruining both equipment or ears, making the track perfect for clubs and bedrooms alike. But be warned do not overdo the gain otherwise all the work of the other plug-ins will be lost and your track will lose its unique sound.
Logic's Stereo Spread

Step 8 - Stereo Spread
The second last step in this mastering chain is a Stereo Spread. Again a very trial and error process, yet again with one rule. Only spread the upper frequencies. Leave the lower spectrum intact. A stereo spread is a great way to add your unique touch to a track, regardless if your own track, a remix, reedit or you simply remastering a original.
Logics Denoiser

Step 9 - Denoiser
The last step in my mastering chain is to add a Denoiser to all the previous plug-ins. A denoiser is used to clear the final mix. Again purely trial and error, a denoiser can be great but be wary as it can ruin your mix. Not all tracks need one, so just try and see. Here I simply extended the transition and the smoothing time. It simply sounds better this way.
Logic's Dithering
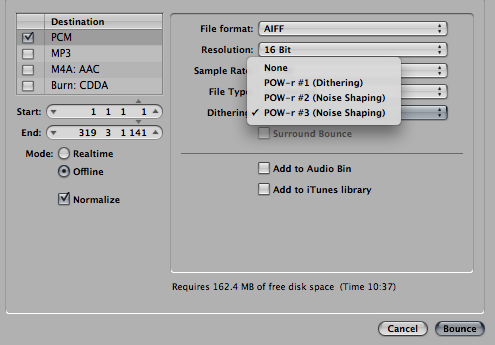
Step 10 - Exporting
The final step is to export the mastered track. During this process dithering is an important part of making a great track. If you made it in 16bit, you have nothing left to do, if you made it in 24bit (which is normally the case). Dithering reduces a track from 24 to 16 bit without the loss of quality. This should only be done once during the entire production of the song, NOW! The best algorithms are POW-r & Apogee, Logic preferring POW-r.
Any Question?
So here it it, a simple mastering process, which can be done in the same software you made your track. Of course, a professional audio engineer would probably do a better job, but would cost $500, which very few upcoming, young, amateur DJ/Producers can afford. So I, as a young DJ/Producer stick to this mastering chain. The other plus is that this takes between 30minutes and 1 hours and still produces a well rounded, loud and clear final mix.
If you have any questions feel free to ask me here, or on my facebook page or soundcloud, for which the links are below:
Digital Audio Workstations
Which DAW do you most frequently use?
Introduction to Logic X
© 2014 Andro Mathewson


