Kegging Your Home Brewed Beer

The Art of Home Brewing...
This hub will teach you everything you will need to know to start home-brewing, whether you're a first time brewer or an experienced artisan of beer making..
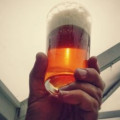
Its coming up to summer, and we all know theres nothing more satisfying than a nice, fresh, thirst quenching beer after mowing the lawn. Or perhaps there is... a nice, fresh, thirst quenching beer - MADE BY YOU!
Here you will find a simple and reliable set of tips and techniques that will put you well on the way to making a satisfying beverage to share with family and friends on any occasion. If there are any topics i haven't covered that you are interested in, do not hesitate to contact me by way of email or the comments section below. I will be more than happy to help.
Keep it Clean! - Good sanitation is the key to success
Throughout all stages of the brew, from fermentation to kegging or bottling, the most important thing to keep in mind is sterilisation. That means EVERYTHING must be perfectly clean and free from bacteria or microbes. In other words, anything that will touch the beer; spoons, racking arms, syphon tubes and kegs etc. must be soaked in a sterilisation solution for an hour. This could be the difference between a beautifully clear and tasty home brew and a disgusting undrinkable slush. You have to remember that the yeast in the beer is alive, and easily susceptible to infections. Yeast infection WILL ruin your batch. Without the proper cleaning solution, it will just be potluck as to whether your beer will be drinkable and/or safe to drink. Any of the below products will do the job. First clean with water and a lot of scrubbing. Once its clean, just mix up one tablespoon per gallon of hot water and soak the equipment in it for an hour or two to sterilise. Then just rinse with cold water to remove any residual chemicals.
Choosing your Liquid Malt Extract - Find all the ingredients here...
There are two ways to make your beer. One being extremely quick, easy and cheap and that provides great results every time. The other requires an extensive knowledge of the flavourings that go into beer so as to customize exactly how much hops and malt and various other ingredients will go into making your beer. I am only going to cover the simple method in this lens, however i shall provide links at the bottom for the other method. First you need to buy your liquid malt extract. This is a thick syrup concentrate that will be the basis of your beer.
Now selecting a good LME will be completely down to you and your own personal preference. Do you want to make an english ale or a pilsner or stout or bitter. Lager or dark ale or blonde.... the list is endless, so it is worth having a think about exactly what you would like to create! I have recommend some great kits that i have brewed before below, so if you are unsure where to start, why not try one of those.

Now for the fermentation!
So you are ready to put your brew on... Most of the LME (Liquid Malt Extract) beer kits will make between 5 and 6 gallons of home brew. The amount you will brew is of course down to your personal taste. If you make 5 gallons, then the beer will have more strength to the flavours and of course will be higher in alcohol strength compared to a 6 gallon batch - providing you use the same amounts of sugar. I would recommend making 5 gallon batches, simply because it is far easier to find a 5 gallon keg than a 6 gallon keg and i much prefer a stronger taste! Of course if you end up bottling it all then it really makes no difference.
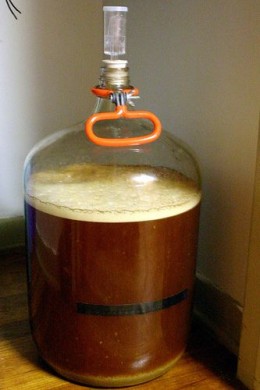
You will need a container that will hold over 5 gallons of water with about 5 inches of room at the top. Generally a tall container will be better than a short container, for reasons i will explain later. Many brewery shops encourage you to buy the big white buckets, or carboys. Personally i don't use carboys, simply because they are a pain to clean as you can't get your hand in there! I just use a number of 23 Litre storage containers from Wallmart. The ones with a lids would be ideal.
After making sure the container is sterilised, pour in the LME and then pour in 1Kg of Sugar. You can get special sugar for brewing, but once again, Ive found that some of the best brews i have done have been using the generic no name brown sugar from the supermarket. On top of this add 4 pints of boiling water and stir until the sugar and the LME has disolved into the water. Then add the remaining 36 pints of cold water. Stir thoroughly and leave it to rest until the froth has gone. It should be slightly warmer than room temperature. Now sprinkle the yeast (it is included in the beer kit in a foil sachet under the lid) over the surface of the beer. Put the lid on and leave it in a warm place for instance in the airing cupboard or near a radiator. Within a day it should start to froth again and continue to do so for a week or two depending on how warm it is. Too warm and the yeast will die. No more than 25 degrees C is an ideal temperature. Try not to remove the lid or disturb the liquid at all during this time. The carbon dioxide that the yeast makes, is heavier than air, so tends to form a blanket on top of the beer. Without this the beer would oxidise and go bad. If using an airtight lid, install an airlock, to release pressure. You can buy these for a couple of dollars at any brewing shop.
To Keg, or To Bottle?
Now you wil need to decide whether you will be bottling the brew or kegging it. If you are going to keg it, which type of keg will you use. Bottling has its advantages and disadvantages. It is by far more portable- you can take bottles to a picnic, a mates house, BBQs etc. However it is far more time consuming, what with all the washing, sterilisation, priming, and filling, and with a considerable amount of wastage in each bottle. There are several different types of kegs to choose from also, in a number of different price ranges.
The best type of keg by far is the cornelius keg, but is slightly more expensive than the cheaper plastic kegs. The benefit of the cornelius, is that the pressure is monitored with a regulator, meaning the fizz of the beer is much more consistent. Also, a cornelius keg can undergo the pressures required for forced carbonation, meaning the beer can be completely clear before kegging as no priming fermentaion is needed. This means there is virtually no waste from the entire keg.
The plastic kegs will not hold the pressures required for the forced carbonation, so you will have to prime the keg, which means there will be yeast residue and wastage in the bottom of the barrel. If you are going to be brewing on a regular basis, i would recommend investing in a cornelius set up. The extra initial cost is well worth it.
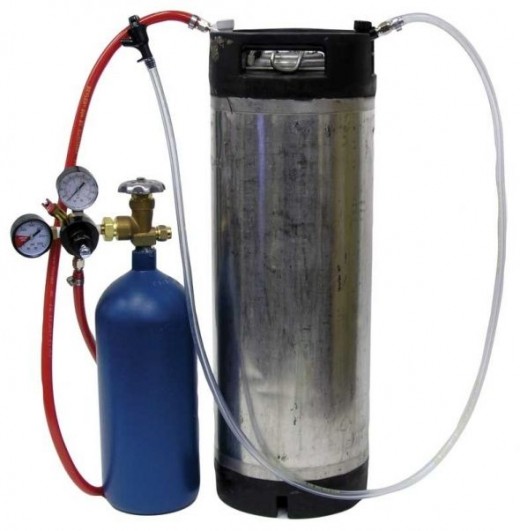
Great deal on a basic Cornelius Keg setup

Bottling Your Home Brew
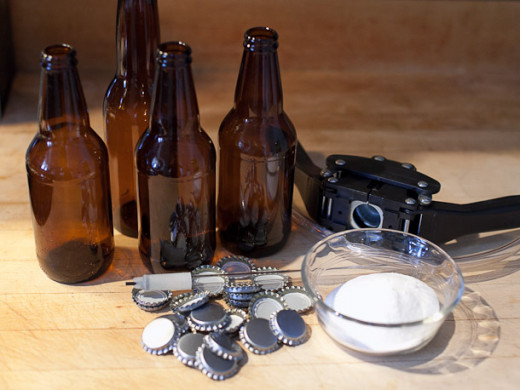
Bottling can be time consuming, yet satisfying. First you will need to start collecting bottles. Avoid twist cap bottles, and use clear bottles as it makes it easier to see the clarity and sediment. Bear in mind a problem with using clear bottles is that if they are stored in direct light then they will tend to spoil quicker. This is the reason why brown beer bottles are often used. If stored in a cupboard or cellar, clear bottles will be fine too, and be easier to judge where the sediment is when serving. You will need to wash out, and sterilise each and every bottle. I find it is easiest to do this by running a bath of hot water, adding in a couple of tablespoons of steriliser, and leaving the bottles to soak for a few hours. This process also removes the labels on the bottles. Make sure the bottles are submerged and not just floating. Next you rinse each bottle, and using a funnel, pour in 1 teaspoon of brown sugar per bottle. Now before adding the beer, it is essential that you measure the beers specific gravity using a hydrometer. It has a band on it saying. "safe for bottling" and when floating in the beer should be at that level. If fermentation is not complete then the bottles can explode. After the beer has been left to clear for a few days, syphon into each primed bottle and cap immediately using a bottle capper.
Once capped, shake each bottle to disturb the priming sugar at the bottom. Leave the bottles in a warm environment for a week. Now move to somewhere cool, and wait for them to completely clear. When pouring, do so in one fluid motion, try to minimise glugging of air back into the bottle, and make sure to leave the sediment behind in the bottom. It will ruin it if you pour the beer in two or more goes, as it will disturb the sediment and make it cloudy; so pour it over a sink or outside to minimise mess if it overflows.
Kegging with a Cornelius Keg
This method of kegging provides the best quality beer in my opinion, and the most reliable way to repeat a good beer. You will need a bit more equipment to make it work, however it is worth it. You will need:
|
|---|
- Cornelius Keg. Pinlock or Ball Lock, Ball lock is easier to get parts for nowadays.
|
- CO2 gas cylinder. 5lb is ideal, however 20oz paintball cylinders can be used ( I'll explain more later)
|
- Gas-In and Liquid-Out disconnects (the MFL fitting is easiest to remove pipes to clean)
|
- High pressure gas hose (normall comes with gas disconnect)
|
- Picnic tap or faucet and beer pipe.
|
- CO2 gas regulator. Input up to 3000PSI, output up to 100psi
|
- Fridge or Freezer capable of holding cornelius keg (optional)
|
The process of kegging is identical to that of bottling up until the beer is ready to be bottled. You will have to add a few more stages in at this point. With force carbonation, there is no need whatsoever $6 to have sediment in the beer, so why not eliminate it for a perfectly clear, hassle free beer.
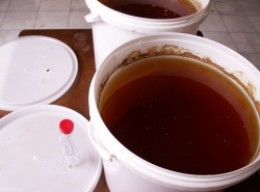
For this, you will need to syphon the already fermented beer into a secondary clearing vessel. This can be identical to the first one used. By syphoning the beer to this other vessel removes any sediment all ready at the bottom of the container, so now we only have to deal with the sediment suspended in the beer itself. Using beer finings, or beer gelatine in solution, the remaining yeast will sink to the bottom of the second clearing vessel. If you buy your beer finings pre mixed, then one sachet will be fine for 5 gallons of beer. just slowly stir it in and leave to settle in a cool place for another week or so.
If you are mixing up your own gelatine to make beer finings, use 3/4 teaspoon, mixed with half a mug of cold water. Stir this mixture for a couple of minutes, and put in the microwave until it is the same temperature as a coffee. Let the mug cool for 10 minutes, and add to the beer the same as you would with pre mixed finings. By adding the gelatine to cold water first, it prevents it from clumping together and makes for a better solution.
At this point, you have removed the Co2 barrier from the beer that prevents oxidisation. I use cling film, laid across the surface of the beer to work as a new oxygen barrier. It just floats there on top, is food grade sterile, and prevents any infection entering the beer also.
After a week or two, you should have completely clear beer in your secondary clearing vessel. It is now time to keg it. Assemble the keg with no beer in to start with and pressurise with 20psi. This ensures that there are no leaks (it is much easier to trouble shoot a leak in an empty keg than a full one!) and also purges the keg of any oxygen. Once you are sure the keg holds pressure, burp the co2 out of the release valve and open the lid. The Co2 will stay in the keg as it is heavier than air. To make completely sure that no solidified gelatine or yeast gets accidentally transferred into the keg, I use a couple of paper coffee filters over the output of the syphon. Don't stretch the paper over tightly, as you will probably end up either tearing the paper or restricting the syphon flow. Try to make the coffee filters look like a little bag over the output of the syphon. Make sure that the syphon output is at the bottom of the keg, so that the beer is not splashing about in the keg as it is filled.
Once filled, and the sediment left behind in the clearing vessel, burp the head space out of the keg by pressurising with CO2 and releasing it from the valve on the lid. Now set the regulator to the desired PSI (table of pressure is at bottom of page) and leave to carbonate at the serving temperature. It is no good carbonating warm beer at 12PSI and then serving it chilled. It will be flat. I will explain the relationship with temperature and pressure in the table below.
How Fizzy Should My Beer Be?

Video Tutorial on Kegging a Cornelius
© 2014 Skookum