Performing CPR To Infants

INTRODUCTION
As parents of a preemie baby, we were required to take a CPR class before our baby could come home. Both of us have had CPR training sometime in our life, but it is always important to revisit this training. Especially, if you have not performed CPR. The class was offered by the hospital where our baby was at.
CPR (Cardiopulmonary resuscitation) is the act of pushing fast and firm on the chest of an infant and giving your breaths to the infant. CPR should be performed to an infant or any one whose heart has stopped pumping and circulating their blood throughout the his or her body.
An infant who doesn't respond, move, makes sounds, blinks, or reacts to you when you tap him or her and shout something, such as their name will need CPR performed on them.
The thought of performing CPR on an infant can be a scarey idea. But your actions in a timely manner can safe the life of an infant.
An infant is considered younger than 1 year old.
ACTIONS
Pushing firm and fast on the infant's chest is the most important part of CPR. When you push on the chest, you circulate and pump blood to the brain and heart. Time is of essence here.
One of the most problems for people, they don't push hard or firm enough because they're worried about inuring the person, which in this case is an infant. Hurting the infant with your purshing is probably not going to happen. However, if an injury occurs, it is better than death of the infant. It's better to push too hard/firm than not hard enough. Sometimes, people worry they'll make an injury worse if they give an injured infant CPR. They won't. If an infant's heart has stopped pumping, they won't live. Your actions can only help them.
Make sure you place the infant on a hard, firm, flat surface above the ground. Sometimes a table is near and will work for this. A proper flat, hard surface makes it easier to give CPR.
STEP 1: Make sure the infant is lying on his or her back on a firm, flat surface above the ground.
STEP 2: Move any clothes out of the way, so that you can determine the right location on the chest.
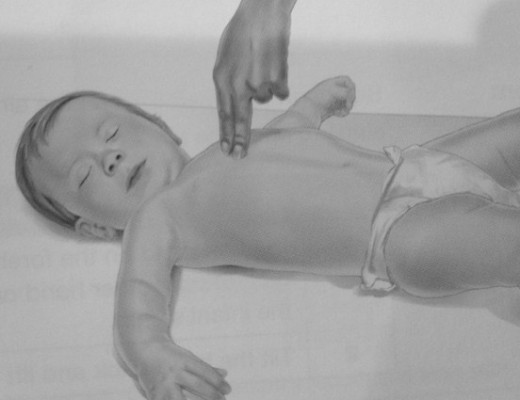
STEP 3: Place your 2 fingers (middle two) of one hand on the breastbone just below the nipple line, center of the chest. (use the infant's chin to determine the center)
STEP 4: Start pressing the infant's chest straight down about 1 1/2 inches at a rate of at least 100 pushes a minute.
STEP 5: After each push, allow the chest come back up to its normal position.
Pushing is important, and can be tiring if done correctly. You don't want to get tired because the less effective your pushes will be. If someone else knows CPR, take turns. Switch resuers about every 2 minutes, moving quickly so that the pause in pushing is as short as possible. Remind each other to push down about 1 1/2 inches, to push at a rate of at least 100 pushes a minute, and to let the chest come back up to its normal position after each push.
BREATHS
Usually an infant's heart stops pumping or circulating blood because he or she can't breath or is having trouble breathing. As a result, it's very important to give breaths as well as chest pushes to an infant.
Your breaths need to make the infant's chest rise. When the chest rises, you know the infant has gotten enough air. Pushing on the chest is the most important part of CPR. If you are also able to give breaths, you will help the infant even more.

AIRWAY
STEP 1: Put one hand on the forehead and the fingers of your other hand on the boney part of the infant's chin.
STEP 2: Tilt the head back and lift the chin to a sniffing poisition.
Do not push it back too far because this may block the infant's airway. Also, avoid pressing the soft part of the neck or under the chin.
BREATHS
STEP 1: While holding the infant's airway open, you take a normal breath.
STEP 2: Lean down and cover the Infant's mouth and nose with your mouth.
STEP 3: Give 2 short and normal breaths (blow for 1 second each). Keep an eye on the chest to make sure it rises as you give each breath.
If your mouth is too small to cover the infant's mouth and nose, put your mouth over the infant's nose and give breaths through the infant's nose. (You may need to hold the infant's mouth closed to stop air from coming out through the mouth.)
IMPORTANT:
If you give an infant a breath and the chest doesn't rise, reopen the airway by allowing the head to go back to the normal position. Then open the airway again by tilting the head and lifting the chin. Then give another breath. Again, make sure the chest rises.
Don't interrupt pushes for more than 10 seconds to give breaths. If the chest doesn't rise within 10 seconds, begin pushing firm/hard and fast on the infant's chest again.
HOW LONG
When performing CPR, perform sets of 30 pushes and 2 breaths. Push down about 1 1/2 inches with your middle fingers along the nipple line and center of the chest, using the chin to find the center. Do this at a rate of at least 100 pushes a minute. After each push, let the chest come back up to its normal position.
If the infant is not injured and you are alone, after 5 sets of 30 pushes and 2 breaths, you may cary the infant with you to phone 911. While carrying the infant in a football carry position, with their chest facing you, you can still be performing CPR while call 911.
SUMMARY
STEP 1: Make sure the area is safe. A flat and firm surface
STEP 2: Tap and yell
- See if the infant responds
- If the infant doesn't respond, then...
STEP 3: Yell for Help
- See if there's someone who can help you.
- Have that person phone 911.
STEP 4: Check Breathing
- Make sure the infant is on a firm, flat surface above the ground.
- See if the infant isn't breathing at all or is only gasping.
No response + No breathing or only gasping = Give CPR
STEP 5: Give CPR
- Give 5 sets of 30 pushes and 2 breaths, and then phone 911 (if no one has phoned yet).
- Pushes:
- Move clothes out of the way
- Place 2 fingers just below the nipple line.
- Push straight down about 1 1/2 inches at a rate of at least 100 pushes a minute.
- After each push, let the chest come back up to its normal position.
- Push on the chest 30 times. - Give breaths:
- After 30 pushes, open the airway with a heald tilt-chin lift.
- After the airway is open, take a normal breath.
- Cover the infant's mouth and nose with your mouth.
- Give 2 breaths (blow for 1 sesond each). Watch for the chest to rise as your give each breath.
STEP 6: Don't Stop
Keep providing sets of pushes and breaths until the infant starts to breath or move or someone with more training takes over.