Step by step treatment with negative pressure wound therapy on amputation wound with MRSA


How i treated my patient
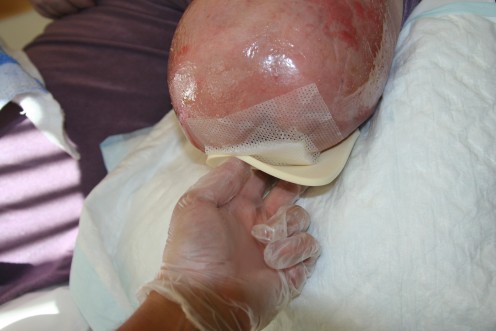
Amputation wounds can be quite tricky to treat as you have to make sure that the exposed tendons and bone are protected.
The wound in this case is an above the knee amputation in an elderly lady with diabetes type 1.
The patient also had very sensitive skin so we had to be very careful to protect the skin where the film was applied. ( Glue on transparent had a tendency to irritate her skin ). We protected the skin with cavalon spray.
The wound was infected by a resistant bacteria and therefore negative pressure was applied to help eliminate the excessive wound fluid and pus which was building up by the hour.
Due to the MRSA infection we changed the dressings daily instead of every third day. This lasted for one week and then we went over to every other day. Due to her skin sensitivity we continued with treatment every second day.
The wound was both clean and closed after six weeks of treatment.
PREPAIRING THE WOUND
The wound was flushed with sterile saline solution. A small catheter was placed into the wound and 2 litres of saline was used to flush out as much pus and bacteria as possible.
As the wound was infected with MRSA we took all necessary precautions to avoid any spray from the drainage.
The skin around the amputation stump was thoroughly cleaned and dried. While doing this we used some compresses around the wound opening to soak up the continuous wound fluid. These were discarded before the npwt dressing was applied.
The Negative pressure wound therapy dressing
To protect the bone and tendons I put several layers of a soft silicone dressing in the base of the wound making sure that no bone wound come into contact with the antimicrobial gauze dressing . This is quite tricky as you have to apply this with sterile tweezers or surgical grips. The reason for using silicone is that it is easy to remove and it does not stick to the bone during the treatment.
Whether you are using a treatment device which uses a sponge or one that is using gauze, it is very important that these are not applied directly to the bone.
I have seen cases where both gauze and sponge alike sit fast and pressure is needed to remove these. In the worst case scenario, small pieces of sponge or gauze can remain in the wound and this then becomes a foreign object. It has to be removed.
It is also worth to point out at this point, if you choose to use gauze then never ever use a normal gauze bandage, this is too tight, you need to use an open mesh gauze such as AMD which is softer and open pored. When it collapses into the wound it allows the fluid and pus to pass freely into the drain.
After the silicone is in place you will pack the wound cavity with either sponge or gauze. At this stage it is important that the dressing “ touches where it will treat” Pack enough dressing material in with the thought that this dressing will collapse into the wound cavity when pressure is applied. If you put in too little the wound edges will collapse in towards the middle of the wound. In some cases the edges will roll. This is not advisable as the wound has to heal from the bottom up. If the edges become too tight then you may be left with an opening that is too small to insert future dressing material. It might look like the wound is healing but I can assure you that there is a huge crater under the skin that hasn’t yet granulated. So be patient and make sure that the wound is growing up from the bottom and in from the sides.
To protect the wound edges it is good to use a skin protector . Some health care workers swear byzinc, unfortunately this will cause problems when you apply the transparent film. It just won’t stick and remember to achieve a vacuum under the dressing this wound dressing has to be airtight. If the zinc warms up it has a tendency to spread, in many cases it will cause the dressing to loosen.
Now back to what happens if you apply too much sponge or gauze. It has to go somewhere and when the vacuum/pressure is applied it will flop out over the wound edges. Now the edge which has more than likely been debrided will be relatively healthy. When the negative pressure is applied granulation will start almost immediately from this point. The dressing which is lying on healthy skin will be treated and you will have granulation building up outside of the wound as well as the inside.
If you have a wound that has jagged edges and you are worried that this might happen then you can simply apply a hydrocolloid all the way around before you start. This will protect from any undesired results. It will also help keep your wound edges moist and healthy.
Applying the drain
For those of you using a system which requires gauze you will insert one or two drains into the wound cavity. The drain will be placed onto the inserted gauze dressing and should never touch the walls or bottom of the wound. ( This is different if you are treating fistulas but in this case the drain will be specific for fistula)
Sometimes it is easier to wrap the drain in a piece of gauze before it is inserted.
There are several types of drains in shape and size. You should have your supplier to hold courses for you on the correct use of each for best results.
As in the case of the amputee there was excessive amounts of fluid in the wound so I preferred to use two drains for extra drainage. It is also important to think about where the drain will exit the wound. The underlying wound edge has to be protected. This again is as simple as a little piece of hydrocolloid dressing or stomi paste. This keeps the drain from being pressed into the wound edge. It also makes it easier to get the transparent dressing to sit tight around the drain. ( This is a well known spot for air leakage )
The next step is to cover the whole dressing with a transparent film which is sticky on the one side. Make sure the edges are about 2-3 cm over the wound edge. Remember once again that the bandage will collapse into the wound cavity and if the film is too tight it will also be pulled in over.
It is important to make sure that there are no places around the dressing for air to come in. If you are dressing a large wound and need several strips of transparent then make sure they are overlapping where they meet.
If you are using the sponge method then a small hole will be made on the top of the dressing and a pad will be placed over. Just make sure that the hole you make is big enough as it can collapse down with the dressing and be blocked if it is too small. In this treatment I like to make a little cross and cut away the edges before inserting the trac pad. Once again it is good to have your supplier hold courses for you on a regular basis.
Now you are ready to connect the drain or trac pad to the treatment machine. The machine will also have a drainage canister attached to collect the wound fluid which will be continuously be sucked out of the wound.
The machine when turned on will produce a vacuum in the wound cavity and everything that shouldn’t be in the wound will be sucked out.
When I first started to treat with negative pressure I used to saturate the special dressing with saline solution. I find that in wounds which have been thoroughly cleaned and are producing a lot of exudates, that this is not necessary. In the olden days it allowed us to see if the vacuum was working. ( The machines did not have alarms to tell if air was a problem) Nowadays if the vacuum is not achieved an alarm will go off.
I found that too much saline also affected the dressing from sitting fast around the edges.
After all the idea is to get the fluid out of the wound cavity which will allow for granulation to start.
When the machine is in use please observe the canister several times a day. Make sure that the wound fluid does not contain fresh blood. It is not unusual to see a little blood but if it is fresh and rising then you may be sucking on an exposed artery or vein. If this is the case then treatment should be stopped immediately and the wound compressed. When the problem is solved you will be able to start the treatment again.


