Handmade Button Pillow Christmas Tree Ornaments

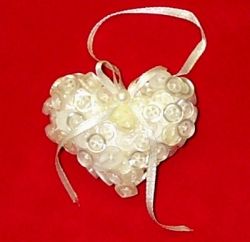
Make Your Own Button Heart Handmade Christmas Tree Ornaments
For many years it was a tradition among family and friends to make a new handmade Christmas Tree Ornament every year to gift them to each other. The end result was Christmas tree full of fond memories and keepsakes.
This page was created to showcase one of my favorite handmade ornaments that I created in recent years. It's pretty easy to do and all it requires is some felt, white thread, left over clear and white buttons (or button colors of your choice) and a little time.
I made my button ornaments in all white but they would be just as charming in red, mixed shades of ice blue or even just an odd assortment of colors which utilizes all those extra buttons you may have laying around. Or perhaps that ages me as I grew up with a button jar where you tossed all your extra buttons.
This page contains step by step on how to create this ornament as well as a few ideas for changing it up a bit and making it your own.
Steps For Making This Button Heart Pillow Christmas Tree Ornament
1. Create A Heart Shape
2. Trace onto felt and cut
3. Sew together front and back of heart pillow ornament
4. Invert pillow and fill with polyfill
5. Add the hanging ribbon and sew pillow shut.
6. Sew on the buttons!
7. Add ribbon bow and special pearl button for final trim.
8. Give as gift or hang and enjoy..
Do You Like To Make Handmade Christmas Tree Ornaments?

Do you like to make handmade Christamas Ornaments?
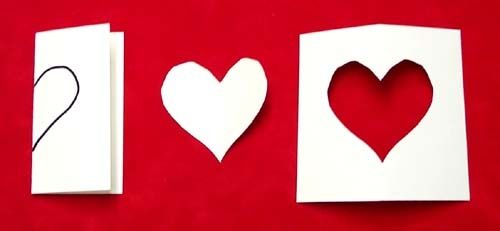
Step 1. Creating The Heart Shape For The Button Pillow Christmas Tree Ornaments.
Creating a heart shape is a pretty straight forward process. You could even get the kids involved in drawing out hearts and making them different sizes and shapes. Get creative and let your inspirations fly.
The easiest way to get a symmetrical heart shape is:
* Fold a piece of paper in half
* Draw 1/2 of a heart shape
* Cut it out and unfold.
Note: For my heart shaped button ornaments I tend to make the shape a little exaggerated since the sewing and the stuffing will round it out with plushness.
Choosing A Size For Your Homemade Heart Christmas Tree Ornaments

Decide Hoe Big To Make The Heart And How Fully You Want To Cover It With Buttons
You can make your pillow ornaments any size you like. Bearing in my that whatever size you end up with is the surface area you need to cover with buttons and that will affect the final weight of the ornament.
Sew It Up
Step 2. Sew Together Your Heart Shape Pattern
Take your heart pattern and lay on two sheets of white felt. Trace and cut.
You could potentially use any fabric of course. I use felt because it's cheap to buy in small quantities, it's soft to the touch and for sewing down all those buttons the density of the material works toward my advantage.
Stitch the two pieces together, remembering to leave an open hole at the top center.
I hand stitch the heart shapes pieces of felt together because it adds to that handmade look but also I find it sort of meditative to sit and stitch these tiny shapes together. It's a good thing to do in front of the television at night. Of course there's no reason you can't speed up the process but pulling out the sewing machine.
Invert your heart shaped pillow

Use White Felt For Making The Christmas Ornament Heart's Body - The felt fabric is what I prefer because it's easy to sew on the buttons.
White is the color I used but this would look totally adorable in red, green or any color that you love.

Next Stuff Them With Polyfill - Use fiber fill types so you can pull off small amounts in oder to stuff them to an adequate fullness.
I'm thinking this is pretty self explanatory.
Step 3. Add White Ribbon For Hanging the Christmas Ornament As Well As Making The Finishing Bow
Add Ribbon Hanger To Your Ornament
For these hearts I used plain 3/8 inch white satin ribbon. Though I do have some white ribbon with silver edging that would have looked lovely as well. Don't be afraid to experiment with different looks.
For the hanger part of the Christmas Tree Ornament I use approximately 10 inches which allows for doubling over for hanging length as well as some to be sewn into the ornament.
Stitch Shut
You don't have to be too fussy with how this looks as for the most part it will be covered with buttons as well as the ribbon bow. But if you can do it neatly, all the better

Step 4. Use Assorted White Or Clear Buttons For Your Button Heart Pillow Handmade Christmas Tree Ornament
Now The Fun Part! Start Sewing On The Buttons.
I used both clear and white buttons for my ornaments. I thought having the two shades added depth and interest. Also I really like that I had a hodge podge of button shapes and sizes. For the most part all the buttons are small and appropriately sized but variety does add spice.
Here's Some Options For Making Your Ornament A Different Color - More Assorted Button Options


Step 5. Add A Bow
And finally
* create a ribbon bow and sew it in the center.
* Then sew on a special button (I used a small rounded pearl button for these) into the center of the bow.
And that's it. It's that easy.
Enjoy, and I hope you try making these Button Heart Pillow Christmas Tree Ornaments. Please feel free to deviate from this and make them your own.
Handmade Button Heart Pillow Christmas Tree Ornaments - front and back

Now Take This Idea And Make It Your Own
For A Little Extra Festivity Fill Your Ornament With Potpourri
Adding a little potpourri will add a nice scented touch to your Christmas Ornaments. It will not last much past the first year but especially for gifting it will add a nice touch.
* Make sure the potpourri is crushed up fine so that it makes your pillow look oddly stuffed.
* You want to add this to the polyfill, but not entirely replace it with it.

About The Author Of Handmade Button heart Christmas Tree Ornaments
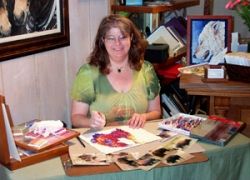
Mona Majorowicz of Wild Faces Gallery
My name is Mona Majorowicz I am a professional artist who has been making my living selling my work for some time now. I am an animal artist, (meaning I paint critters) who works primarily in Oil Pastel or Water Soluble Pencil.
I own and operate Wild Faces Gallery with my husband Mike in a small rural town in Iowa. There we sell my original artwork and prints, as well as do quality custom framing and offer Giclee printing for other artists as well as for ourselves. I have over 20 years in ate art and framing industry both as a business owner and as a working artist.
I maintain a blog called Fur In The Paint, as well as write a regular column for the equestrian magazine Apples 'N Oats about painting horses.
Animals are my passion and art is how I chose to express it.