- HubPages»
- Home and Garden»
- Home Decorating»
- Interior Design & Decor
Upcycling Repurposing and Recrafting - DIY Ideas and Inspirations


Upcycling, repurposing, recrafting…they all mean the same thing: to give tired old pieces, which are screaming for a new life, a new purpose, a new identity.
Rediscover the need to create something, which is unpretentious, uncomplicated, bending our inspiration to accommodate availability.
There is a world of possibilities out there. In flea markets, car boot sales, grandma's loft, next door's skip, hidden old shops…you name it!
And what a satisfaction to be able to dress our homes with our own creations; original, unusual at times, certainly, but undeniably unique.
The pieces I come across, more often than not, are fairly common objects in markets and the like, but what makes the difference is how we look at something and see something else, how we regard objects differently and how, applying a little bit of craftsmanship, we can uncover a world of decor possibilities.
Repurposing vintage wooden crates
Vintage wooden crates are fascinating items.
With a little bit of cleaning and some tlc, they can easily be used as they are to compliment any room and give the space a touch of quirkiness as well as handy storage.

Yet the possibilities don't end there.
By sanding them down (being careful to preserve the original printing, if there is any), a few coats of beeswax and various added extras, vintage wooden crates can become a useful and essential item in the home.
Extras like shelves, drawers, small doors that can themselves be upcycled from other crates that are beyond repair.

The pictures above show a few samples of some of the work I carried out with wooden crates, a small selection to provide you with a few ideas of what can be done.
It might sound a little bit daunting adding drawers and doors, but it is in fact much simpler than it seems.
The drawers are put together with glue and screws, which are then covered with wooden nails, and they simply run on 2 wooden brackets, while the doors are cut to size and hinged to the side of the crate.
To finish it all off, adding handles can make all the difference.
As much as scouring flea markets can provide you with vintage unique handles and it is certainly a lot of fun, it can also be very easy and at the same time effective to cut a big hole in the door or drawer (the size of a finger) or fix a small rope.

All that said, I believe that these crates not only are very easy to work with but also offer endless applications for anyone who wants to add a touch of rustic to their home decor.
They can become side tables, bedside tables, wall or floor cabinets or even coffee tables. There really is no limit to what imagination and necessity can accomplish with these versatile products.

- The average cost of a vintage wooden crate is around £10.00 in a car boot sale. They are a little bit more expensive if found in flea markets or antique shops.
- I suggest applying very light sanding to give the outside of the crate a smooth finish while preserving the original rustic look.
- It is a good idea to paint the inside of the crate with a vintage colour to give it a fresher and cleaner look. I suggest colours like sage, willow, dark green, and dark red.
- To speed up the waxing process for the outside of the crate I suggest the use of a spray wax such as Wood Silk, available in most Supermarkets. It is not as protective as typical beeswax but it's easy to apply and it brings back the original colour of the wood, giving it a nice finish.
Recrafting vintage wooden toolboxes and suitcases
Other interesting items, a little bit more difficult to find, but still not impossible to dig out in car boots sales or flea markets, are wooden suitcases and wooden toolboxes.
Unfortunately they are not always made with solid wood. In fact more often than not, the main material used to craft these essential items was plywood.
Nevertheless it is undeniable that the level of craftsmanship put into them as well as the added bonus of handles, cast iron closing mechanisms and sometimes protective metal corners, make these original objects versatile and interesting pieces to upcycle.

I worked with several of them and enjoyed immensely turning them into something completely different, while retaining their history and indisputable character.
The most obvious change of use is turning these beautiful pieces into wall cabinets, mostly because of their size.
Adding one or two shelves and giving the inside a lick of paint makes all the difference. Of course, again, I suggest a good sanding on the outside as well as a coat or two of beeswax.
In the sample above I was very lucky to have found a wooden suitcase which still retained all of its metal mechanisms as well as its original handle. In this case I decided to leave the handle where it was and added a reclaimed cast iron one to the front. But in other cases I opted to move the original handle to the front.
It all depends on what kind of look you want to achieve and on personal taste of course.

On the other hand if you are lucky enough to find a large suitcase or toolbox, then a very interesting transformation could be to make it into a coffee table.
This choice not only presents you with an unconventional-looking piece of furniture but also with a good storage solution.
It is maybe a little bit more skillful than turning it into a wall cabinet but with a lot of patience and some trial and error it can easily be achieved.
The main difficulty is to add the legs without damaging the suitcase or toolbox.
In this sample I used a reclaimed pallet for the legs but they can also be bought in any DIY shop or a salvage yard, if you want to be loyal to the overall rustic look.
Of course the suitcase already offers a bottom but it must be cut to accommodate the legs. I used a jigsaw to create the opening, cut the legs to size and fixed them to the suitcase with glue and screws, which I covered with wooden nails.
The final touch is painting the inside to give it a cleaner look...a little bit of work undoubtedly compensated for by the final result.
Upcycling wooden ladders and step ladders
If you are an avid reader and want to display your books in the special way they deserve...look no further!
Vintage wooden ladders are the solution!

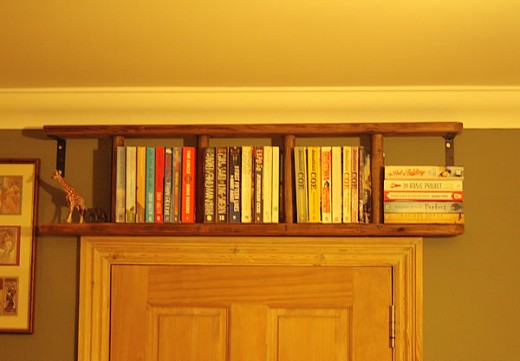
Many of these beautiful and remarkable wooden ladders are easy to find in car boot sales and flea markets. They have become very popular and you can find plenty of pictures on several sites of their various applications.
Yet turning them into bookshelves requires a little bit of work.
First of all most of the time they are covered in paint. This is the easy part. You can either leave them as they are, achieving the shabby chic look, which is so popular at the moment, or you can sand them down and wax them, making them a little bit smarter.
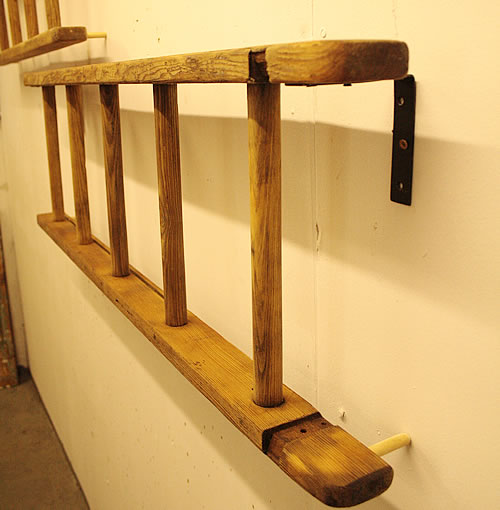
If you want to hang them on the wall horizontally (as in the pictures above) you must create some depth to accommodate the books.
I find that the best way to achieve this is to fix the brackets on the top rail sticking out towards the wall about 4cms and then drill a hole on the bottom rail of the ladder and insert a wooden dowel reaching the same distance from the wall as the brackets.
This way you'll have a good depth for the books and they won't fall down!

Same ladders but upright are very handy towel holders.
Again a bit of cleaning and some bees wax will finish them off beautifully.
And if you have just a bit of ladder left over, don't throw it away. Add a small plank of wood at the top, hang it on the wall, and you will have a small version towel holder with a useful shelf.

How to make a lamp from a motor can
Oil, paraffin and spirit motor cans offer you a great shell for a lamp.
Depending on their size they can be perfect table lamps, floor lamps and also desk lamps.


They come in all shapes and sizes, and with just the right amount of character and originality to stand out and add a nice touch of quirkiness to any room.
Also they are very easy and straightforward to make.
First of all, because they are fairly old, their paint is more often than not a little flaky.
The first thing I suggest you do is to scrape the flaking paint off and then protect the can with a coat or two of satin varnish. This not only protects the remaining paint but also gives the lamp a more elegant look.
Then its time to add the necessary electrical equipment.
To do this you need an electrical cable with earth, brass lamp holder with switch (make sure you choose one with a little plate at the bottom to screw it to the can), a plug and a drill with a metal drill bit.
If you are going to fix the lamp holder to the cap of the can, unscrew the cap then drill a hole at the bottom of the can and feed the cable from the hole you just drilled to the opening at the top.
This is usually the tricky bit. Because the cable bends very easily it is quite difficult to push it to the top. A trick I use is to attach the cable to a wire with duct tape and then push it straight up.
At this point you are ready to fix the cable to the lamp holder and fix the lamp holder to the cap as well as fixing the cable to the plug...and your lamp is ready!

Car boot sales provide you with a variety of motor cans and many of them have definitely seen better days.
In fact many are extremely weathered and more often then not are covered in rust.

Don't be put off by it. Even rust can be beautiful.
With the usual light sanding and a few coats of satin varnish rust can become interesting. And if the can has an intriguing shape I think it is definitely worth the effort.
To conclude
There is so much more to cover! So much more to write about!
Upcycling is infinite, anything can be reused, repurposed. And in the world of furniture the possibilities are many and exciting.
Upcycling is for anybody and with a little bit of inspiration and a pinch of creativity, items that don't really have a plausible purpose as they are any more, can succeed in resulting in unconventional rustic creations.
Which if any of the above upcycling projects has interested you the most?
© 2016 Emanuela Suraci-Neve


 2017: Interesting Facts You Didn't Know")


