Garage Floor Epoxy Guide

Curiously enough, one of the last places most people think about upgrading or beautifying in their home is the garage floor, but it is one of the easiest and startlingly pretty upgrades a person can make to their house. Adding garage floor epoxy paint can transform an average looking oil stained, and cracked garage floor, into your very own auto showroom! This article will examine the costs associated with epoxy garage floor coatings, and provide a simple overview of the steps necessary to do it yourself.
Garage Floor Coatings Prices
There are a variety of do-it-yourself kits available from retailers and available online. The prices will vary depending on which color and style of epoxy floor coating you choose. If you assemble the supplies yourself, you can expect to save a little, but kits offer all the supplies you need in one box and can provide a more professional look. There are pros and cons to both ways, but a do-it-yourself type person can expect to spend anywhere in the neighborhood of $150.00USD to $180.00USD per car bay. So a two car garage can cost roughly between $300.00USD to $360.00USD to coat.
Also, there are professional services available that will come to your house and complete the job for you. Prices are generally reasonable because there should be plenty of businesses to compete for your money. Professionals use a much tougher grade epoxy than that of the do-it-yourself kits that are available to the average consumer. Most professional services should be able to offer your services that will include fixing your cracks and small holes, so that after your floors are finished they look very smooth. You can expect to pay a professional service, and I'm not talking about home depot installers, but a real professional service between $1350.00USD and $1500.00USD for a standard 2 car garage. One of the more glaring benefits of using a professional is that they will offer you long term warranties, usually in the 7 to 10 year range, where at any time if the epoxy garage floor coating peels or your flooring cracks, they can return to your house to do minor cosmetic fixes. The store bought kits usually come with a 1 to 2 year warranty.
*Please remember that these prices are estimates and could vary depending upon your location. Check with contractors in your area for actual prices.
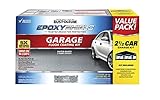
Basic Do-It-Yourself Garage Floor Epoxy
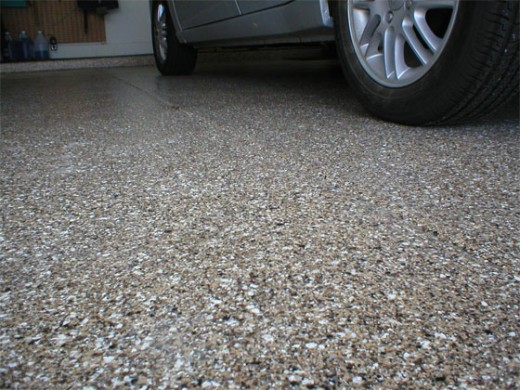
If budget is an issue, and for most it will be, then the only way to go is to buy a kit for epoxy garage floors and do it yourself. An epoxy coat is very tough and can make your garage floors resistant to oils and chemicals, even grease. This project is challenging and will require several steps over several days. Make sure to choose a warm afternoon to start your project and make sure to mark off about 3 days time on your calendar to complete the project on your own.
- Preparing Your Garage Floors- Before jumping into the applying of the epoxy paint, you need to analyze your concrete to determine if you will be able to apply in the first place. One of the easiest tests you can do is to test for moisture coming up through your floors. This is done by taping a plastic bag, i.e. trash bag, to the floor of your garage for a period of 24 hours. If you remove the bag after waiting 24 hours and there is water, or dampness underneath, you will not be able to apply epoxy to your floors. The moisture will not allow the epoxy to bond. If the weather is permitting and warm, and there is no moisture coming up from underneath your floors, then you must prepare the concrete for epoxy application. This begins with scrubbing and cleaning. Most hardware chain stores rent pressure washers and some type of power floor scrubber. Springing for this rental cost will save your back a lot of pain. Spend the first day just cleaning and removing oils and chemicals, and you can use a concrete cleaner that can be found at hardware retailers. You can also "etch" the concrete with a mild acid. Make sure to rinse the floor well. You don't want to leave behind anything that will hinder the epoxy from bonding. The next day will be for repairing cracks and refilling small holes.
- Decide On The Type Of Epoxy - The professionals will most likely use a 100% solid based epoxy that is very durable, but dries quickly and is very hard to handle. This type is very expensive also and it will probably be best left to the professionals. Solvent based epoxy will contain between 40% and 60% solids and is also the choice of some professionals. Solvent based epoxy will bond very well to surfaces and provide a very good finished look. Installation will require you to wear a respirator because of toxic fumes and it will require that others stay away if they are not wearing lung protection. Solvent based epoxy paint will be hard to find from a retailer, but could be available from a paint specialty store. The last type is a water based epoxy. This type will not be as hard to find and is carried generally by the big box retail home improvement stores. The epoxy can be mixed immediately before the application and unlike the solvent epoxy, water based epoxy will not emit toxic fumes. You will also need some type of epoxy thinner on hand just in case you need it.
- Filling In Cracks And The First Coat - After your floor has dried, usually overnight will do the trick, you can use a filler called epoxy crack filler to fill any cracks up to a quarter inch in size. You can use a regular putty knife to make sure to smooth out the filler, and you will have to follow the directions on how long it will take the filler to dry. Once dry you will need to measure and get the approximate square footage of the garage floor. This will let you know how much epoxy to mix for this first coat. Make sure to follow the directions of the product you buy to let the epoxy stand for the required time period before applying to your floors. Follow the instructions and then apply to your garage floors. You may find it easier to get the edges with a paint brush before using a paint roller to apply to the floor. It will also help to masking tape underneath the garage door to allow you to keep the door shut overnight for drying.
- The Second Coat- Let the first coat dry overnight and according to the manufacturers instructions before applying the second coat. When mixing the epoxy for the second coat, add a non-slip product to the epoxy. There is a non-slip product available from Rustoleum. Apply to the floors just like the first day according to manufacturer instructions.
- Wait - Wait at least a week, a full 7 days, to allow foot traffic and parking on the garage floor. Some manufacturers claim that it takes the solvent based epoxy garage floors about a month to fully cure to the floor. If you experience some tire pull up of some of the epoxy, generally this can be fixed with some minor touch up paint.
Other Hubpage Resouces
- Garage Flooring Ideas
My garage floor is solid concrete and although that is alright, I always envy my neibor's garage. He has some plastic / rubber coating over the whole thing and it is a big step up from what I have. One of the...
How To Apply Garage Floor Coating - 1 of 2
How To Apply Garage Floor Coating - 2 of 2
Garage Floor Epoxy Videos
This is a two part video series showing step by step how to apply epoxy to your garage floors.


