Quick Door Hanger


Description
The Quick Door Hanger is an easy, cost effective way to install a pre-hung door. It saves you the hassle of using shims saving you time and money. I have personally used this door hanging system and have found it a quick and easy way to install interior doors. They can be purchased at Home Depot and require minimal construction knowledge and only a few tools.
Quick Instructions
- Pick out and purchase door
- Draw plumb line on hinge side of rough opening
- Attach the quick door hangers to the door frame
- Install door into the rough opening
- Install the trim or casing around the door
(for detailed instructions see below)
Detailed Instructions
1. Purchase door
The rough framed opening for a door is generally about 2 inches wider than the door. This extra space allows room for the door frame and space for adjustments of the frame. Many new replacement doors come with packaging that holds the door square during installation, do not remove this packaging until installation is complete. When picking out the new door, ensure that the hinge is located on the correct side as to not impede walking through the door into the room.
2. Draw plumb line
On the hinge side of the opening, draw a plumb line about 1/2-inches in from the rough opening on the drywall using a 6-foot or 4-foot level. This line will be used to quickly align the door, resulting in a quick installation process. The line will also be covered up with the door trim so don't worry about marking up the drywall. It is also recommended to paint the room before installing the door, this will save you time and the hassle of worrying about getting paint on the trim.
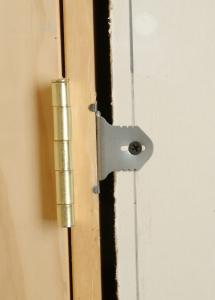
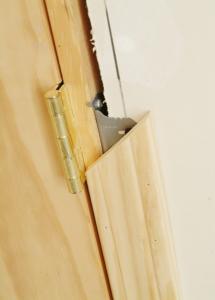
3. Attach the quick door hangers to the door frame
Place a door installation bracket behind each of the door hinges using the provided screws. If you are using a heavy door, make sure to align the brackets' clearance hole behind the hinge's center screw to allow the addition of a long screw through the hinges, passing through the bracket and into the wall stud for additional support if desired. Attach the remaining 3 brackets on the other side of the jamb. Place the first bracket 8" from the top, the next bracket just above the latch stop, and the final bracket 6" from the bottom of the door.
4. Install door into opening
If the floor is finished, set the frame on the floor. If the floor is unfinished, put on blocks the thickness of the finish floor so the bottom of the door will clear the flooring . This will also allow the finished floor can simply be slipped under the door frame minimizing excess flooring cuts. Do not put the door directly on an unfinished floor and install or the door will need to be removed and the bottom cut to allow for clearance, adding labor to the installation.
Starting with the top hinge, align one of the three bracket notches on the hinge side with the plumb line. Then going from top to bottom, align each respective bracket with the same notch attaching the hinge side plumb in the opening. Starting from the top bracket on the opposite side (keeping the door close), attach the bracket to the wall, keeping the reveal (distance between the door edge and the door frame) the same as you work your way down. Watch the video below for further details.
Foam Sealer

For heavier doors, place shims or pieces of wood behind hinges and replace each center hinge screw with longer screw (2" or longer) that will go through the bracket's clearance hole, through the door frame, and into the stud wall for additional support. The shims or wood should prevent the door frame from bending inwards toward the wall, but be careful to tighten them too much. Visual inspect your work and check the door install for issues before installing the trim.
If you would like additional sound dampening to your door assembly, use window and door spray foam to seal the gap in between the door frame and the stud wall. It is important to use window and door foam, otherwise the foam will expand and push the frame inwards resulting in misalignment and issues with the door operating correctly.
5. Install the door trim or casing
Once the door is install, the door trim (or casing) can be installed. Using finishing nails, nail in the door casing to complete the installation.
Note: The door trim will cover the door installation brackets. Most trim has a milled out backside that allows space for the brackets. If using flat backed trim, you will simply need to hammer the brackets into the drywall a little bit so they are flush. Be sure to double check the attachment screws to ensure they are tight.
Additional Information
thequickdoorhanger.com - Manufacture's site, including additional instructions and tips


