DIY: Build Your Own Sandbox With Benches For Your Kids

Kitty Free Sandbox
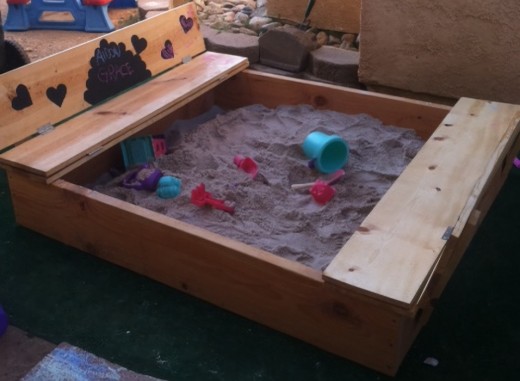
Tired of your kids playing in the dirt? Or maybe your kids love the beach. Bring it home with this easy solution. Hours of fun right in the backyard. You'll never have to worry about the neighborhood cats thinking this is their own personal litter box. This sandbox comes with a bench and cover built in one.
Building a Sandbox like this may seem difficult But it's rather easy and cost almost half of what you'd pay for it. This project cost us nearly under $100. We did however already had the tools and the stain.
I helped my sister with this project for her kids. She found a site with directions on how to build this (which I linked at the bottom of this page) and with a few modifications and a minor bump in the rode we made it our own.
Measurements and Tools
Measurments of Wood Planks:
Three 1"x10"x8' wood boards cut into 6 pieces to 4' each
2 2"x10"x10' wood boards cut into 4 pieces two of them into 43 1/2" and the other two 55"
1 1"x3"x5" wood board cut into 4 pieces to 15"
Other Parts:
8 galvanized hinges
exterior screws one 2 1/2 and the other 1 1/4 inches long
Your preference of stain and an outdoor finish
Tools Needed:
A miter saw and possibly a circular saw.
A drill and drill bits proper size or thinner is fine.
Sandpaper and sand block or a power sander.
Paint brush or rag for Stain.
(I had to use a clamp once not needed though.)
At least 7 50lbs Bags of playsand which you can get from Walmart of Toys R Us for around 3 bucks each.
You'll need to place the Sandbox on something breathable so the rain washes through the sand. We used Grass turf that works perfectly or you could just put it on cement which is fine.
Wanna Buy It Instead?

First 3 Steps
First things first you have to buy all your material. Lumber being your main task might just make this whole thing easier. You can easily get the wood you need at your local lumberyard and get them to cut your wood for you. Home Depot will do this for free, just ask. This will cut the construction time down a bit. The only boards I cut were the four braces using a miter saw. (1 1"x3"x5" wood board cut into 4 pieces to 15")
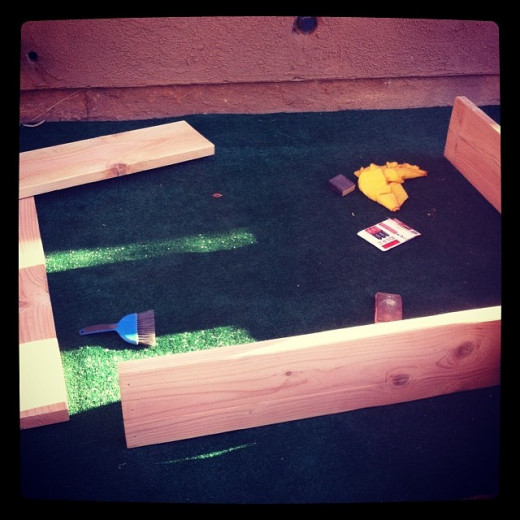
Second thing to do after all your boards are cut is to sand thoroughly around the edges, especially where the cuts were made. When Staining your sandbox you want a to sand more thoroughly than if your going to paint. The reason for this is that you want that stain to sink into the wood. Thing to remember is that different types of wood stain differently. Also more coats will give it a darker tone. We hand sanded which will take longer than having your very own power sander. We used a sand block, a sponge sander, (reusable) and just our hands with a piece of sand paper. Using a rag or a little broom as you can see in the picture will help dust off after sanding.
Third, you can do this in any order you want. Set up the boards for the sand box (2"x10"x10' Boards). Make sure you look at the sides for imperfections in the wood to choose the best outer and top sides that look best (this matters more when staining). Then once you have those chosen the sides you want. You will then have to place your boards how you want them with the 55" boards on the outer side of the 43 1/2 boards. Next drill three pilot holes on each side of the 55" boards. After drilling the pilots you'll want to line up the boards and drill into the pilots making incision in the 43 1/2" boards. You can Mark the boards so you don't for get with a number or letter to keep track of how the boards connect where it will be unseen.
A Few Things You Might Want To Order Now

Staining Or Painting
Stain or paint all your boards.
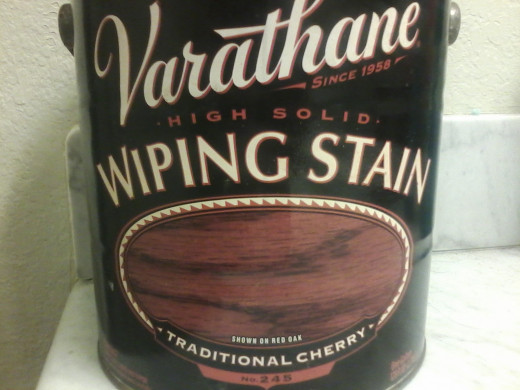
If you haven't stained anything before. The number one rule is to stain outside or in a ventilated area. Make sure you have a clean rag near you to wipe your hands or any spills. Stain is just that a "stain" so wear clothes that you would paint with and if you get any on your skin be sure to wipe it off quickly. We had this Traditional Cherry stain (image) from previous projects and it looked great. Just one coat got us the look you'll see in the next image. If you want a bright color but don't want the look of paint, try a colored stain. They come in the colors of the rainbow.
Side Note:
Staining will take longer to dry than Painting the boards.
Put The Sand "Box" Together
Now that all your Boards are colored put it together. Drill in the screws to the square box together using the pilot holes to guide the screw in. It will be easier if you have someone helping you hold the boards steady.
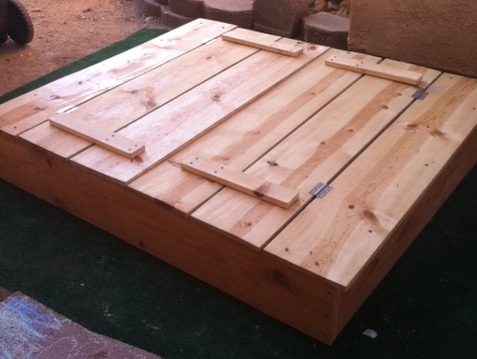
Once the box is put together, well there you go you got your sandbox. Now for the lid/bench. Lay out the boards on the top of the box in the order you want. The bottom of the second ones from the edge are the seats and the two middle boards their bottoms are the back of the seats. Be sure the Boards pick are in the right area. Make sure you have enough space between the boards to put the hinges on (you could crack the boards). Screw in the hinges they should self screw for you. Two on the first row then turn the boards over and two hinges on the third board. Same for the other side.
Next screw in the first and last boards as many as you like really but 2 on the small sides and 3-4 on the long sides should do.
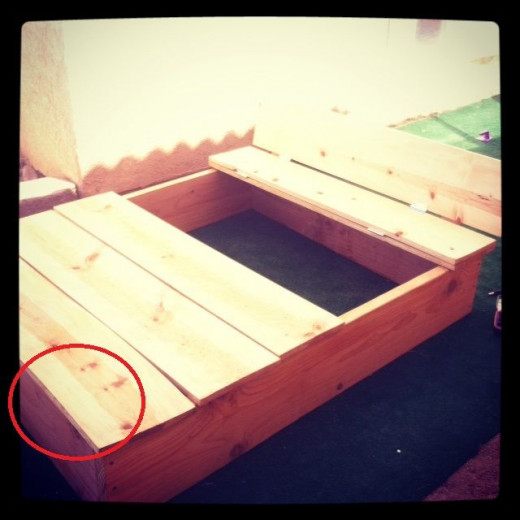
If you notice I put a red circle around the last board. This board was warped and it had a bump that made it difficult to flatten out. (Try to get boards that don't have imperfections like this). If you do come across this it does have a simple solution though. Use it as one of the last boards like you see it. Using a clamp you can hold it down and put in your screws easily enough and it will look fine. I did break my last drill bit after drilling in the pilot holes for the box. So I did have to just screw in the screws blindly. (Not recommended unless you know what your doing)
Almost done!
Now the bench braces. Simple enough, we didn't even measure the exact spot but two to three inches down from the middle boards will do. Drill in four screws for this to only the middle boards. Then comes the handles we decided we will use a rope stapled on (haven't done so as of yet) but you can put the handles on bottom of the two on the side Check the link below to see how they put their handles on.
All that's left is to paint on the finish (Keep the rain from ruining the boards) if you've stained it. And, now fill with sand and enjoy.
Ready to Build
Are you ready to build your very own Awesome Sandbox?
Something Extra - Feeling Creative? My sister decided to use chalk board paint on the seats.
Click thumbnail to view full-size


Wanna Build One That Looks Like The Store Bought Sandbox? - Watch This Video

Inspiration to Build
lynnspin.com
My sister got this idea to build this sandbox from lynnspin.com
Great instructions on how to build this just painting it instead of Stain. As you can see they decided to paint theirs a light blue. Click the Image to visit this site.


