Do It Yourself Kitchen Re-facing


The Art of Cabinet Refacing - Its Easier Than You Think!
In tough economic times, few of us are in the mood to go buy a new home and probably can't sell the one we have anyway. So, more and more of us are looking for that fresh, new way to bring life to our existing home while adding lasting value that will reap a return on our investment dollar.
The kitchen or bathroom has always been the safest room in which to spend your hard earned money because, if done correctly and with a cautious eye on the budget, you will almost certainly recoup at least the initial investment and possibly more. That's why refacing your kitchen makes so much sense.
in the past, refacing cabinetry was something you would only hire a professional to do. However, with advances in technology as well as a ready supply of materials (such as doors, veneers, trim, adhesive and tools), many homeowners are tackling this project themselves - and saving a bundle in the process.
The purpose of this lens is to discuss when refacing makes sense and when it doesn't as well as to outline the steps and material needed to tackle this messy but rewarding remodel. Lets get started!
Reface Versus Replace
Which is the best option for you?
To keep it simple, I list several criteria that, if you meet some or all of them, you may want to consider cabinet refacing:
1. Are the existing cabinets worth saving? Are they a press board cabinet that is peeling, shelves are warping, drawer boxes are falling apart, etc? To be truthful, by the time you get done putting 'lipstick on a pig', you will have spent a fortune and still will not be happy with the end result. The cost to replace all that may be wrong will be so high, you may have been able to purchase a new kitchen for less money. However, if your cabinets are soundly constructed (as many older cabinets are) and only the cosmetics are poor, refacing may be for you.
2. Have you already replaced the counter tops? Back in the last remodel boom, many folks dipped in to savings to put shiny new granite or quartz tops on their outdated kitchen in an effort to spruce it up. well, that granite is not going to come up without the risk of breaking it, so you may be committed to just refacing. You may be able to find a counter top company that will take the old tops off and lay them on new cabinets, but they will make you sign a waiver stating that if anything happens to the top when removing or resetting, they are not responsible. In cases where you have nice new tops and salvageable cabinets, refacing is just the ticket.
3. How are your cabinets constructed? Refacing is far simpler if the existing cabinets are 'face frame' style cabinets (a wood frame runs around the face of the cabinet and the door mounts to this frame) versus frameless (the door sits on the front edges of the side/top/bottom panels and hinges to the inside of the cabinet box itself). Face frame style cabinets allow you to re-surface the wood faces with either solid wood strips, plywoods or veneers - or often a combination of the three. Since the face frame usually hangs past the side of the cabinet by 1/4" or so, you can easily laminate a piece of plywood or veneer to the side of the cabinet and then tuck it up behind this frame overhang. This hides the cut edge of the plywood and creates a seamless installation. On the other hand, frameless cabinets are tough to reface because there is no good way to resurface that front edge of the cabinet box. Plus, it becomes tough to hide the edge of the veneers being used where the new side veneer meets the front edge piece. Its not impossible to reface frameless cabinets. Its just harder for the average handyman to do it and have it look good.
4. Are you really happy with the existing cabinet layout and functionality? If you are not, a reface is a waste of money as you are gaining nothing but an improved look. If your hope was to 'rework' some of the existing cabinets, add on to the run of cabinets, or otherwise change the existing layout, you are better off looking in to new cabinets. One thing to keep in mind here: Moving cabinets around and changing layouts means that you may be exposing areas of the floor that were previously covered by a cabinet. In most homes, especially 'spec' homes, tile flooring stops at the cabinet, so you will be exposing raw floor and will need to plan on 'patching in' or even replacing the entire floor. In the case of wood floors, the flooring probably goes under the cabinetry, but it will not be finished and will probably be tough to tint to match the aged/exposed floors. You may need to have them resurfaced and all re-stained/coated. Something to keep in mind as you plan the scope and budget of your project as no one likes these last minute surprises!
5. What does the budget look like? You can reasonably expect to pay upwards of $3000-4000 in materials (doors, drawer fronts, veneers, moldings and supplies) for an average reface. Truth be told, there are some decent import RTA cabinet lines out there that would come in at about that price and even a nice American Made, luxury grade RTA cabinet made by Conestoga Wood Specialties that would not price out a whole lot higher than that. If your goal in refacing your kitchen is to save a ton of money, you need to be open to other DIY cabinets options like RTA cabinets that may give you more value for the money. However, if your alternative was to go to a Lowes, Home Depot or a kitchen and bath dealer and drop $15-20K on a new set of cabinets, Refacing might be just the ticket for you. The answer really lies in you determining what level of work you are comfortable putting out and how you determine 'value' for your specific project and budget.
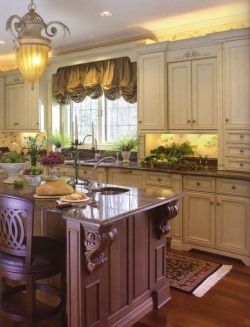
6. How simple or exotic are you expecting your remodel to be? Take a look at the first two pictures in this lens. The first one in the opening paragraph is a very nice, functional kitchen that was an easy reface. However, look at the second picture. Notice the intricate details such as the island panels, the furniture feet on the main kitchen run, staggered height upper cabinet run, etc. This is a pretty luxurious kitchen and some of what makes it look so rich is that it was made from shop built cabinets where things were built to integrate with each other to provide a clean final install. If you were to attempt to create a kitchen like this by refacing, you would have your hands full - and the end result would probably look a little 'rough around the edges' . So think through the kind of final 'look' you after. Simple and clean lined kitchens are a snap, but more detailed kitchens require more materials, more craftsmanship, more planning and allow far less room for error.
6. What appliances are you thinking of using? If you are going to be changing the appliances to ones that are larger (IE: going from a 30" range to a 36" or a 33" fridge to a 36"), you will spend so much time and money trying to make this work tat you may be better off just replacing the cabinets outright.
There is no right or wrong answer to any of these questions, they are just meant to get you thinking. Lets assume you have determined that a reface is the way you want to go. Lets move on to discussing the process as well as providing you with some sources for the hard to get materials like cabinet doors and veneers.
Planning Your Reface
Time Requirements
So, you've decided that a reface might be the ticket for your new kitchen...Well, then lets get started planning it!
Time Frame
Make sure you leave enough time to complete the project. You will have a week of evenings plus a weekend to get the cabinet boxes completed and then a few more hours of trim work, hanging doors, etc. For a person with above average handyman skills, plan on 40 hours to complete an average reface. However, other things factor in to the entire project scope:
Counters: If you are planning on having new counters installed, have that done AFTER the reface, but BEFORE you put on the doors and drawer fronts. You do not want to be spilling glues, etc all over your new cabinets and faces. Plus, the process of installing heavy granite may lead to dings in your new doors. Leave 'em in the boxes until the counters are on. Counters generally take about a week to complete. Until they set the tops, much of your work will be on hold, so use the time to complete your painting, trim work, etc.
Electrical and plumbing: If you are planning on moving or adding electrical or plumbing, be sure to plan this out. If you are doing it yourself, this is easy. If you are having someone else do it, you need to get them involved early in the project so that they have it on their schedule to make the changes right when you need them done. By doing so, you ensure that you are without power or water for a very limited time. Also, remember that these folks need to come back after the install to complete their jobs. For instance, with electrical, they will come and run new wires, cap off cut wires, etc on their first trip. However, once your cabinets are done, the counters are down and the tile backs plash is set, they need to come back and 'trim out' their work: Install the outlets, switches and face plates, hook up appliances that are hardwired such as Dishwashers and built in ovens, etc. Same applied to plumbers. Their first trip will be to remove or change plumbing locations, but they need to come back after your sink is in to complete the faucet hook ups, etc. Just be sure to leave them enough time i the schedule and don't have them tripping on each other by having them i the house on the same day.
Backsplash and floors: These are almost the last things to happen. You can't install tile back splash until the counters have been laid. And with floors, you don't want a lot of construction activity taking place on your newly surfaced floors. In the case of wood floors, if they need to be sanded, the sanders will come close to and may bang in to your new cabinet faces. Protect them cardboard and hold off on installing any of your floor trim (baseboards, shoe moldings, etc) until the floors are totally complete.
OK, lets move on to actually performing the reface...
Measuring For Your Materials
This is the Important Part!
When planning a reface, you will need to plan on your door and drawer front sizes, veneers, moldings, plywood, wood strips, adhesives, etc. In the next section, we will talk about where to get these materials, but for now, lets talk about the critical nature of getting the measurements right!
Doors and Drawer Fronts: This is, by far, the most costly element of the reface project as it pertains to the cabinets themselves. Additionally, it is the most exacting part of the measuring process. If you are planning on keeping your doors and drawer fronts the same size they are now, its fairly easy. However, if you plan on taking your kitchen from a ho-hum partial overlay look (where a lot of cabinet shows around the doors) to a full overlay kitchen (where the doors cover almost all of the cabinet face), then you need to be extra careful. Lets assume you want to increase the sizes of your doors and drawer fronts. First, you need to determine how wide the face frame material is on your cabinet. Most cabinets use a 1-1/2" wide frame while 2" is not uncommon. Next, measure the opening width on a given cabinet. Lets assume you have a 21" wide cabinet with an 18" wide opening (1-1/2" face frame material on both sides) and you want one FULL overlay door on this cabinet. In this case, you would simply add 2-1/2" to the opening size and order a door 20-1/2" wide. This gives you a 1-1/4" 'overlay' on both sides of the door, leaving 1/4" of cabinet showing to the left and right of the door. If you are doing a 2 door cabinet (2 doors over one opening), simply add 2-1/2" to the opening size, divide the result by 2 since you have 2 doors and then SUBTRACT 1/16" from each door. This is because you will need to have a little space between the doors to keep them from binding and to allow you to adjust the spacing with the adjustable hinges (we'll cover hinges later in this lens). Be careful with full overlay though. Reason being, it is not very tolerant of clearance issues in corners, against other cabinets that may be deeper, against walls etc. You need to plan for trim that may need to contact the cabinet face such as base moldings or chair rail and full overlay cabinets against a wall will leave only 1/4" between the door and the sheet rock - obviously not enough to allow for your trim! Also be careful where doors may share a common piece of cabinet framing. For instance, on cabinets with 4 doors, you will find that the doors will share an upright face frame member. If this face frame piece is 1-1/2" wide, you need measure for a 1/2" overlay so that each door that shares that frame only lay over the frame by 1/2", thereby leaving 1/2" gap between them. For more information, check out our web site at www.thecabinetjoint.com and then click 'Custom Doors and Drawer Fronts'. Go to the 'Downloads' section and open the PDF called 'A Pictorial Explanation of the Term Overlay'. This may help you further. Main point with door measurement is that you only get one shot at it because you can't easily trim them down. So take your time, draw out your kitchen i necessary and make sure every door and drawer will fit without binding or clearance issues.
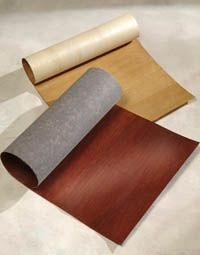
Cabinet Boxes: Most professional re-facers use sheets of veneer for the cabinet sides and ultra thin (1/4") solid wood strips for the cabinet face frames. The solid wood can be ripped and mitered to create a really tight joint where necessary. Your only trick here is to determine A) how many sheets of veneer you need for your cabinet sides (also plan on any veneer needed to finish off any open or glass cabinets where the inside needs to match the outside) and how many strips of the solid wood you'll need (they come in 96" lengths) and in what widths. While the strips can be ripped, you will be exposing a raw edge, so its best to try to order exact widths when possible. Always err on the larger side as you can always trim down or use shims, but you can't 'grow' the wood if its too narrow.
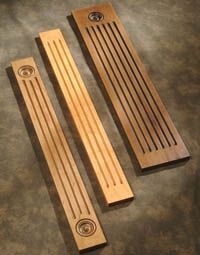
Trim: Plan your crown molding, shoe molding, base molding, scribe molding and light rail requirements. Be sure to allow enough material to make your returns to the wall (along cabinet sides) and also allow for your miter cuts. For instance, a larger crown molding may require an additional 4-5" on either end to allow for the 45 degree miter. This will add up over the course of a kitchen and you do not want to find your self short when you are so close to being done!
Drawer boxes: If you are planning on redoing the drawer boxes in your cabinets as well, it is wise to plan on new slides too. The best is the Blum Tandem Soft Close glide. These glides require that the drawer box be 3/8" LESS than the opening they are going in. This is critical! The drawer boxes must also be in a depth of 15", 18", or 21". A 21" deep drawer is standard in a 24" deep base cabinet, an 18" drawer is standard in a 21" deep vanity cabinet and so on... The height of the drawer should be no higher than 1" less than the opening height.
Adhesive: The best we have found is an aerosol based contact cement made by 3M. It is readily available at Lowes or Home Depot in their glue/paint section. It comes in a green can and costs about $12 per can. You will need a lot of it, probably 6-8 cans by the time you are done. The adhesive is simple to use. Just spray the back of the veneer and then the surface to which you are applying it. Let both set for 4 minutes BEFORE you try and adhere the two together. Carefully set the veneer in place (you only get one shot at it. The stuff grabs right away, so work from one edge to the other) and roll out any bubbles with a rubber J roller. Use the adhesive for both the veneer pieces and the wood strips.
Now that you have an idea on how to measure your materials, where do you get them? We'll cover that next.
Sourcing Your Materials
Where Do I Find This Stuff?
Thanks to the internet, there are lots of places to find the materials you'll need, and they already come prefinished for you! My favorite supplier is Conestoga Wood Specialties. These guys offer everything you'll need. They sell doors, drawer fronts, drawer boxes, veneers, plywood, thin wood strips, moldings, carvings, corbels, valances, decorative feet and legs, range hoods, internal storage items like spice racks and trash pull outs...the list goes on. They even sell the hinges for the doors and the drawer glides for the drawer boxes. They are literally a one stop shop for the refacer and the stuff all comes either raw (you finish it) or finished in one of their gorgeous hand wiped stains or in a paint. Either the painted of stained finishes are also available with luxury treatments like glazes, speckling, distressing or antiquing. Conestoga has been around for over 40 years and has has become the gold standard in wood components for the cabinet industry. However, they do not sell direct to the end user, so you need to purchase through an authorized reseller like www.thecabinetjoint.com.
As for the basic materials such as glue, nails, screws, sandpaper (you need to scuff sand all surfaces before you apply adhesives), etc, just go to your local hardware or home improvement store.
Now, what tools will you need? Lets explore that next!
Tools You'll Need
We All Need an Excuse For New Tools, Right?
Here is a comprehensive list of tools to reface cabinets:
- Basic hand tools such as screwdrivers, utility razor, sandpaper, block plane, drill, etc.
- A pneumatic pin gun that shoots the smallest possible brad. You do not want to make large holes in your new cabinets! You can probably rent the pin gun and compressor from a good rental facility. If not, rent at least the compressor and treat yourself to a new pin gun by purchasing it an online store or from a local high end hardware/home improvement store.
- Chop saw
- Table saw- Can be rented
- Rubber J roller for pressing out veneers - Can be rented
Of course, every job is different and you may run in to some odd situations that require additional tools or even professional assistance. However, this is the exception, not the norm. Most kitchens can be refaced with the tools and equipment noted above
List of Helpful Links for Your Kichen Reface
- TheCabinetJoint.com
A premier supplier of everything you need to complete a kitchen reface. Everything is custom sized to your needs and ships in just a few weeks. Available finished or unfinished.
RTA Cabinet Assembly - In Case a Reface is Not For You, This Might Be!
This video is for Conestoga's high end RTA cabinets. If you decide that refacing is not for you, or if you want to add a few cabinets to your existing kitchen that you will be refacing, this cabinet program might be just what you need! Check out the awesome assembly. No cheap cam locks and best of all, its made in the USA!