Micro Hydro Project

How to build a micro hydro power plant
This lens describes the steps that I will be taking to establish a micro hydro power station. My yard is bordered by a ravine that contains a small seasonal creek. This has enough flow to power a small wattage micro hydro generator. While there is a substantial amount of water flowing at times, the first micro hydro project is basically a proof of concept. Using a combination of parts bought locally and via eBay, I will be establishing the working micro hydro power plant. Follow the progress of the project. In time, I hope that my concept will evolve into a larger effort. It would be great to then see the downstream neighbors copy the principles of my micro hydro installation.
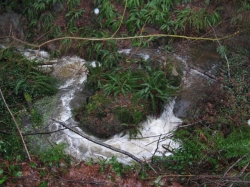
The photo shows the micro hydro creek flow after a substantial storm. We received 4 inches of rain in 24 hours, 6 inches in 48 hours. The creek was raging. While it's hard to see, this creek is flowing in a loop around a small island. A channel was dug across the top of the photo which makes the island. A small dam is in the creek at the right of the photo. The water is pouring over the dam.
Spring 2011 update: The creek is again under control. Water levels are fairly high but dropping due to reduced rain of late. The terrain that will support the alternate energy works, (alternator, water wheel, etc.), is being evaluated for suitability. The diversion cut in the creek proved to be inadequate for the water flow. Efforts are being made with shovels to increase the width of the cut. The dam used to divert water into the diversion has withstood the winter and the tremendous water flow despite being completely overwhelmed on two occasions. Efforts will be made to bolster the dam to improve its performance in future years. With the improvement in the diversion cut and dam bolstering, there should be no possibility of the water going over the dam again. This will bode well for the installation of the PMA alternator and the mechanisms that support the generation of the energy.
Update: the risk of flooding caused a big setback at the site. Much early work was done to straighten the water flow. This was successful during the winter of 2011/12. The water flowed in the desired direction and did not cause any further erosion of the banks. More importantly, the construction site for the water power generation system, (a small area), was not at risk. Over the course of the winter, the water continued to cut a deeper channel in the desired location. With luck, the creek should be completely under control in future years.
Micro hydro basics
Why this project was started
My area is quite rural. There are many trees along the power lines. During storm season, there can be many power outages due to branches and trees breaking the power delivery. My property has a ravine at the back that was formed by a seasonal creek. While there is little water in the creek during the summer, it is quite powerful in the winter. Some of the water flow can be diverted to drive a water wheel that turns an alternator. There is not enough power available to generate a lot of power. The creek should be able to power a micro hydro installation capable of producing 500 or more watts. This power would be quite useful during power outages.
Micro Hydro Economics
Financially, it hardly makes any sense to generate alternate power from my ravine. The stream is dry in the summer. The water flow varies quite a bit depending on rainfall. Electrical energy in British Columbia is very inexpensive and it is green as the electric company uses water generators themselves. My house is in a very rural area, however, so we experience electrical power outages. When these happen, it is usually very rainy and it is in the winter. This is exactly when the stream in the ravine is running at maximum flow. When I generate 1000 watts of power from the stream, each hour will save me less than 10 cents worth of electricity, although the cost is likely to rise in the future. If there is a power failure, the same 1000 watts would need to be produced by a gasoline generator, (which I don't have). Now the alternate energy is worth much more.
There is also a convenience factor to consider. If the power goes out, my stream will provide me with ample 12 volt power for emergency lights, a radio and maybe even a small heater. The alternate power is also available when the regular electricity is working. During those times, I can use the alternate energy to heat a small greenhouse that I have in the yard. That will allow fresh crops to thrive over the winter. Lettuce in January can be very expensive but would be free to me with my alternate energy heated greenhouse. Who knows, in time I might be able to raise pineapples using the energy from the stream.
Micro Hydro Stuff on Amazon - Help yourself to alternate energy
The Most Important Thing
Safety First! There can be a lot of electrical power located in a wet environment.
Major rainstorm overwhelms the micro hydro creek

After receiving 6 inches of rain in 2 days, the creek was raging. The loop in the photo points towards the property bank. There has been substantial erosion here in the past. A diversion channel was dug at the top of the photo, creating a small island. A small dam was constructed on the right of the photo to block water from taking the original path. With the rain, the water rose enough to go over the dam.
The components of the micro hydro project were not yet installed. If they were, they might have been destroyed during this flood event.

Micro hydro components
Electrical specifics
The electrical parts of the project will use an alternator, power controller, diversion load and batteries. The alternator was purchased from eBay for $100. This is a unit that contains permanent magnets. Other alternators, such as those in cars, use electro-magnets. These allow the alternator to be constructed of lighter weight, and cheaper, components. The problem with such an alternator is that the electro-magnets require quite a lot of electrical power just to get started. With a micro hydro installation, there is often not a lot of power available. Using a permanent magnet alternator ensures that the electrical power is generated into the system and less is lost.
The PMA alternator used for this project contains an internal rectifier. This is a set of 4 diodes arranged in a square. They convert the produced alternating current into direct current. There is some literature that suggests that the alternator should output alternating current and be connected to the rectifier closer to the storage batteries. This allows for somewhat cheaper line to be used to connect the alternator to the rectifier when the two devices are located a long distance apart. This project will only have about 100 feet between the alternator and the storage batteries. Using regular 12/2 or 14/2 cable, there will not be an appreciable voltage drop over the required distance. The project uses a power controller to monitor the state of charge in the batteries. When they are fully charged, the power controller will switch the micro hydro power to a diversion load. This is just an electric heater that will use the surplus power. The batteries are deep cycle units such as those used by recreational vehicles. The electrical system operates at 12 volts.
Micro Hydro Components on eBay
The variety of items on eBay is constantly changing. Keep checking back to find what you need.
Micro hydro project costs
Here are the costs of the project thus far:
PMA micro hydro alternator $150. Source: eBay, shipping, tax
Power controller: $80. Source: eBay, shipping, tax
Batteries: n/a Source: not yet purchased
Diversion load: n/a Source: not yet purchased
Water wheel: $200 Source: recycle yard aluminum costs
Penstock: $60. 30 feet of 4 inch PVC pipe. Source: The Home Depot

Water wheel details
The heart of the micro hydro system
The micro hydro installation uses the flow of water to turn a wheel. Ideally, the system should be designed to contain as large a wheel as possible. Practical realities tend to limit the size of the wheel, though. A large wheel takes more materials to build, is heavy and requires substantial supports. This project will use a wheel much smaller than the maximum size possible in this micro hydro situation.
A trip to the local metal recycling yard yielded a pair of aluminum rings. These are about 32 inches in diameter. At a cost of $2 per pound, they were a good value. Various water wheel designs have been considered. The wheel may use both of the aluminum rings or just one. Being made of aluminum, there will be no issues with corrosion and no ongoing need to paint the water wheel.
The water wheel is an important part of the micro hydro system. The major consideration is the diameter of the wheel. With the purchase of the aluminum rings, this project has the wheel diameter fixed. The vanes of the wheel are another issue. They could be made of plastic pipe, wood, steel or aluminum. A trip back to the recycle yard found a number of aluminum parts that will be made into the micro hydro water wheel vanes.

Micro hydro penstock details
Also known as the flume
The penstock is the delivery system that brings water to the micro hydro wheel. For this project, 4 inch plastic pipe was chosen. This material comes in 20 foot lengths. 40 feet will be purchased. The lay of the land allows the penstock to be routed from the water source to a position where the water wheel can be constructed. 4 inch allows for a gate valve to be installed. The valve will shut off the water flow when maintenance of the wheel is required. Instead of a gate valve, a diverter could be fashioned or the penstock could be lifted out of the water. The gate valve is easier since the penstock pipe will be heavy when full of water.
More Alternate Energy Options on Amazon - Not just books anymore

Do you have a stream nearby? Are you already extracting energy from the water? I'd love to hear from you.


