Tomato Planting and Growing Tips

How to plant tomatoes to get the best results:
Did you know that there is a best way to plant atomato seedling?
Read on to find out how to make your baby tomato plant grow strong and healthy roots.
The planting tips here are the ones that I actually use in my own garden and containers. The images shown on this page illustrate how I planted my own tomatoes in a container, but some of the tips can apply to planting tomatoes in the ground, too.
The images are mine; use only with permission.
Please note
This page was originally published several growing seasons ago by me, Mickie Gee on a site called Squidoo. The products mentioned in this article are still excellent choices. The tomato planting tips are timeless and proven. I currently feed my container and garden grown vegetables and herbs with Dynamite Complete Plant Food Flowers & Vegetables. It is in a red container.
How have you had the best luck growing tomatoes?
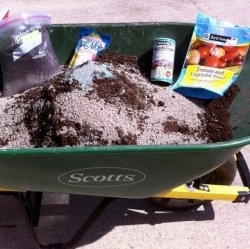
The BEST Fertilizer for Growing Tomatoes: - A southerner knows about growing tomatoes!
I have personally used this fertilizer in all of my container and in ground gardening. I have found none better. What I love about Dynamite Flower and Vegetable Plant Food is that I do not need to worry about "burning" my plants by using too much product. I tend to forget when I last put on fertilizer, so this product is perfect for me.
Tomato Planting Tip#1:
Bury that plant deep!
Step 1: Dig a deep hole in the dirt for the tomato plant: - You will bury all but the top of the healthy tomato plant!
I also sprinkle in some Fertilome Start-N-Grow. It is an excellent product. Not "organic", however. Burying at least 2/3rds of your healthy plant helps develop a strong root system.
Give your young tomato plant a boost: - Sprinkle this boosting fertilizer into the hole before you put the plant in the dirt.
I use this Start-n-Grow product on almost everything--flowers and vegetables--I put into the dirt. You can also use it at other times of the growing season as a fertilizer. It is the best product I have found and I buy a lot of it.

Step 2: Clip off the lower leaves from the tomato before you put it in the dirt: - You snip off the lower leaves because they might be harboring disease.
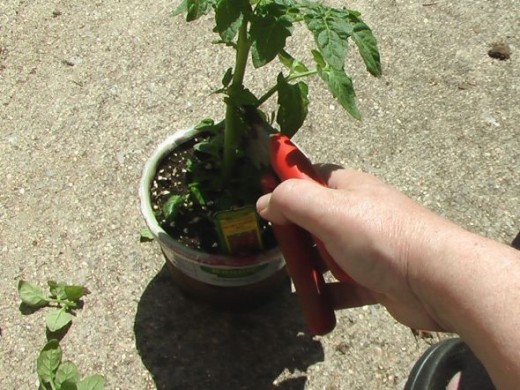
These are usually the first leaves to develop fungus problems. I bet trimming offf leaves near the soil after the plant has grown at least 3 feet tall will help with disease, too.
Your trimmed tomato plant should look like this one:

Handle the tomato plant by the leaves or the pot. Avoid touching the stem too much so you won't bruise it.
Step 3: If your tomato is in a peat pot take off the white label. - OR carefully remove the tomato plant from the container.
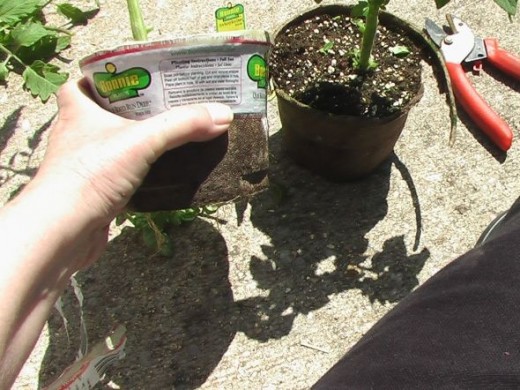
Leave the plant in the biodegradable peat pot--just peel off the bottom of the container. It will help protect the root system when you are planting. If the plant is not in a peat pot like this one, carefully remove the tomato plant before you put it in the ground.
Gently remove the bottom of the peat pot:
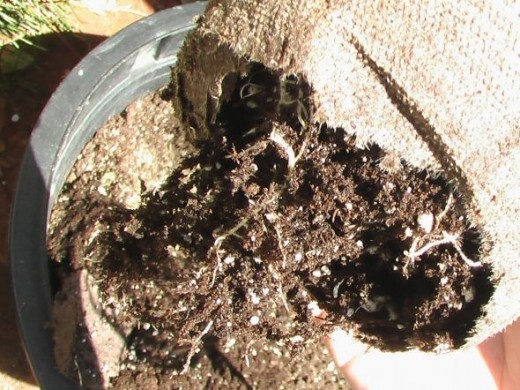
gives the roots a way out.
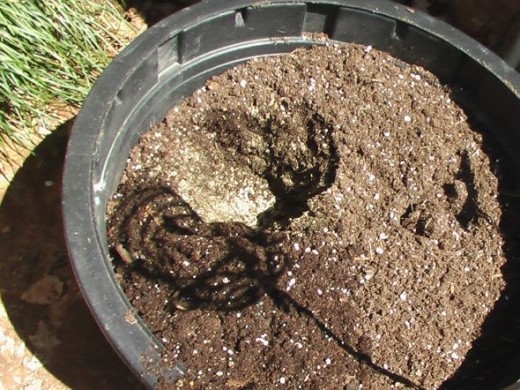
Tomato Growing Tip #2:
Have good dirt!
And Plant Deep!
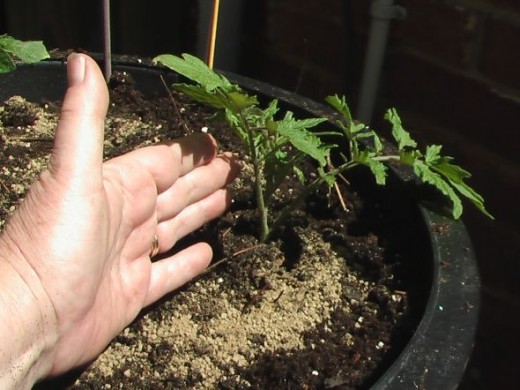
After trimming the plant and preparing the peat pot, sprinkle in a booster fertilizer (like the Fertilome Start-N-Grow mentioned above) and plant deep! Only the top of the seedling should be visible. The light brown granules are organic lime fertilizer.
Tomato Growing Tip #3 for a great harvest:
Use a good fertilizer and follow the recommend application instructions.
Again, Remember to Fertilize your tomato plants! - I cannot tell you about this gardening product too many times.
Dynamite is an excellent environmentally sustainable fertilizer that I use in my own vegetable garden and containers. If you cannot find it in the stores, do purchase it here on this page. I have also found that Fertilome Tomato and Vegetable Food is an excellent product, as well.
A must have product for container grown tomatoes! - Calcium will keep away blossom end rot!
If there is not enough lime in the dirt, you will get blossom end rot on tomatoes and peppers. Use granulated or liquid soil additions when preparing dirt for your containers.
Tomatoe Planting Tip #4:
Use mulch. It keeps the weeds to a minimum and helps hold in the soil's moisture and keep the roots warm during the cool spring nights.
(I misspelled tomato on purpose!)
Mulching the tomato plant is a good thing.

But first, I made a circle to go around the tomato plant! - This prevents weeds and holds in moisture.

I used a cracker box to make a circle. For a pattern I used the saucer from a pot. This circle disintegrated late in the summer, but it still did a great job protecting the young tomato plant from weeds and holding in moisture until the plant was established.
I have since decided that using a box with dye in the paper is not good for the plant. Who knows what that dye my contain? Use plain newsprint from a newspaper. Stay away from colored anything. Hmm, I wonder if it might have been possible to peel the colored paper off the cardboard? Sometimes a company will let you know if the package is organic and does not contain harmful chemicals.

Cut a hole in the center of the circle and cut from the edge of the cardboard circle to the notch. You have to be able to slip the circle around the plant.

Carefully place the cardboard circle around the tomato plant. Then cover with pine straw, bark nuggets or a mulching material of your choice. Do not let the mulch touch the stem.
Tomato Growing Tip #5:
Do not place the tomato plants too close together.
Proper spacing helps control disease and pests.
These plants are too close together! - Tomato plants need good air circulation!

Space equals less disease and problems for your tomato crop!
My bamboo tomato stakes are nice, though. Cages built around your plants are great for helping the plants stay in their own space.
My best basic tip for growing tomatoes:
If you must grow tomato plants in pots, buy the varieties that are developed for growing in pots!
Big Boy, Early Girl, etc... all prefer to be planted in the ground.
You should look for "Patio" and "Cherry" tomatoes.
They will also do well in a raised bed garden or the ground. (You can try your favorite kind of tomato, too!)
I learned this from experience!
The Tomato Plants two weeks after planting: - That Fertilome Start-N-Grow really gave them a boost!

Notice that I have put the stakes in even though the plants are not high. Putting them in early keeps you from damaging any roots. Yes, these are the very same seedlings shown above after two weeks. I watered them every morning and made sure that they got at least 6 hours of direct sunlight.
This year I have two containers and am growing a cherry tomato and a yellow tomato (one plant per pot). I will post pictures for you as the growing season passes. Check back often to see what happens.
If you have a tip you would like to share, feel free to leave a comment below. You do not have to be a member of Squidoo to leave a comment! Please feel free to leave me your favorite tip for growing the best tomatoes that you can!
Thanks.


