Silver Clay Courses and Silver Clay Workshops
Silver Clay Courses and Workshops
In my discovery trail of making jewellery, I decided to find silver clay courses to go on. Silver clay courses are springing up everywhere in the UK, but have been around for quite a few years in the US.
Silver clay courses teach you how to make real silver jewellery from a substance that looks like a clay, which, when heated up, becomes 99.99% pure silver, or fine silver. This is real silver - of a higher silver quality than sterling silver. It is of hallmark quality, it's genuine silver.
As unbelievable as it is, silver clay courses take you through this easy process and enable you to learn how to make your own silver jewellery quickly - and it can all be done at home too. Silver clay courses are a fun day out, but if you're looking to make your own jewellery then this is the way forward for you to be able to make your own handmade silver items.
Silver Clay, PMC, Silver Art Clay - What's the Difference?
Whatever it's called, it's all pretty much the same stuff. PMC™ is short for Precious Metal Clay. It is the brand name of one company. Art Clay™ is another brand. Art Clay™ is a tiny bit cheaper than PMC™, but there's not much difference.
The term Silver Clay is a generic term, referring to any brand of the product.
They will all produce solid silver pieces once fired.
The clay was developed over many years in Japan. It consists of fine filings of pure silver, suspended in a clay substance. When you fire the piece the clay substance burns off, the silver pieces all join up and you're left with a piece of 99.99% solid silver jewellery.
During the firing process, your piece will shrink. Art Clay shrinks a little less than PMC. Once you've used the product a few times you'll get used to how much it shrinks, it's easy to forget it'll shrink when you're forming your piece - and then you might feel slightly disappointed at the size. You should really make your piece 10% larger than you'd like to allow for this shrinkage.
Silver Clay Courses: Taster Day
If you're looking for silver clay courses and you've never used it before, then most will be offering what they call Taster Days. A Taster Day is 3-5 hours, during which time you'll cover everything you need - and you'll walk away with your own pieces of jewellery from the day. Typically you'll be able to make 3-4 small pendant-style items, or a matching pair of pieces that you can attach to ear wires as earrings.
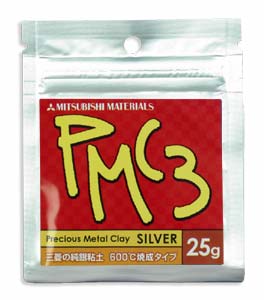
7 grams of PMC looks like about just over half of a stick of chewing gum.
Silver clay is sold in sealed packets - do not be fooled by the size of the packet, once you open it, most of it is the leaflet! On the Taster Day I went on, a 7gram packet of silver clay was included in the price.
From the 7 grams I made two small stars to wear as earrings, a fold over pendant (just needs to be strung onto a silver necklace), a shell pendant and a twisted and textured cylinder which will make a pendant if I add a jump ring to it.
Silver Clay - What's it For?
Apart from being fun to make your own jewellery, there are a lot of business uses for it.
A lot of people want to make their own jewellery, yet end up buying supplies from the same places everybody else does.
If you can easily create your own pendants, they're unique - and therefore more valuable, so can be sold for much more. I've seen simple silver pendants, on a silver chain, nothing special about them, just some textured silver clay using the techniques I learnt on the Taster Day, selling for £80-100. This was without any genius creative spark :) The materials cost, all inclusive, was probably no more than £20. If you're going to make a pendant for sale, would you rather make £50-60 profit? Or £10-20? Would you rather be unique? Or like everybody else?
Some people have used this to start their own business offering to make Baby Fingerprint Pendants and similar products. It's all done with silver clay.
How to Make a Fingerprint Charm With Silver Clay
- Silver Metal Clay: Baby Fingerprint Courses in Engla...
Learn how to take a cast of fingerprints and turn them into silver jewellery - there are courses throughout England. It's easy, it's fun - and makes for a great home-based business! Find out where..
It isn't difficult to make fingerprint jewellery. Following the information below, or on your Taster Day if you book one, simply:
- Roll out your clay onto a nice textured swatch
- Press your finger firmly into the clay
- Poke a hole out for the jump ring to go through
- Use a cutter to cut round the fingerprint and hole
- Dry and fire
Silver Clay Course: What you Learn
The Taster Day I attended only had two of us + the teacher, which was good as it meant there was more personal attention.
First you learn how to handle the clay. Once it's out of the packet it dries off very quickly, so before you open the packet you'll need to have thought about what you'll be making and have everything set up and ready. Having cut off the piece you want to work with, you'll have to put the rest quickly into clingfilm to stop it drying out.
Re-hydrating Silver Clay
If the clay dries out, then it can be "resurrected" by simply flattening it out while keeping it covered in the clingfilm, then spraying some water down, dabbing your finger into the water and wiping that over the clay, before folding the clay over and squashing it all through again. You do this with the silver clay still inside the cling film.
As you're working on your piece, if you have any leftover scraps, simply add these into the cling film with the rest. There's no waste at all, ut when it dries out you do need to re-hydrate it before you use it again.
Silver Clay Moulds and Cutters
At the silver clay Taster Day the teacher provided a variety of cutters and moulds for us to try - and some texture sheets. Small pastry cutters are good for this, but if you want to make a freehand design, then you can use cocktail sticks. If you've got plastic cocktail sticks they'd be best, but you can use wooden ones if you remember to oil them well.
For my first piece I just grabbed a small star shape pastry cutter and cut out two stars from the clay. Remembering to immediately put the scraps into the clingfilm with the rest of the clay, which I'd be using for my next piece.
Using Moulds
There were a variety of moulds she'd made, these are easy to make using silicone mould products, but making the moulds wasn't part of the Taster Day, she did say that it is part of what you do on a full day's course though. You can easily buy moulds that are sold for other crafts, such as soap moulds, chocolate moulds, or candle moulds.
Ebay's a great source for these, I find it also an inspiration because the range is greater than your imagination would be - and it might help give you a great idea on what to make with your silver clay.
If you're going to use a mould, don't forget to wipe it down with the oily sponge so the clay doesn't stick.
If you use a mould for your silver clay then don't let the clay dry inside the mould, you should leave it in there 10-15 minutes to start to set, then pop it out to continue its drying, else it might get stuck and break.
Rolling Out Silver Clay
You shouldn't touch the clay without having oil on your hands (olive oil is good), we had a small pot containing a cube of sponge, which had been wetted with olive oil. It's enough just to rub your finger/palm with the cube before you pick up the clay. This is to prevent the clay from sticking to your hands, the clay is perfectly safe to touch.
You'll need a texture to roll the clay out onto. As you're making your jewellery and thinking about how it'll look, you need to also be thinking about how the back of it will look, so will need to be using something with a texture to roll out onto so that the back is as pretty as the front.
In the class I attended, we had leather swatches to roll onto. These were simply free leather swatches picked up from a local furniture store, about 3"x4" in size. This needed to be rubbed down with the oily sponge too, so the clay wouldn't stick.
To get the clay rolled evenly, we used playing cards. We had a pile of 10 cards either side of the swatch - and as a rolling pin we used a thin piece of plastic pipe cut off, something that could be picked up from a DIY store for pennies. You can use anything that isn't porous to roll the clay - avoid, for example, using any wood as the wood will suck the water out of the clay. But if you have any length of pipe, or metal, or marble, that'd be fine.
Now your clay is rolled to an even thickness, you've got a texture on the back from your swatch and your chosen design texture on the front - so now's the time to cut out your shape. Having cut out the shape in my silver clay I was almost done.
Textures in Silver Clay
Next I had to think about the texture for the front of the star. You can buy texture sheets in silicone or metal, or you can simply use things you have around, such as lace, string, or even wallpaper samples. Whatever you use needs to be oiled.
A texture is simply a pattern and pretty much anything can be used. If this is your first time then you'll be sticking with simple texture sheets rather than trying to be creative and arty and brave.
You can buy texture sheets of your own if you're looking to do this at home - anything that has a texture can be used, or buy texture sheets from craft shops or online; online (ebay's my favourite) will give you a greater range than most local shops.
So I had the swatch on the desk, oiled. I had a pile of 10 playing cards per side of the swatch, I had my roller, oiled. I had chosen my star. I chose a piece of wallpaper to give the texture on the front of my stars, oiled. Now I was ready to get my clay out.
I quickly opened the packet, broke off as much clay as I thought I'd need, and put the rest into cling film. With my oiled hands/palms, I rolled the silver clay into a ball and placed it on the textured swatch, between the playing cards and I rolled it twice. I then turned the clay round, removed two cards from each side and rolled it again. I then turned the silver clay around again, removed two cards from each side and rolled it again. I did this a third time. Now I had only 4 cards on either side. At this stage you remove 1-2 of the playing cards and lay your texture down on top of the clay and roll it again.
Cutting a Hole in Silver Clay
Now you need to know if you will want a hole in your piece of silver clay jewellery or not. While the clay is still wet is the easiest time to cut a hole. If you wait until it's dried you'll have to use a small drill bit to cut a hole - and if you wait until it's fired and is solid silver you'll need a full-blown proper precision drill.
So - do you want a hole in it or not?
To make a hole, you can simply use a straw to punch a hole out, or you can use a cocktail stick.
Now your piece just needs to be dried.
Hollow Tubes With Silver Clay
In my silver clay Taster Day, I also wanted to make a pendant, where the top was folded over to enable it to be put onto a necklace - and a hollow tube of textured material, wrapped round on itself.
To make these I rolled out the clay, with texture sheets, the same as before. I then oiled a straw to use for both.
For the pendant I wanted to wrap over, I wrapped the end of the piece of clay round a straw. For my long hollow tube I wrapped it round a straw.
Binding the Silver Clay to Itself
Where silver clay touched in both these instances, I needed to use silver clay paste. You can buy silver clay paste in a small tub when you start out, it's just a wet paste version of silver clay. Using a small paintbrush, I simply painted the clay where the surfaces would be touching, then gently pressed the two surfaces together.
Using Paste to Create Designs
If you're a little more gifted or arty than I am, then you can buy silver clay in a tube, as a paste, and squirt patterns out onto your silver, this is similar to cake decorating. I am not gifted or creative and arty, so on this occasion I didn't even try to do this :)
Drying Silver Clay
You can simply leave your silver clay out to dry, in the class there was a heated hostess trolley type of food warmer, set to low, that we used to dry our pieces off.
We placed the silver metal clay onto a piece of Teflon sheeting and just placed it directly onto the hot plate. If you have such a heated food tray then fine, else, just put your silver clay somewhere warm and safe until it dries. Our pieces dried in about 20 minutes using the heated tray.
Once the silver clay is dry, you can still change your mind about what you've made and simply re-hydrate the silver clay and start again, so there's no waste. There's still time to change your mind now and not have wasted your silver clay.
Drying Hollow Silver Clay Pieces
For the drying process, we used the heated food plate again - but after about 15-20 minutes I had to gently tweak and twist the straw and removed it from the clay, then returned the piece to the heating tray to continue drying.
Again, this proved that you can easily work with silver clay in your own home as we didn't use any specialist equipment in the whole time.
- Cleaning and Polishing Jewellery
Finishing, cleaning and polishing your finished silver metal jewellery.
Sanding Silver Clay
Once your silver clay piece is completely dry - and before you fire it - now's a good time to just give it that final checkover.
You might want to use a fine sander to just smooth off any tiny rough edges, or you can use a small hand-held drill piece to drill a small hole through (carefully so you don't break it) if you forgot to put a hole into your piece before you dried it.
At this stage, the clay can still be re-hydrated and re-used, so if you do break your piece, don't chuck it away, simply add it to the rest of your clay, add some water and it'll become clay again. Watch your filings - don't waste them. It's silver, so keep your filings and add them into your clay. If you plan to do a lot with silver clay then keep your filings to add to your paste pot, which you can use as a binding material if you need to join two surfaces of silver clay together.
It's also possible at this stage to gently carve your piece. You can use any small sharp point to write or draw onto your clay.
In the class we used fine nail files for the sanding, just emery boards. Again, emphasising that this is something you can do at home without any major expenditure at all.
Firing Silver Clay into Solid Silver
This is something you can do at home, although it is tedious if you were thinking of producing a lot of items. Firing silver clay can be done with a simple, small, domestic gas torch - the type of blowtorch you might use in the kitchen to brown the top of your creme brulee.
There are plenty of DVDs you can buy to watch this part of the process. Getting the colour right - and holding it at that colour for 4 minutes - is the only part that's vaguely likely to go wrong. If you go wrong at this point, you can't re-hydrate the clay any more, so the worst that can happen is you've just wasted $2-5 of clay... and have to start again.
A kiln is something that can be used for larger/more pieces, but at a silver clay Taster Day you'll learn how to fire your pieces using the torch. This means it's a craft you can do at home if you wish as you don't need a kiln.
Safety is first, so you do need to use protective glasses. Nothing should fly off or behave dangerously, but if you're using gas torches then you can never be too sure. The firing area you need should have a floor tile at the base and a few fire bricks on top. If you can do this outside, or on a solid bench, then fine - but be aware that if you try to do this in your kitchen and you get it wrong you could end up with scorch marks on your worktop.
We placed our silver items onto a metal gauze on top of the fire bricks and started the gas blowtorch. What you're now trying to do is get the silver to be a lovely pink colour and hold that colour for 4 minutes. We used a standard 4-minute egg timer for this.
Keeping the torch moving around the silver item, the first thing that happens is that all the non-silver content burns off - this will produce a few seconds of steam/smoke and maybe a tiny flame. Then, that's the clay burnt out and you're just now bringing the silver clay up to the temperature it needs.
Keep the torch moving around the piece, you're looking for it to become a pink colour, not red. If it's red it's too hot and you'll melt it, so take the torch further away. Keep the torch on the item, moving it around, until the whole piece is pink - and flip over the egg timer. Now this will be the longest 4 minutes of your life as you concentrate on moving the torch over the item, keeping the item at that pink colour and watching the egg timer. Once the four minutes is up, turn off the gas torch.
Pick up your silver piece with some tweezers and drop it into a bowl of cold water. It's sizzle/pop for a split second as it cools. But there, in the bowl, is your first silver clay solid silver piece of jewellery.
At this stage it looks white. That's because the silver, if viewed under a microscope, has little particles sticking up. You'll now need to polish your piece. To polish the silver clay we used a bowl containing some washing up liquid and a soft wire brush. Just a few seconds and it was all shiny.
That's it - that's your first silver clay piece .... now you need to work out what to do with the rest of your clay to end up with 2-3 pieces to take home.
My Top Tips For Silver Clay Courses
The first time you go, you'll probably turn up with nothing, expecting them to provide everything. They will, but if you can take along with you any textures you want to use, or any cutters, then that could be better.
I made random pieces from what they provided at the course and from that I know now what I'll be doing different next time. My next time will be another Taster Day and this time I'll have a texture.
When you make silver clay items, during the firing process they shrink by about 10%, so think big, don't think small. My mistake was to try to make two lovely little stars for earrings - the cutters gave the impression they'd be bigger, and by the time they were fired they were ridiculously tiny :)
At my next Taster Day I plan to make just two pieces from 7 grams of clay - and to make them thicker.
Overall, I had a thoroughly enjoyable Taster Day of 3 hours, using 7 grams of silver clay.
I came away with:
- A pair of small stars which could be used for earrings
- A small pendant with a fold-over top
- A textured hollow tube, ideal as a pendant
- A small shell pendant, made using moulds
I've already booked onto another Taster Day, of 5 hours - and am looking forward to this. I plan to make two thicker pieces, with strong textures.
Beyond a Taster Day you'll find 1-2 day courses across the country. There are also full Certification courses, where you can progress through and become certified to teach silver clay, or even to obtain a Diploma in Metal Clay. Through these courses you'd also get to work with other metals (copper, gold) and learn how to embed stones, use enamelling and other advanced techniques.
Going on a Taster Day is great if you want:
- To have a fun day out, it's great if you're single and looking for activities as most people tend to be there alone too
- To learn enough to be able to carry on making your own pieces at home without needing further courses
- To pick the brains of the teacher if you're keen to make a particular piece that you think might be a bit tricky
I'd thoroughly recommend it to anybody.

