6 Most Useful Mac Terminal Commands

One of the aspects that makes the Mac so user-friendly is that they hide many of the more obscure “under the hood” option and information that the average user doesn’t particularly care about. However for the more advanced user, this also means lack of customization and a lot of digging. Fortunately there are actually many customizations that can make life with Snow Leopard even easier--you just need to know the right commands.
Begin by opening Terminal. Either go into Applications > Utilities and open Terminal.app, or simply search for it in Spotlight.
1. Show or Hide Hidden Files
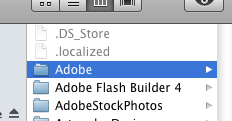
Mac has an astounding number of hidden files. While many of these are important binaries and are hidden so you don’t mess with them, sometimes it’s helpful to see exactly what is where. To reveal all your hidden files, in Terminal type:
defaults write com.apple.finder AppleShowAllFiles true
And hit enter. Then, to relaunch the Finder enter:
killall Finder
Check your folders and you’ll see all the files that were previously hidden. To hide them again, use the same commands but simply change “true” to “false”.
2. Change Screen Capture Format
Mac’s default screenshot format is PNG, but you can change this to be whatever you want. In Terminal enter:
defaults write com.apple.screencapture type image_format
Just change “image_format” to your desired format. For example, to change the screen capture format to JPEG, enter:
defaults write com.apple.screencapture type jpeg
Other possible formats include:
- BMP
- GIF
- JPEG
- PICT
- PNG
- PSD
- SGI
- TGA
- TIFF
Finally, for the changes to take effect, enter the command:
killall SystemUIServer

3. Disable or Enable Window Screenshot Shadow
Snow Leopard has a lovely feature where, with the combination CMD + Shift + 4 then pressing space, you can screen capture an entire application window. It’s very handy, except by default the image it outputs has a drop-shadow behind the window. Nice effect, but for me defeats the purpose of screen capturing a window all by itself. Fortunately, you can get rid of the shadow. In terminal enter:
defaults write com.apple.screencapture disable-shadow -bool true
then
killall SystemUIServer
Bam, shadow gone.
To enable the shadow again, simply change "true" to "false".

4. Enable or Disable Path View in Finder
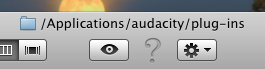
Adding the path view to your Finder windows can be very handy if you often work with a lot of windows open. More than once I’ve almost copied over my latest document changes instead of backing them up. The path view is a helpful reminder of which folder you’re actually in. In terminal enter:
defaults write com.apple.finder _FXShowPosixPathInTitle -bool YES
killall Finder
To disable the path view again simply change “YES” to “NO”.
5. Make Hidden Programs Transparent in Doc
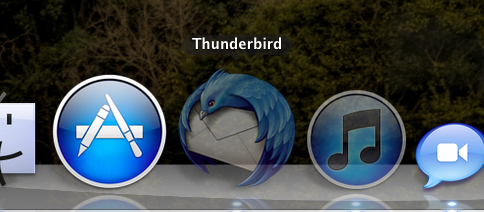
Often when I’m running a lot of programs, I hide the ones I’m not immediately using to reduce clutter in the doc. However sometimes I’ll forget which are hidden and click on something I don’t mean to. Making the hidden programs transparent is a handy reminder:
defaults write com.apple.Dock showhidden -bool YES
killall Dock
To change them back to normal, simply change "YES" to "NO".
6. Set Safari History Limit
To keep your Safari browsing history in check, you can set it to a limited number of items. Just change the number as desired.
defaults write com.apple.Safari WebKitHistoryItemLimit 2000
Instead of limiting the number of items, you can also limit it by number of days tracked in the history:
defaults write com.apple.Safari WebKitHistoryAgeInDaysLimit 30


