Customize your Windows Desktop

RocketDock
Ever wished your windows to look as minimalist as a mac? Then you might want to start by adding a dock. But how?
Thankfully Rocketdock can do it for you! It is an animated, alpha blended application launcher, providing a cleaner and fully customizeable interface. For a deeper view of its features you may want to look here.

How to Customize Rocketdock
To fully customize your Rocketdock follow this steps:
1. First download Rocketdock here.
2. Find the file on your downloads folder and install it (running as administrator might be required). Take note that the installer may lure you into installing apps you do not want be very carefully and read installation carefully.
3. Press dock settings and go to General Tab, make sure that the language is set to Engllish and the Run at Startup check box is filled. You may want to change other general settings to your liking and you may look into it later for now lets go to the next step.

4. Next go to the Icons tab. Set the opacity you like higher opacity makes the dock clearer and lower makes it more see through. Next you should change the icon sizes this will set the size of the dock, higher value will lead to a bigger dock while lower makes the dock smaller. You may also want to change zoom values which takes place whenever you hover your mouse on the dock.
5. Next go to the position tab, set the dock on whichever side you like. Also change the layering into whatever position you like. If you prefer your dock to stay on the desktop then choose always on bottom and if you would like to see the dock always floating around whatever activity you are doing with your computer then choose always on top.
6. Next choose the style tab. Here you will decide on how your dock will look there are many themes to check out with luminous being my favorite. There are also a lot of themes online crafted by the community press the Get More button to see them.

Bonus! How to add Shut Down, Restart and Sleep in the Dock and How to change icons
1. First, right-click on your desktop and create a shortcut.

2. A window will pop-up saying "What item would you like to create a shortcut for?".
3. Input the corresponding command.
For Sleep:
rundll32.exe powrprof.dll,SetSuspendState 0,1,0
For Shut Down:
Shutdown.exe -s -t 00
For Restart:
Shutdown.exe -r -t 00

4. A new bubble will then pop-up asking "What would you like to name the shortcut?" Simply put the corresponding command to what ever you are doing.
5. Download your preferred icons (.ico) for each shortcut and put them on a folder. You can download icons here.
6. Drag the shortcuts to the dock.
7. Right click the shortcut and select Icon Settings.

8. Press the + button and select the folder you created in number 5 and press OK button.
9. A selection of icons will appear on the upper right area of the bubble. Select the icon of your preference and press OK.

10. See your dock and don't forget to try each button if its working. Take note that steps 5-9 can also be used to change other icons on your dock.

Rainmeter
This application is one of my favorites, Rainmeter boasts on loading fully customizable skins wherein each skin may have its function. Skin functions ranges from note recorder to a music player and even to a CPU process and temperature monitor. You can also make your own skins or load skins shared by a very creative online community.
For a closer view of the rainmeter app, you may want to look here.
How to Customize Rainmeter
1) First install Rainmeter, you can download it from here.
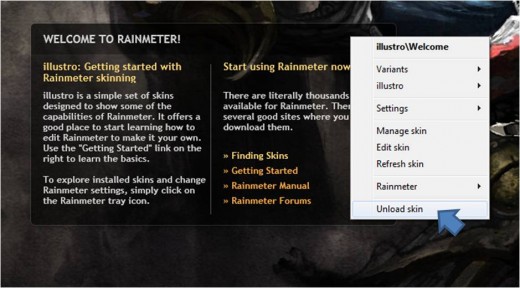
2) At launch you will see a skin like this:
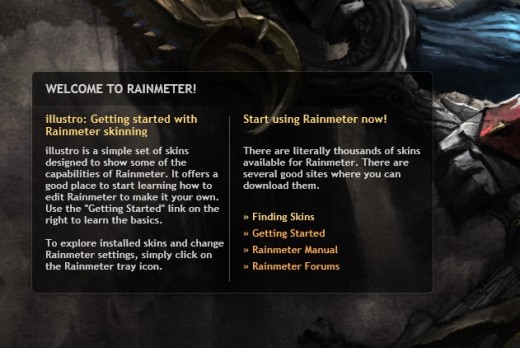
I bet you do not like that skin so we are going to hide it by right clicking on top of it and choosing Unload skin.
Dreamscene
Ever wished your windows wallpaper was moving instead of a plain and dull wallpaper? Then you might want to check out Dreamscene. This is a feature present in old versions of windows, and as time pass windows remove it from the default personalization features. What Dreamscene app does is reactivate it. In short, Dreamscene allows the user to use a looping short video as their wallpaper. For more information on it, you may want to look here:
How to Customize with Dreamscene

3. A bubble like this will pop-up, just click ENABLE.
4. Now, find your short video, right click it and press set as desktop background. Take note that dreamscene only supports .wmv and .mpg formats. You can download some moving backgrounds here. Enjoy your new wallpaper!
Rainlendar
If you want a minimalist calendar/to do list/reminder widget in your desktop that is also fully customizable, then you may want to look at rainlendar.
Actually there are other desktop calendar widgets available, (you may to read them here) but I chose Rainlendar because its lightweight, does not eat a lot of RAM and has available skins that can match your desktop wallpaper.
How to Customize with Rainlendar
3. The application should run automatically after the installation, and you will see the default calendar design in your desktop. Right click it and press options.
4. A bubble like this will pop-up, choose the skin tab
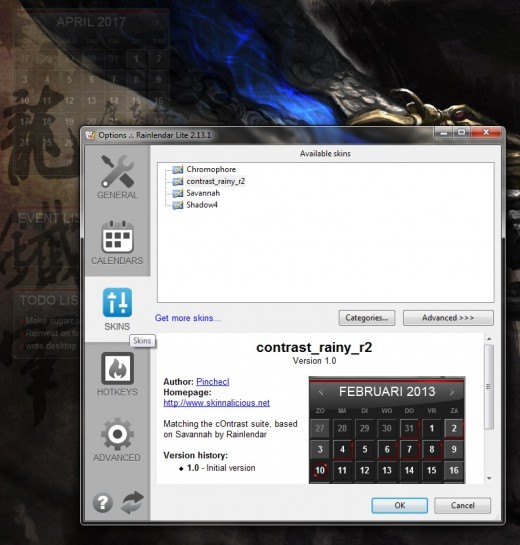
5. You will be able to choose among the skins included from your initial download or press the get more skins.... line at the middle of the bubble.
6. You will then be leaded to a list of sites where you can get rainlendar skins just choose one and load it. If you need instructions on installing skins read here.


