- HubPages»
- Technology»
- Computers & Software»
- Computer Science & Programming»
- Programming Languages
How to create Struts 2 Hello World dynamic web project using Maven build tool and Eclipse IDE or Spring Tool Suite IDE?

This tutorial shows you how to create Struts 2 Hello World dynamic web project using Maven build tool and Eclipse IDE or Spring Tool Suite IDE. Here, we will use Struts 2 and Maven as a build tool. We will create a simple JSP page which provides user to type his / her name with a Submit button. If user type his / her name and then click Submit button, he / she will see her name there with greeting.
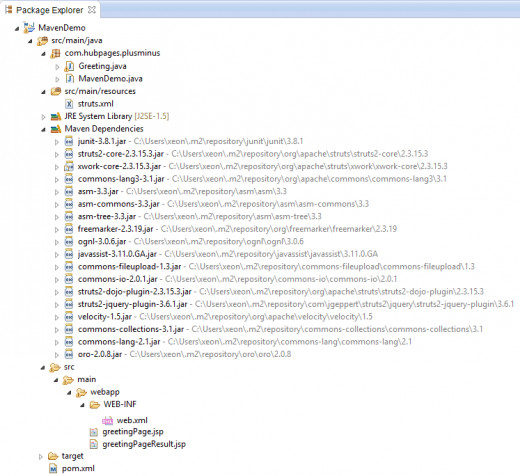
Full project structure
After finishing the tutorial, the full project structure will be the following:
Steps to create Struts 2 Hello World dynamic web project using Maven build tool and Eclipse IDE or Spring Tool Suite IDE?
Follow the following steps to create Struts 2 Hello World dynamic web project using Maven build tool and Eclipse IDE or Spring Tool Suite IDE. All steps are explained with full codes.
Step 1: Creating a Maven project
First, it needs to create a Maven project. The tutorial, How to create dynamic web project using struts2 and Maven in Eclipse IDE or Spring Tool Suite IDE?, has the detail step by step instructions to create a Maven project. We will use that project to continue this tutorial. If your Maven project is ready, then you can follow the next steps to create a Hello World dynamic project.
Step 2: Configuring the pom.xml file
We only need the Struts 2 Maven dependency to create a Hello World Struts 2 page. The Maven Struts 2 Maven dependency repository is like the following:
        <dependency>
            <groupId>org.apache.struts</groupId>
            <artifactId>struts2-core</artifactId>
            <version>2.3.15.3</version>
        </dependency>
Add the above lines of code into your pom.xml file. Here we are using 2.3.15.3 version of the struts 2 core. However, if you also use other versions of Struts 2.
Full code of pom.xml file [pom.xml]
<project xmlns="http://maven.apache.org/POM/4.0.0" xmlns:xsi="http://www.w3.org/2001/XMLSchema-instance"
	xsi:schemaLocation="http://maven.apache.org/POM/4.0.0 http://maven.apache.org/maven-v4_0_0.xsd">
	<modelVersion>4.0.0</modelVersion>
	<groupId>com.hubpages.plusminus</groupId>
	<artifactId>MavenDemo</artifactId>
	<packaging>war</packaging>
	<version>0.0.1-SNAPSHOT</version>
	<name>MavenDemo Maven Webapp</name>
	<url>http://maven.apache.org</url>
	<dependencies>
		<dependency>
			<groupId>junit</groupId>
			<artifactId>junit</artifactId>
			<version>3.8.1</version>
			<scope>test</scope>
		</dependency>

		<dependency>
			<groupId>org.apache.struts</groupId>
			<artifactId>struts2-core</artifactId>
			<version>2.3.15.3</version>
		</dependency>

	</dependencies>
	<build>
		<finalName>MavenDemo</finalName>
	</build>
</project>
Step 3: Configuring the web.xml
We now need to configure the web.xml file which is located into src/main/webapp/WEB-INF folder.
Full code of web.xml [web.xml]
<!DOCTYPE web-app PUBLIC
 "-//Sun Microsystems, Inc.//DTD Web Application 2.3//EN"
 "http://java.sun.com/dtd/web-app_2_3.dtd" >

<web-app>
	<display-name>Archetype Created Web Application</display-name>

	<filter>
		<filter-name>struts2</filter-name>
		<filter-class>org.apache.struts2.dispatcher.ng.filter.StrutsPrepareAndExecuteFilter</filter-class>
	</filter>

	<filter-mapping>
		<filter-name>struts2</filter-name>
		<url-pattern>/*</url-pattern>
	</filter-mapping>

</web-app>
Step 4: Creating an action class
We need to create an action class. Our goal is to create a form with the following things:
- There will be text input filed where we can type our name
- There will be a submit button to submit the form
After submitting the form, the form will give a message by greeting the name field value.
So, we need only one variable / field to implement this tutorial. The field will store String type data. After declaring that field, we need to add the setter and getter of that filed. Necessary code blocks will be like the following:
        String name;

	public String getName() {
		return name;
	}

	public void setName(String name) {
		this.name = name;
	}
We need a method when the first type a jsp page will be prompted to ask user to put a username. To do this, we declare a method executeGreeting and define it like the following lines of code:
	public String executeGreeting() {
		return SUCCESS;
	}
On submitting the form, we also need to implement another method which will be executed on successful submission of the form. We will do this using the method displayGreeting. Code snippets of this method:
	public String displayGreeting() {
		return SUCCESS;
	}
Full code of action class [Greeting.java]
package com.hubpages.plusminus;

import com.opensymphony.xwork2.ActionSupport;

public class Greeting extends ActionSupport {

	private static final long serialVersionUID = 1L;

	String name;

	public String getName() {
		return name;
	}

	public void setName(String name) {
		this.name = name;
	}

	public String executeGreeting() {
		return SUCCESS;
	}

	public String displayGreeting() {
		return SUCCESS;
	}

	public static void main(String args[]) {
		Greeting g = new Greeting();
		g.executeGreeting();

	}

}
Step 5: Configuring struts.xml file
To do this, we need to create two actions. One action for presenting a form which offers user to type his/her name and another action to display some message when users click on the Submit button. Suppose, the actions are like greeting and greetingResult. Both of the action will work with the Java code which we created earlier. So, we need the following codes to complete our action:
		<action name="greeting" class="com.hubpages.plusminus.Greeting"
			method="executeGreeting">
			<result name="success">/greetingPage.jsp </result>
		</action>

		<action name="greetingResult" class="com.hubpages.plusminus.Greeting"
			method="displayGreeting">
			<result name="success">/greetingPageResult.jsp</result>
		</action>
Add all the above lines of code into struts.xml file.
Full code of struts.xml
<?xml version="1.0" encoding="UTF-8"?>


<!DOCTYPE struts PUBLIC
    "-//Apache Software Foundation//DTD Struts Configuration 2.0//EN"
    "http://struts.apache.org/dtds/struts-2.0.dtd">


<struts>
	<constant name="struts.devMode" value="true" />
	<package name="basicStruts" extends="struts-default">
		<action name="hello" class="com.hubpages.plusminus.MavenDemo">
			<result name="success">/index.jsp</result>
		</action>

		<action name="datepicker" class="com.hubpages.plusminus.DatePickerAction"
			method="execute">
			<result name="success">/datepickerpage.jsp </result>
		</action>

		<action name="displayDate" class="com.hubpages.plusminus.DatePickerAction"
			method="display">
			<result name="success">/resultPage.jsp </result>
		</action>


		<action name="greeting" class="com.hubpages.plusminus.Greeting"
			method="executeGreeting">
			<result name="success">/greetingPage.jsp </result>
		</action>

		<action name="greetingResult" class="com.hubpages.plusminus.Greeting"
			method="displayGreeting">
			<result name="success">/greetingPageResult.jsp</result>
		</action>


	</package>

</struts>
Step 6: Creating a page for users to input some his / her name
As we are working with struts, we need to include the struts tag library into our jsp page. So, add the following line into the JSP page.
<%@ taglib prefix="s" uri="/struts-tags"%>
As our intention is to provide a text field to the users to type his / her name, we have to use struts 2 text field tag. s:textfield tag provides the option to create a text field into the jsp page. So, we need to add the following lines of code to use this tag.
<s:textfield name="name" label="Enter your name:" />
And finally, add the submit button to submit the form. We will use simple form instead of Struts 2 submit tag.
The final code will be like the following:
Full code of greetingPage.jsp
<%@ page language="java" contentType="text/html; charset=ISO-8859-1"
	pageEncoding="ISO-8859-1"%>

<%@ taglib prefix="s" uri="/struts-tags"%>
<!DOCTYPE html PUBLIC "-//W3C//DTD HTML 4.01 Transitional//EN" "http://www.w3.org/TR/html4/loose.dtd">
<html>
<head>
<meta http-equiv="Content-Type" content="text/html; charset=ISO-8859-1">
<title>Sample Greeting Page</title>
</head>
<body>

	<h1>This is a sample greeting page using Struts 2.</h1>

	<s:form id="greetingForm" action="greetingResult" method="post"
		name="greetingFormName">

		<table>
			<tr>
				<td><s:textfield name="name" label="Enter your name:" /></td>
			</tr>

			<tr>
				<td><input type="submit" id="greetingSumbit"
					name="greetingSubmitButton" value="Submit" /></td>
			</tr>

		</table>

	</s:form>

</body>
</html>
Step 7: Creating the action result page
We are now ready to display the action result page. greetingPageResult.jsp is the action result page when users submit the form. In this JSP page, we simply type a message with the user's user name. The codes of this page are the following:
Full code of greetingPageResult.jsp
<%@ page language="java" contentType="text/html; charset=ISO-8859-1"
	pageEncoding="ISO-8859-1"%>
<%@ taglib prefix="s" uri="/struts-tags"%>
<!DOCTYPE html PUBLIC "-//W3C//DTD HTML 4.01 Transitional//EN" "http://www.w3.org/TR/html4/loose.dtd">
<html>
<head>
<meta http-equiv="Content-Type" content="text/html; charset=ISO-8859-1">
<title>Insert title here</title>
</head>
<body>


<h1> Welcome to struts 2 page... </h1>

<h4> Hi
	<b> <u><s:text name="name" />!! </u>
	</b>
</h4>
</body>
</html>
Step 8: Running the program
We are ready to run our project. Open a browser and type the url like http://localhost:8080/MavenDemo/greeting into the browser address bar and hit Enter key. If everything is ok, you will get the following page into the browser:
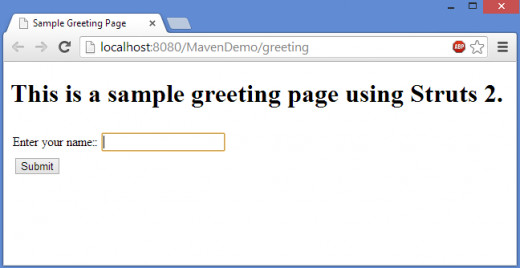
In this form, we are seeing an input filed with the Submit button. To test whether the Struts 2 Java application is working or not, just test the application. We type plus minus into the input filed and click on Submit button to test.
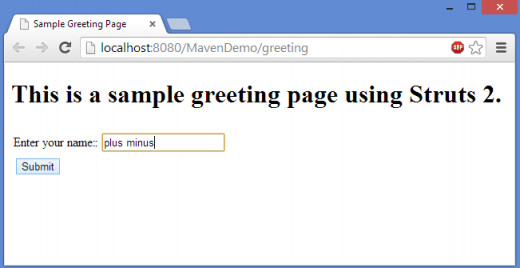
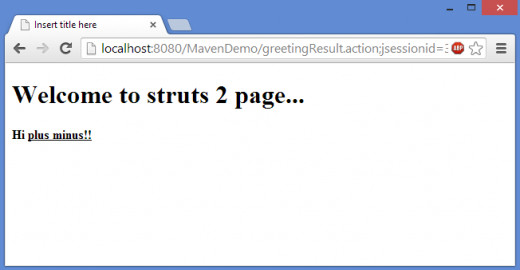
After submitting the form, the following message appears.
Following the above steps, you can easily create Struts 2 Hello World dynamic web project using Maven build tool and Eclipse IDE or Spring Tool Suite IDE. Hopefully, you have completed the project.


