- HubPages»
- Food and Cooking»
- World Cuisines»
- South Asian Cuisine
How to make Chapati - an easy Indian Flatbread Recipe for Beginners


Rate it!
How to make Indian Rotis – a beginner’s guide
Roti or also called Chapati is a flatbread made of whole wheat dough which is baked on a flat iron pan called Tawa. You might also have heard of Naan, which is baked in a special oven and made of white wheat flour. Roti is given as a side order to Curries, vegetable or meat dishes. It literally can be eaten with anything – even jam or cream cheese go well with it and it can be used to make a stuffed Roll called Frankie. While the ingredients couldn’t be simpler – whole wheat flour and lukewarm water - the making requires patience and practice to get the consistency of the dough right and thus create thin, round and soft Rotis. You can buy your whole wheat flour either in your local store or even better in a local Asian market - look out for the name 'Atta' (whole wheat flour) vs. 'Maida' (White Flour). In this article I will introduce a technique to you that slightly differs from the standard process followed by most Indians, but which will make it much easier for you to achieve soft, multi-layered Rotis that can even be kept for several days in the fridge and be warmed-up without becoming dry or hard.
For the lazy ones;)

Why this recipe might be different...
When I moved from Germany to India I least expected to face difficulties making the famous Indian flatbread called Roti or Chapati – after all I came from a nation of excessive baking. I soon had to discover that what had looked so simple when others were doing it, seemed to require a lot of practice to get it just right when doing it myself. My Rotis tended to become too hard and heavy and I soon gave up.
Luckily my father-in-law then introduced me to a technique that he had learned from his mother as a child. This technique also requires a wee bit of oil, but it has become much easier for me to bake satisfying Rotis ever since. While most Indians won’t have heard of this special technique and due to experience also won’t need it, I am sure that other non-Indians like me can highly profit from it when venturing out to learn Indian cooking. Enjoy this step-by-step tutorial, be patient with your progress and feel free to ask questions.
You will need...
- 2 cups Whole wheat flour, Atta
- 1.5 cups luke warm water, approximately
- 1/2 tsp Salt
- 2 tbsp Oil, neutral
- 1 Tawa, flat frying pan
- 1 Rolling Pin, wooden
- 1 flat bowl, large
Cook Time


Be sure to start making your Rotis a while before the meal as you will need to let the dough sit for at least 30 minutes during the making process.
Let's get those hands dirty!
Making Rotis that are fully round, airy and soft will most likely take more than one attempt. But don't worry, your Rotis will be eatable even if they don't turn out perfect right away and the more often you do it the faster you will develop a feeling for the right consistency of your dough. So don't give up if it doesn't work out right away and always remember - 'You must spoil before you spin'!
1. Mix flour, salt and water
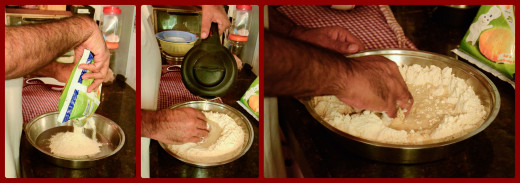
Give the desired amount of flour and salt into a big flat dish that gives you enough space to knead the dough with your hand. Now add a little lukewarm water and mix it with the flour. It is advisable to keep adding only small amounts of water as you can always add more later but it requires a lot of flour to get a too wet dough back in shape. This step is actually the most crucial one, as the exact amount of water will later decide if your Rotis are hard or soft. There are no exact measurements that you can simply follow, so instead try to develop a feeling for your dough. The aim is to knead your dough until it becomes a smooth ball in which you can poke a hole with your finger without needing much pressure. Too little water and your dough will be tough to knead and not looking smooth, too much water and your dough will start sticking in the bowl.
2. Knead your dough thoroughly
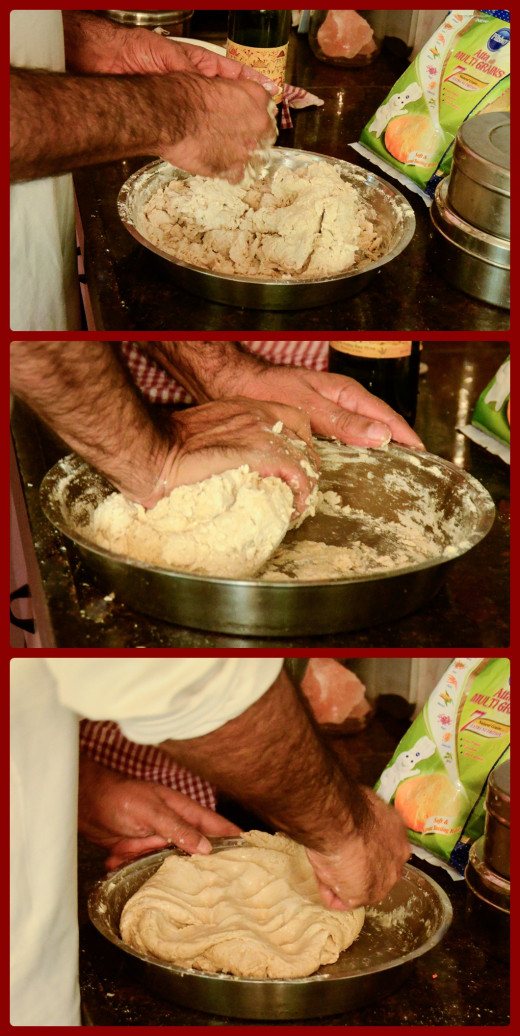
Another crucial point is the kneading. Since no raising agents are being added to Rotis you will have to trap air bubbles in your dough while kneading it. Traditionally you keep beating the dough flat with your fist, then fold it back into a lump and repeat the process over and over again. The longer and the more vigorously you knead your dough, the more likely you will end up with soft Rotis.
3. Let the dough sit
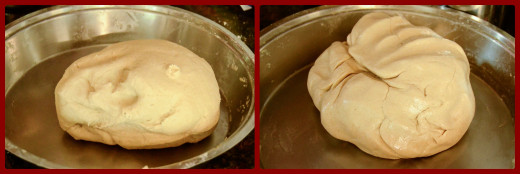
When your dough has become soft and smooth and holds as much water as it can without getting sticky you are nearly there! Now all you need to do is to let your dough sit for at least 30 minutes in a warm environment. If your surroundings are very cold you should consider leaving the dough next to a heater or even at the lowest temperature in the oven. This process is similar to letting a yeast based dough rise – the warm temperature will give your dough the time to undergo a fermentation process that helps making your Rotis light and soft. You can add a drop of oil in your palm and rub your dough ball in it to prevent it from drying on its surface during that time.

4. Divide the dough into units and roll them out
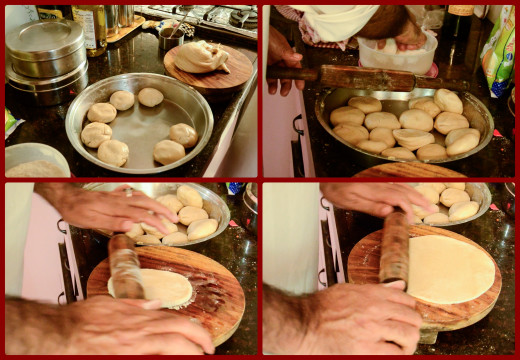

Divide your dough into even units, each about the size of a small tangerine. Once your dough is evenly distributed into small balls, pick up one and flatten it in your palm. Dunk the flat ball from both sides in a bowl with flour that you have kept aside. Now place the dough on a clean and even surface - in India everybody uses an extra wooden underplate that is extremely convenient.
Use a rolling pin and try to evenly roll out your dough into flat round breads. At this point you don't need to worry too much about the perfect shape as this is not yet the final stage of our Rotis.
5. Cut, Roll up into cone and Flatten it
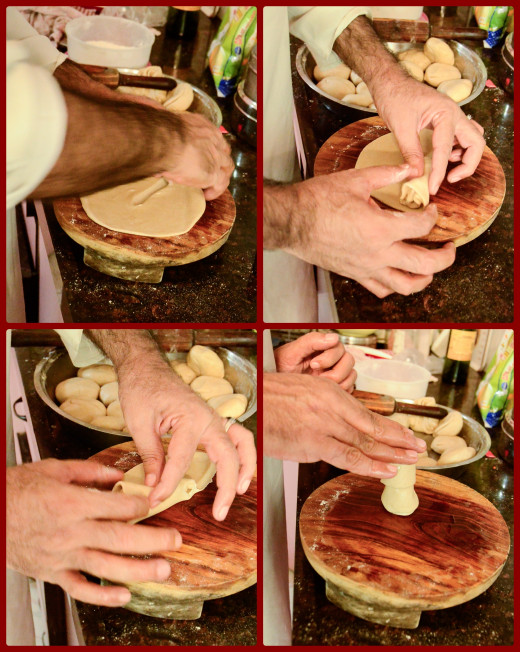
Now comes the specialty of this recipe. Add a few drops of oil on your flatbread and spread it with your fingers. Then cut the dough from the center to the perimeter with your finger and pick up the outer edge. Roll this edge inwardly and make a cone out of your chapati by going once all around the perimeter with the tip of your cone pointing towards the center. Then you set your cone with the flat side on the dish and the tip pointing upwards. Press the tip down with your flat palm. The end result should be yet another flat ball, but with the structure of a spiral.
The description might sound a bit confusing at first, but once you try it out it will be quite self-explanatory for you. Making the Rotis from this spiraled base is the secret of them becoming multi-layered and thus soft and fluffy.


Keep things ready
The baking process is fast, so keep everything ready before you heat up your pan. Keep a small bowl with some oil and a teaspoon next to you. Also have a clean kitchen cloth handy. You will keep rolling out your Rotis while you are baking them at the same time. If you prepare them in advance you will run the risk that your Rotis stick to each other or to the underground, so it is better to roll them out as you go.
6. Get ready to bake
Now the main baking process can start. Take up a dough ball, dunk it into the flour and roll it out as thinly and evenly as you can. You can also sprinkle the surface with a bit of flour to prevent your Chapati from sticking to it. The basic technique to achieve round Chapatis is that you use more pressure with your rolling pin towards the center. Like that your Roti will start spinning around its own axis while you are rolling it out. Nevertheless the shape of your Rotis will hardly influence their taste as long as you make them fairly thin, so nevermind if your Rotis have the shapes of American states.

Once your Tawa/pan is hot place your first Roti on it. Let it sit for about 30 seconds until it slightly starts browning, then flip it. You can use the baking time of your Roti to start rolling out the next one - like this you will finish the job quickly! Now sprinkle half a teaspoon of oil on your Roti and spread it with a spoon. After a few more seconds you can flip your Roti again. If your Roti now starts balloning up you have done everything just perfectly fine! Keep pressing the edges of your Roti slightly down, using a clean kitchen towel. You can also keep moving your Roti around while you do this and thus prevent it from sticking or burning on uneven spots. The heat should be fairly high, but you have to be careful as your pan will get hotter and hotter during the process so you should keep in mind that each Roti will take less time.

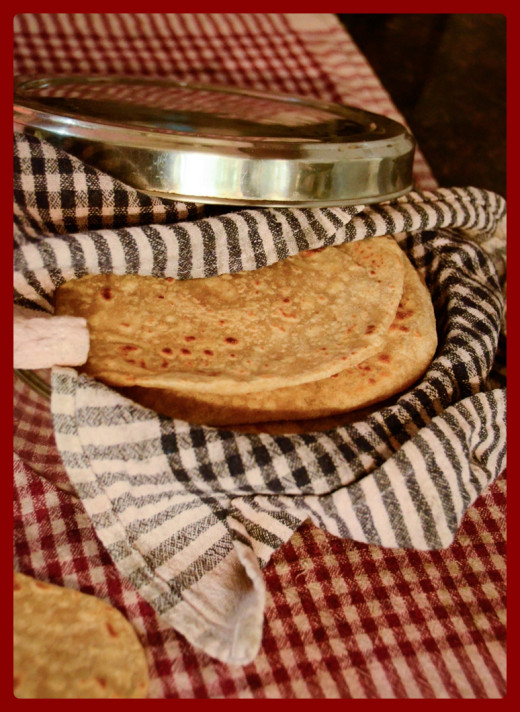
7. Keep your Rotis warm
Place a clean kitchen towel into a well-sized container and keep adding your Rotis until you have finished.
Approx. Nutrition Value
| Nutrition Facts | |
|---|---|
| Serving size: 1-2 Rotis | |
| Calories | 142 |
| Calories from Fat | 45 |
| % Daily Value * | |
| Fat 5 g | 8% |
| Saturated fat 1 g | 5% |
| Unsaturated fat 4 g | |
| Carbohydrates 22 g | 7% |
| Fiber 4 g | 16% |
| Protein 4 g | 8% |
| Cholesterol 0 mg | |
| Sodium 157 mg | 7% |
| * The Percent Daily Values are based on a 2,000 calorie diet, so your values may change depending on your calorie needs. The values here may not be 100% accurate because the recipes have not been professionally evaluated nor have they been evaluated by the U.S. FDA. | |
No one was born a master...
As mentioned earlier you might not be satisfied with your results right from the start - that is what makes Chapati making so exceptional: It is the easiest recipe and yet it seems to take forever to master the skill of the famous Indian flatbread making. My advise is to start making only small quantities to begin with and then keep adding to it.
By the way - Chapati dough can be kept in the fridge after its resting time is over and thus doesn't need to be made freshly everyday.
Once you master this skill however, you will be rewarded with a delicious, hot, fresh, soft, cheap and healthy bread with your meals that even your pets will love!
Good luck and bon apetit!


")


")