- HubPages»
- Arts and Design»
- Crafts & Handiwork»
- Textiles
Basket Weaving - How to Weave a Pet Basket

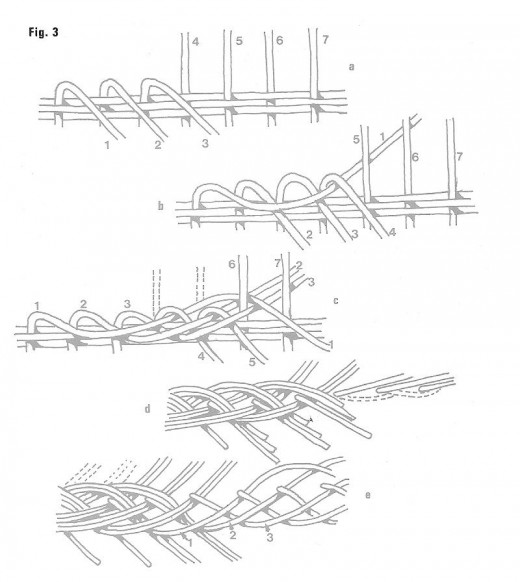
This substantial basketwork pet bed needs care and skill.
For a simpler project you could finish the basket at a lower level with a braided border all around.
If you are new to basket weaving and need additional help with the different weaves used in this article, make sure you check out my other article on
Basket Weaving - A Beginners Guide.
Have fun and I hope you enjoy making this useful household item!
Materials Needed:
- Heavy willow staking for stakes and bye-stakes
- Lightweight rods for weaving
How to Weave an Oval Base
The oval base is worked on heavy willow stakes. Work with five cross stakes, 10 inches long, slit in the middles and placed about 2 inches apart, and four long 15 inch stakes that are started off close together.
Work a round of pairing around this arrangement with your thinner weaving rod, treating the long osiers at teach end as one.
Then separate them and fan them out so that your ready to rand on all the eighteen spokes to make the oval shape. Work until you are close up to the ends of these spokes.

You will now insert thirty-six soaked, sharpened bye-stakes, one on each side of every original spoke, pushing them well in for about 3 inches or so. The length of these new stakes will vary.
The fourteen stakes that will form the front of the basket will have to cover the basic 4 inches for the actual height measurement, plus the 3 inches insertion allowance, plus another 4 inches for the foot border and another 8 inches for the braided top border.
So allow at least 19 inches altogether, and remember always to lean on the generous side as you can always clip off excess!
The stakes gradually get longer as you move around the basket, unless you are not making the hood, in which case they will all be the same length as the front section.
The eight or so at the center back will be a basic 20 inches for the height, plus 15 inches for all the extras. The other stakes will graduate between these two extremes to create the curve of the hood.
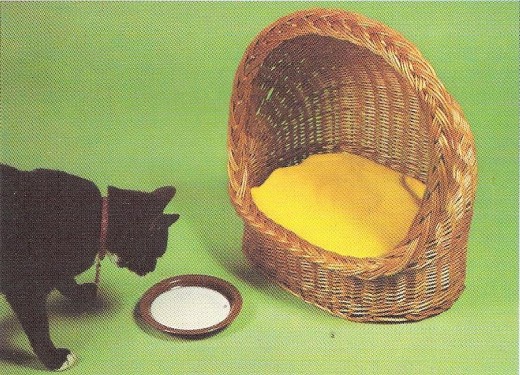
Keep these new stakes damp to make it easy to work the bottom edge. Work on a pair at a time, twist them around each other and along the edge towards the next pair and bend them up at the postions shown in Figure 1 so that they are now ready to be used as the uprights.
Treat the whole bottom edge in this way.
Work three lines of upsetting with the weaving rod to give the body firmness and strength, and then start on the basic randing. Complete twelve rows of randing. Now work one round of waling.
Here is the point where you should stop and make the braided border all around if you have settled for the smaller version of the pet basket.
If you are going on with the hood, leave the front section, tying the stakes out of the way if necessary, and work on around the back and sides
Does your pet have it's own bed?
How to Weave the Hood
Continue on in simple randing, adjusting the shape as you go. You must keep the stakes damp and bend them into the right curves.
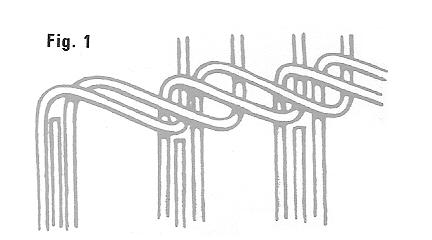
For the hood, each weaver must be separate and, because you are creating this special shape, many of them will not be worked for the full width of the sides. These will be cut off at earlier points. Figure 2 shows a close-up of the inner 'wing' where this is happening.
Weaving a Braided Border
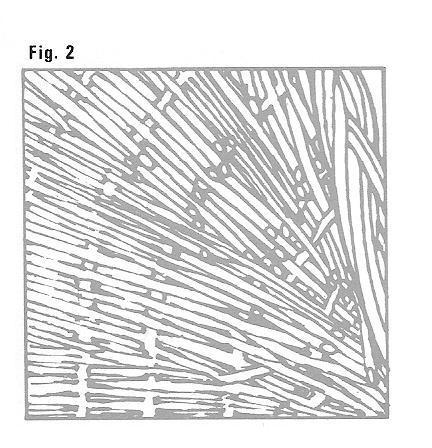
Braided borders can be difficult. Figure 3 shows a simple one, it is however slimmer than the one in the photograph.
Follow the pattern in Figure 3a, 3b and 3c. Continue by bringing stake 6 down over 3; then 6 and 1 are treated as one stake. You are now working on three rods at one side (one now being double) and two on the other.
Keep working in the same way, drawing down each succeeding upright stake as you cross it. When you reach double rods treat them as one. When you reach triple rods work on the two longer ones, dropping the shorter and eventually trimming it off.
When you have turned down the last upright stake you will be left with three sets sets of 3 rods on one side and two sets of 2 rods on the other (see figure 3d).
Figure 3e shows the join in progress. Follow through to beginning of braid with the longer of the remaining rods and tuck the ends neatly away inside with a bodkin.
Mini Muffin Basket Shows How To Do Braided Rim
You can spray paint this basket to match your décor, but using different colors of weaving material will give it an attractive color pattern.
Below is a great video I found on sewing an easy liner for your basket. This could be used in any number of ways and I am sure you will find it useful!
Thanks for stopping by & Happy Crafting!
An easy way to sew a basket liner without a pattern or without sewing tricky corners.
© 2013 Dawn