Beaded Waves Bracelet

Easy to Make Wavy Beaded Bracelet
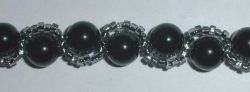
This super-easy variation of the daisy chain thread path results in curves or waves. The pattern works up quickly and easily. You can make a bracelet (shown) or omit the clasp and use smaller beads to make a ring.
Beaded Waves Bracelet Materials
Skill Level
Beginner/Intermediate
Time Required
About half an hour for a bracelet. It will take a bit longer if you extend the pattern to make an anklet or necklace.
Main Beads
I used 8-mm rainbow obsidian rounds. I like this pattern best with 6 or 8 mm rounds or coins (flattened circles). Both smooth and faceted beads are great. Cubes also yield an interesting effect. The pattern can be used with other shapes, like rectangles, triangles, stars, etc., but the curviness will be lessened. I like 4-mm rounds for rings.
Seed Beads
I used size 11 silverlined gunmetal Matsuno seed beads. Size 14/15 are also very nice, as are Delicas. Charlottes are good for added sparkle. Smaller seed beads produce smoother curves than larger beads.
Beading Thread
I used 10-lb Power Pro. Nymo works well too, but if you are using heavy beads, like my obsidian, I recommend a stronger thread and one with minimal stretch. I've seen Czech and Japanese beadwork using this threadpath with fine gauge wire. I've seen this path in Russian books using what looks like clear nylon fishing line.
Beading Needles
I used size 10 beading needles.
Scissors or Nippers
I used kiddie Fiskars.
Clasp
I used a commercial sterling clasp, but a simple bead/loop closure works nicely if you prefer to avoid metal.
Find Materials for this Project Online - Pretty Beaded Bracelet Items
You should be able to find the materials for this project at any beading or craft store. Beads, stringing material, and clasps are available online too.
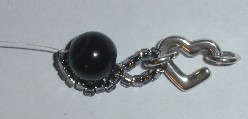
Beaded Waves Bracelet - Step 1
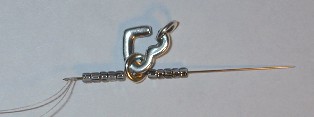
Cut at least four times more thread than your finished length. I used about a meter of thread to make this bracelet. Tension is important for this stitch, so I recommend working with one long string as opposed to adding more thread as you need it. Start by figuring out how many seed beads you will need to go around your larger beads. One way to do this is to lay seed beads out in a ring around a larger bead. Each curve will take half of this number of beads (because it goes halfway around the bead). This little exercise will give you a good idea of how many beads are needed for each curve, but the actual number of beads you use will depend on your thread tension and how close you want each curve to be to the large beads. If you use more seed beads than you need to complete a curve, then you will get an open space around the big bead. On the other hand, if you use too few seed beads to go around the big bead, then the beadwork won't lie flat! Start the bracelet (or necklace or anklet or whatever) by attaching the clasp. For my clasp, the beads were too large to fit through the clasp rings, so I strung on 5 beads, the clasp, then 5 more beads and allowed the beads and clasp to slide down to within about 6 inches (~10 cm) of the end of the thread.
Beaded Waves Bracelet - Step 2
I ran the needle back through the beads to secure them (I don't like putting knots in beadwork where multiple passes through the beads are needed, but you may prefer to knot the beads into a circle at this point.) In the photo, my working thread is the top thread. The tail thread is the bottom thread.
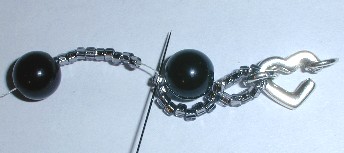
Beaded Waves Bracelet - Step 3
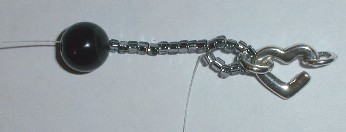
String on the number of beads need to go halfway around your larger bead (it was 9 for me) and one large bead. Allow the beads to slide down toward the clasp end. You still see my tail thread in this photo. Weave this thread into your work once it is long enough.
Video of Making a Beaded Bracelet
Here's another bracelet you can make using beads.

Beaded Waves Bracelet - Step 4
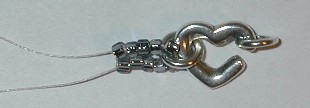
Now, run your needle through the last bead you passed through before you added the seed beads and large bead. You are making a circle, so you want to enter this bead from behind so that your needle/thread will be lined up to pass through the newer seed beads.
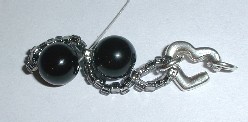
Beaded Waves Bracelet - Step 5
... and that is exactly what you do next! It's exactly like making the first thread pass in the daisy chain stitch or like the thread path used to make a spiral rope chain (except with fewer beads and just a two-sided 'spiral'). Use your needle to pass through all of the new seed beads, but not the large bead. Tighten the thread and you should see your first curve or wave. You will know whether or not you have the 'right' number of seed beads by the way they lay against the larger bead. If you count carefully, you will see that I performed the 'rip it' stitch between photographs, reducing my original number of seed beads from 10 down to 9. If you have to undo work, it's best to do it now, before you get too far along.
Beaded Waves Bracelet - Step 6
From this point, you are simply repeating the pattern. String on the number of seed beads used in the previous step, plus one large bead. Pass back through the last bead of the previous motif. Pass through all of the new seed beads (you can do the 'pass back through' all in one step).
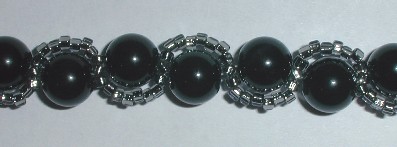
Beaded Waves Bracelet - Step 7
You'll get a natural wave shape without having to worry about manipulating the beads or stitching. Easy, right?

Beaded Waves Bracelet - Step 8
When the chain is sufficiently long, it's easy to add the other side of the clasp. I added 4 beads, the clasp, and 5 beads. Complete the loop by running the needle back through the last bead of the curve motif. Pass the thread through the clasp loop a few times to strengthen it. If desired, tie a knot and cut your thread. Again, I didn't use a knot. I actually retraced the pattern back to the other end of the clasp to reinforce the entire bracelet.
Beaded Waves Bracelet - Step 9
If you want to use this pattern to make a ring, start the ring by stringing the number of beads needed to make the curve plus a large bead. Slide the beads down toward the end of the thread. Pass the thread back through the very first seed bead and then all of the other seed beads (not the big bead). You've completed the first curve and are lined up for another motif. If you plan to continue the motif all the way around the ring to make a continuous wave, I suggest using small beads, as the pattern needs to match up when the ends of the ring meet (hard to size the ring if the beads are large). Have fun!
Learn to Make More Beaded Jewelry

Questions or comments about this beading project or lens? Here's the place for them!


