Create Super Cool Fancy Pants Style Text Effect in Photoshop

This time I am going to offer you to create funny Fancy Pants Text from scratch in Adobe Photoshop. In the process of work you’ll be firstly using Graffiti photo for Background which is from my own archive and I leave it as unrestricted stock for anyone who would like to include it in their own projects.
You will be also using many Blending Options, default Dirt Pattern, Golden Gradient and most important- Transparent Stripes Gradient in combination with red Foreground Color which will add unique touch to your Text design.
The Fancy Pants stock Font I have used is downloaded from www.fontsquirrel.com. In Step 7 you could get the link and grab the awesome Font.
This tutorial is good for Beginners level users and all Photoshop versions are applicable. Do not be afraid of the Golden gradient which is exclusive for the higher versions. I have given you its color stops so that you can prepare it yourselves.
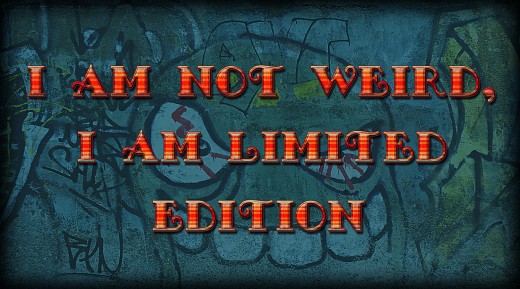
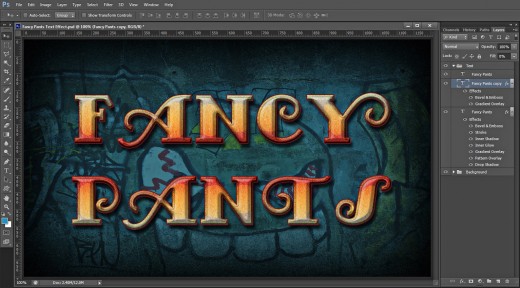
This is the final result you should get if you are disciplined, obedient and strictly following my instructions:

STEP 1
At first create a new Adobe Photoshop .psd file of 1200px Width and 700px Height. Set Resolution to 96 Pixels/Inch (if you don't intend to print the final result) and select Transparent for Background Contents so that your first layer to become editable. I have called my file Fancy Pants Text Effect after the stock Font I have chosen for this tut.
Rename also Layer 1 to Background, then press Ctrl+G to place it in a Group. Call the Group Background too.

Fill the Background with Blue Color, Create Vignette Effect and Blend the First Layer with Awesome Graffiti Texture
In Steps 2-6 you need only to colorize the first layer in Background group then you should apply Inner Shadow Layer Style in order to darken the canvas borders and to create the famous Vignette Effect.
When you are ready with the Background layer, you should Create a New Layer in Background group and Paste there my stock Graffiti Texture. You have to Transform the Photo so that it covers your canvas, then change its Blend Mode to Overlay and lower its Opacity Option.
STEP 2
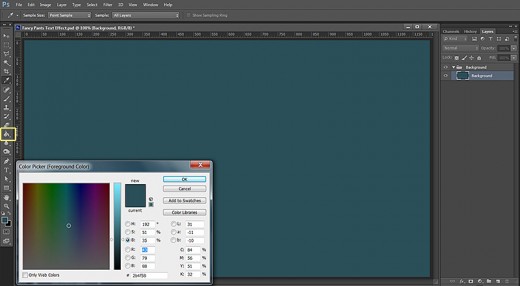
Change Foreground color to #2b4f58 and while the Background layer is selected, use Paint Bucket Tool or Edit, Fill, Foreground color option from the Menu bar to colorize the Background layer.
STEP 3
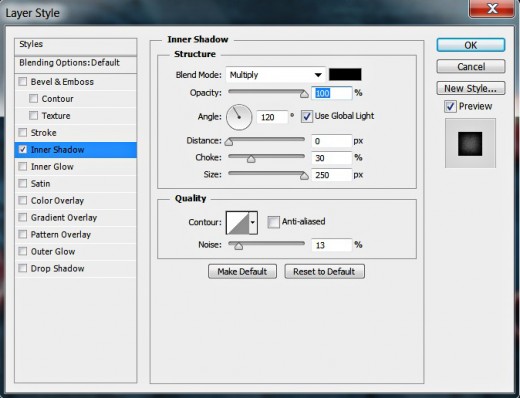
Double click on Background layer or go to Layer, Layer Style, Blending Options and tick Inner Shadow. Change its settings like this in Layer Style dialog box:
Blend Mode: Multiply
Color of Shadow: #000000
Opacity: 100%
Angle: 120 degrees
Use Global Light: ticked
Distance: 0px
Choke: 30%
Size: 250px
Contour: Linear
Anti-aliased: unchecked
Noise: 13%.
Press OK button to apply the effect and to close Layer Style dialog box.
STEP 4
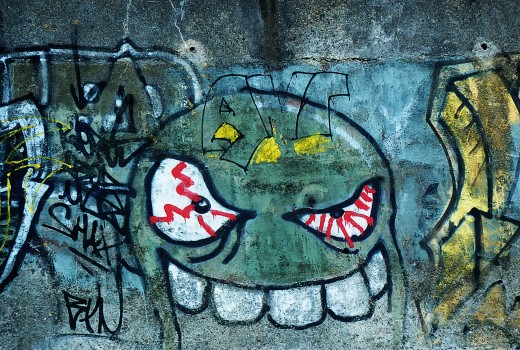
Click on the Graffiti image below in order to open it in a new window then right click and select Save Image As to save it in the respective folder on your computer.
This Graffity image is my own photo and unrestricted stock. You can use it for your own projects.
STEP 5
Create a New Layer on top of Background group and call it Graffiti. Keep this new layer highlighted.
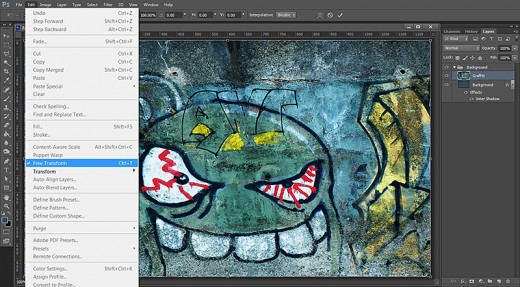
Open in Adobe Photoshop the Graffiti image which you downloaded in the previous step, press Ctrl+A to load selection then press Ctrl+C to copy it. Go back to your Fancy Pants Text Effect.psd file, and press Ctrl+V to paste the texture in Graffiti layer. As the texture is bigger than your canvas, go to Edit, Free Transform and drag the nodes vertically and horizontally in order to resize the texture to cover your canvas. Press Enter to apply the Transformation.
STEP 6
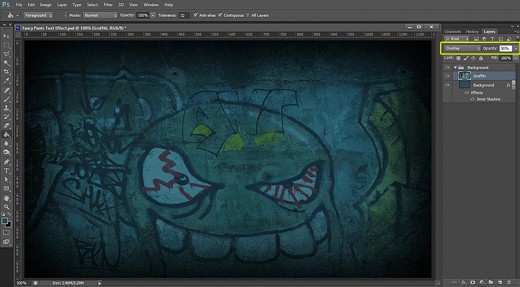
Change the Blend Mode of Graffiti layer to Overlay and reduce its Opacity to 50%.
Type Your Fancy Text and Create Two Duplicates with Reduced Fill Opacity
In the coming two steps you should download the Fancy Pants Font and type it on your canvas with pink Font Color and 150pt Size. If you are happy with the preliminary typography on your canvas, you should duplicate twice your first text layer and reduce the Fill Opacity of both upper copies to 0%.
STEP 7
Now we'll start to create our Fancy Pants Text Effect.
Big thanks to Fontsquirrel for the cool text effects which they have given us for free. Download the Fancy Pants Text Effect from here:
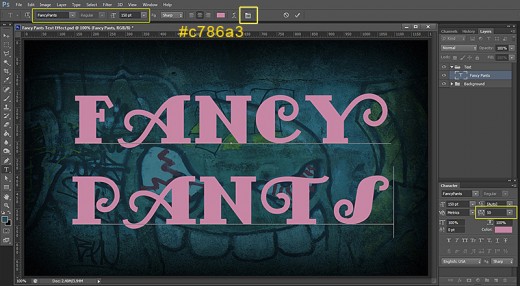
Install the font then select Horizontal Type tool from the Tools bar (or press T). From the Font Family drop down menu choose the new Fancy Pants Font. Set the Font Size to 150pt. Choose #c786a3 for Text Color then type Fancy Pants in Capital Letters as you see on the screenshot below.
After you have typed the Text, you can select it then click on Toggle the Character and Paragraph Panels icon in the Options bar and Set the Tracking for the Selected Characters to a value you like. I have left it to 50. I haven't changed the Leading too and left it to Auto by default.
Press Ctrl+G to place the Text layer in a Group. Call the newly created Group Text.
STEP 8
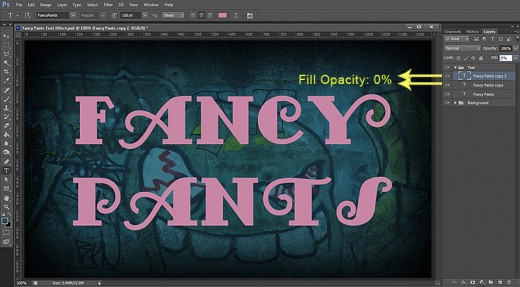
Now duplicate Fancy Pants Text layer twice and reduce Fill Opacity of both copied layers to 0%.
Add Eight Layer Styles to the Original Fancy Pants Text Layer to Create Retro Style Gradient and Noisy Colors
In Steps 9-15 you have to work hard on the original Text layer. Your task is to Shadow Effects, default Dirt Pattern to improve the Texture, vivid colored Gradient Overlay, orange Glow and thin dark red Stroke. You will finish your work on the first Text layer with applying of 3D Effect- Bevel and Emboss and Contour.
STEP 9
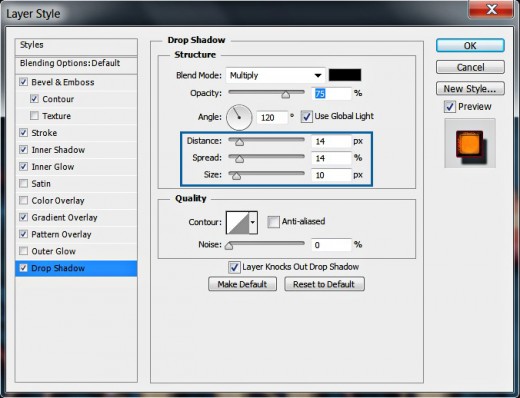
Select the original Fancy Pants Text layer, right click on it, choose Blending Options and firstly tick Drop shadow. Change its settings as follows:
Blend Mode: Multiply
Color of Shadow: #000000
Opacity: 75%
Angle: 120 degrees
Use Global Light: checked
Distance: 14px
Spread: 14%
Size: 10px
Contour: Linear
Anti-aliased: unchecked
Noise: 0%.
Layer Knocks Out Drop Shadow: checked.
Don't close Layer Style box. We have six more Blending Options to add to the original Fancy Pants Text layer.
STEP 10
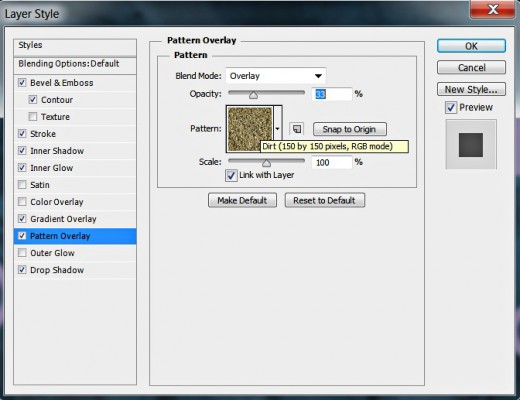
Check Pattern Overlay in Layer Style dialog box and apply the following settings:
Blend Mode: Overlay
Opacity: 33%
Pattern: Dirt (150 by 150 pixels, RGB mode)
Scale: 100%
Link with Layer: checked.
STEP 11
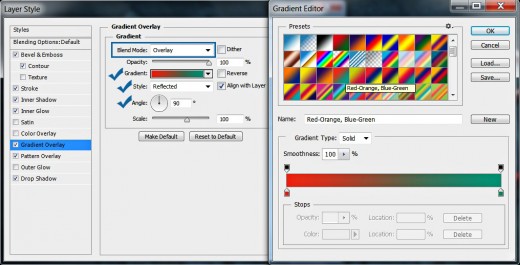
Now tick Gradient Overlay and insert these settings:
Blend Mode: Overlay
Dither: unchecked
Opacity: 100%
Select Red-Orange, Blue-Green Gradient
from the Gradient Picker.
Reverse: unchecked
Style: Reflected
Align with Layer: checked
Angle: 90 degrees
Scale: 100%.
STEP 12
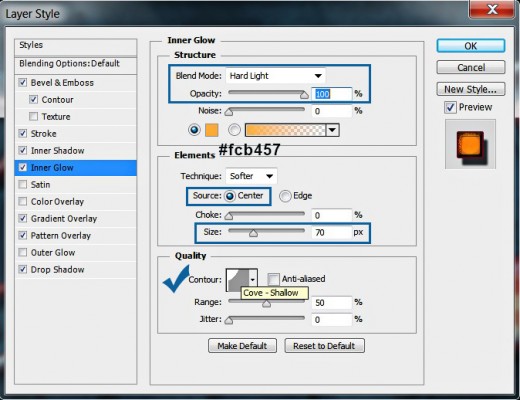
Now add Inner Glow Layer Style with these settings:
Blend Mode: Hard Light
Opacity: 100%
Noise: 0%
Color of Glow: #fcb457
Technique: Softer
Source: Center
Choke: 0%
Size: 70px
Contour: Cove-Shallow
Anti-aliased: unchecked
Range: 50%.
Jitter: 0%.
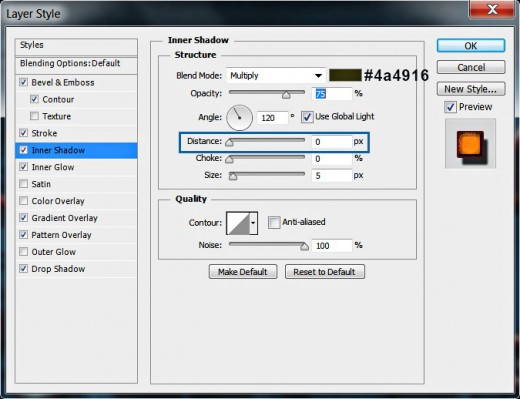
STEP 13
Now tick Inner Shadow to add dark shade:
Blend Mode: Multiply
Color of Shadow: #4a4916
Opacity: 75%
Angle: 120 degrees
Use Global Light: ticked
Distance: 0px
Choke: 0%
Size: 5px
Contour: Linear
Anti-aliased: unchecked
Noise: 100%.
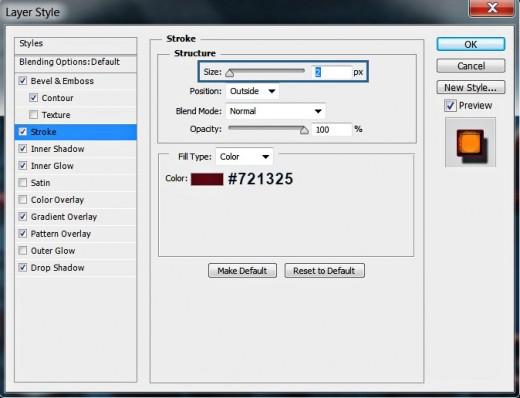
STEP 14
The next Layer Style to be added to the original Fancy Pants Text layer is Stroke. Insert these settings:
Size: 2px
Position: Outside
Blend Mode: Normal
Opacity: 100%
Fill Type: Color
Color: #721325.
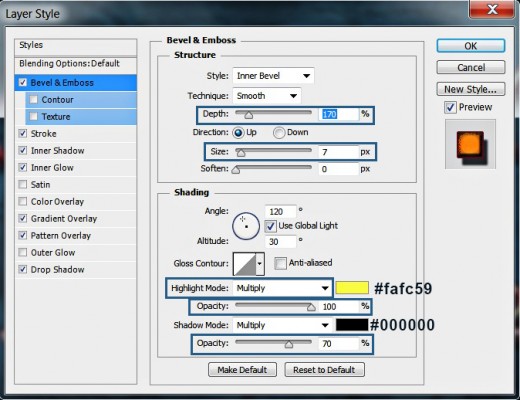
STEP 15
The next Layer Style to be added to Fancy Pants Text layer is Bevel and Emboss. Modify its settings as follows:
Style: Inner Bevel
Technique: Smooth
Depth: 170%
Direction: Up
Size: 7px
Soften: 0px
Angle: 120 degrees
Use Global Light: checked
Altitude: 30 degrees
Gloss Contour: Linear
Anti-aliased: not checked
Highlight Mode: Multiply
Color for Highlight: #fafc59
Opacity: 100%
Shadow Mode: Multiply
Color of Shadow: #000000
Opacity: 70%.
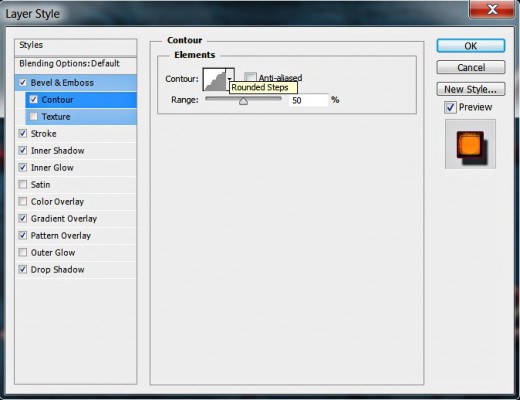
Tick Contour Layer Style which is below Bevel and Emboss and change its settings as follows:
Contour: Rounded Steps
Anti-aliased: unchecked
Range: 50%.
This is the Retro Style look you should get after adding all Blending Options to the first Text layer:
Add Three Blending Options to the First Duplicate of Fancy Pants Text
In the coming two steps you have to improve the unique look of your Fancy Text with more Blending Options. For the purpose select Fancy Pants Copy layer and apply on it Gold 1 Gradient, Bevel and Emboss and Half Round type of Contour.
STEP 16
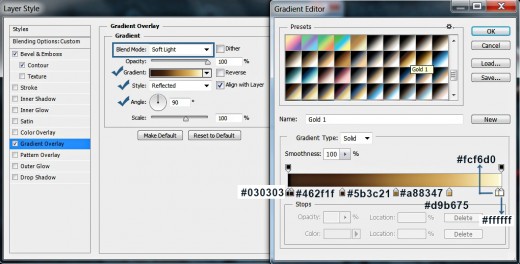
Now select Fancy Pants Copy layer, right click on it, choose Blending Options and check Gradient Overlay in Layer Style box. Change the settings like this:
Blend Mode: Soft Light
Dither: unchecked
Opacity: 100%
Select Gold 1 Gradient from the
Gradient Picker.
For those of you whose Photoshop version
doesn't have this gradient the color stops are
the following:
First Color Stop (Location 0%): #030303
Second Color Stop (Location 2%): #462f1f
Third Color Stop (Location 25%): #5b3c21
Fourth Color Stop (Location 50%): #a88347
Fifth Color Stop (Location 75%): #d9b675
Sixth Color Stop (Location 98%): #fcf6d0
Seventh Color Stop (Location 100%): #ffffff
Reverse: unchecked
Style: Reflected
Align with Layer: checked
Angle: 90 degrees
Scale: 100%.
Keep Layer Style box opened as we have to add 3D effect in the next step.
STEP 17
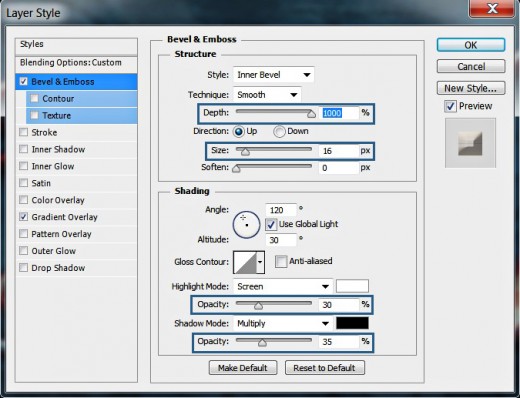
Check Bevel and Emboss Layer Style and apply these settings:
Style: Inner Bevel
Technique: Smooth
Depth: 1000%
Direction: Up
Size: 16px
Soften: 0px
Angle: 120 degrees
Use Global Light: checked
Altitude: 30 degrees
Gloss Contour: Linear
Anti-aliased: not checked
Highlight Mode: Screen
Color for Highlight: #ffffff
Opacity: 30%
Shadow Mode: Multiply
Color of Shadow: #000000
Opacity: 35%.
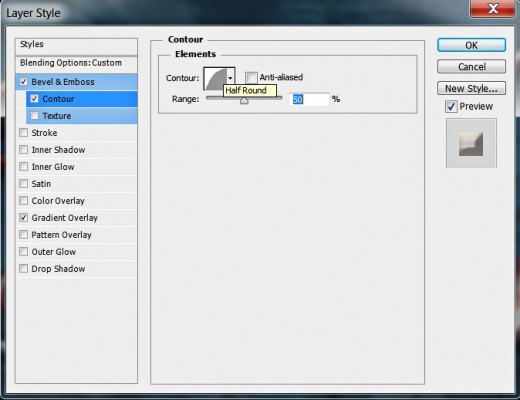
Tick also Contour Layer Style and change its settings like this:
Contour: Half Round
Anti-aliased: unchecked
Range: 50%.
Press OK button to close Layer Style box.
This is the outcome you should get so far after you have processed the first duplicated Text Layer:
Add Red Stripes to the Second Duplicate to Make Your Text Resembling Clown Pants
You will finish this funny tut with creating red stripes with the help of default Gradient Overlay. Just select the second duplicate of the Text, set your Foreground Color to deep red and apply Transparent Stripes Gradient with Soft Light Blend Mode to make it translucent and preserve the visibility of the Text contents under the stripes.
STEP 18
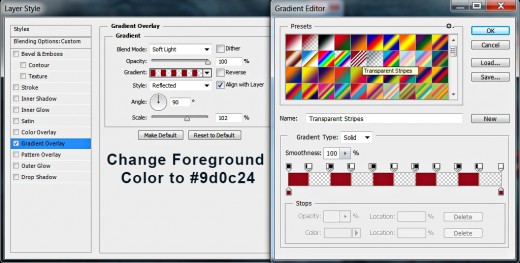
Now select Fancy Pants Copy 2 layer- the one on top of Text group. Change Foreground color to #9d0c24- the color of the Gradient we are going to use now depends on the chosen Foreground color.
Right click on Fancy Pants Copy 2 layer, select Blending Options and check Gradient Overlay in Layer Style box. Change its settings as follows:
Blend Mode: Soft Light
Dither: unchecked
Opacity: 100%
Select Transparent Stripes
from the Gradient Picker.
Reverse: unchecked
Style: Reflected
Align with Layer: checked
Angle: 90 degrees
Scale: 102%.
Press OK button to apply the Gradient and to close Layer Style dialog box.
STEP 19
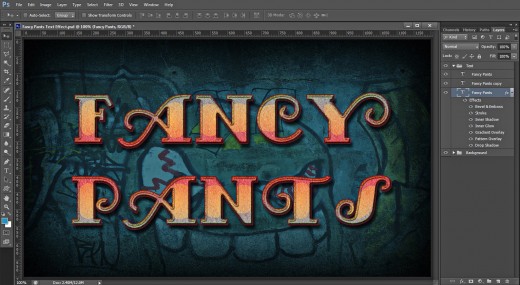
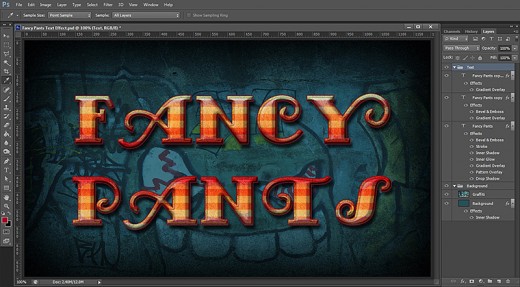
You should have the result shown on the screenshot below if you have followed all my steps in detail. To the right is Layers pane with two groups of layers:
- Background Group which contains two layers: Background and Graffiti;
- Text Group which contains three Text layers: Fancy Pants, Fancy Pants Copy and Fancy Pants Copy 2 layer.
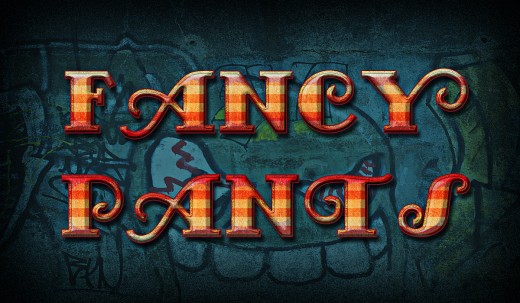
STEP 20
This is my Fancy Pants Text Effect saved in .jpg format. You should get similar income if you have followed my steps in detail.
Hope you like this short tutorial and find it useful. Good luck and have fun! :)
And this is just one simple example, i.e. my bonus from me to show you what cool slogans you could create with this type of Text Effect. :)