Get a Great Food Shot Every Time with These 5 Tips

It happens time and time again…
…you take a picture of your favorite meal (the one that took you hours to get absolutely perfect) to post for everyone to see on Instagram. In person, it looks just as amazing as it tastes. Alas, after all of your hard work, your gorgeous meal results in a lackluster snapshot that does not even begin to do it justice. If your goal is to show off your spectacular meal in all its glory, the following five tips are designed to help you do just that.
1. Shoot from a variety of angles.
Begin by looking at the dish from several different angles to determine which looks best.
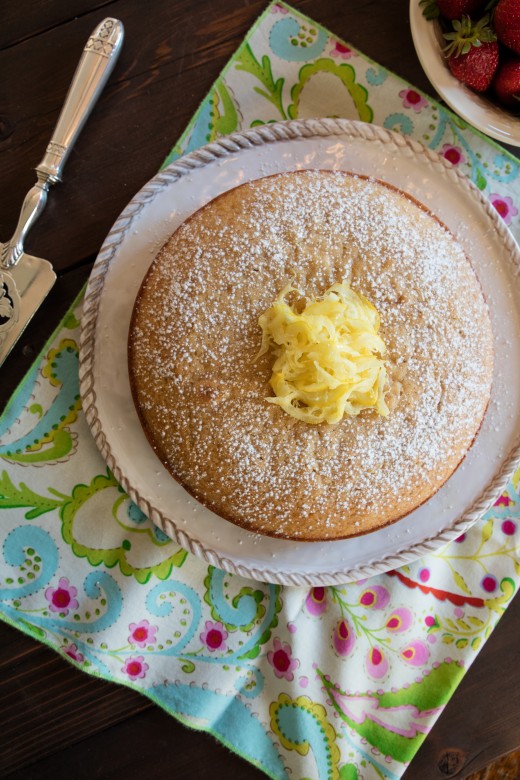
A great option is to take a photo from a bird’s eye view by standing on a ladder or chair and taking the photo from directly overhead. The overhead view works especially well with graphic heavy culinary creations, such as foods that are styled or cut in rectangles, triangles, or circles.
Another angle you may not have considered is shooting from directly at table level. Simply crouch down and click away for a shot that is both cool and unusual. As an added bonus, it gives viewers an intimate look at the food, much like it would look on their own plate at home. In addition, you can take a photo from an up close angle, which shows off all the details.
Be sure to move around the subject and try shots from various angles until you find the one that gives you the perfect photo to post. Be aware that just because one food looks amazing from a certain angle, does not mean that other foods will also photograph well from that angle. Testing different angles is going to be important every time you take a food photo.
2. Get rid of the plate:
Restaurants are fond of serving their dishes on white plates to show off their visual creativity. Unfortunately, this does not always work so well when it comes to taking photographs of food.
Deep bowls are another type of dish that tends to be tricky to photograph because they pretty much eliminate your ability to take a photograph from the side. Of course, there is no rule that says you have to put food on an actual serving dish before you start snapping shots. Yes, this may be something that you have never thought of, but you will be amazed at the difference styling the food on something other than your traditional white plate (or any other plate for that matter) can make.
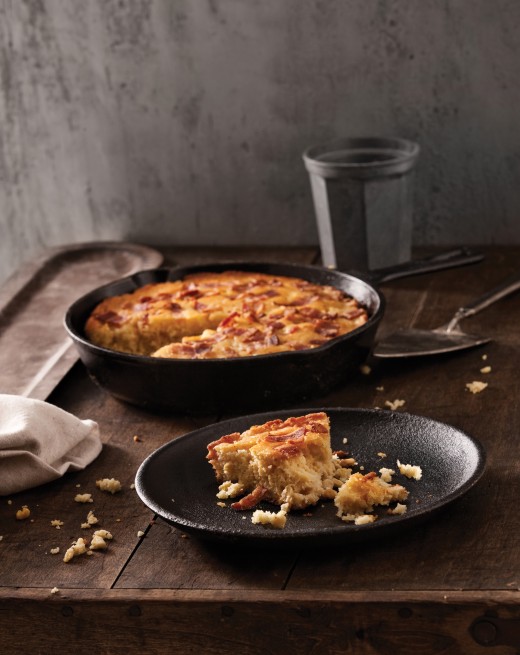
Do not be afraid to style the food on a cutting board. You can also think completely outside the box and opt for a large marble tile, a piece of black slate, or even on top of some parchment paper. Also, be sure to shoot a few shots during the preparation process, so you can show off all the work you had to do in order to create this culinary masterpiece. As an added, taking photos during the preparation phase can add interesting compositions (which is discussed in detail below) to your photography.
If you do decide to use plates, opt for smaller and shallower plates (around 7 to 9 inches) to make a sensible portion look filling and generous. It’s also worth noting that in many cases, patterned plates or any with multiple colors tend to draw attention away from the food.

3. Use ingredients as props:
Utilize simple dish ingredients as props in the background or foreground.
This is another idea you may have never considered, but it will add an interesting element to the photo, as well as liven it up. For example, let’s say you are have made a delicious spicy pumpkin soup. Place an actual whole pumpkin (or two) in the background. Not only will the pumpkin(s) add a pop of rich color, but it also offers a hint at what ingredients are used in the dish. Here’s another idea. If you just baked some yummy chocolate chip cookies, scatter a few chocolate chips in the foreground.
When choosing which ingredients to add to the photo, pay attention to color. For instance, you may have just baked a delicious cinnamon apple pie, but the bland colors of browns and tans are just boring. Why not add a bright red apple and/ or a shiny green Granny Smith apple to the background to lend it a little touch of color? It will definitely make the photo more visually appealing.
Of course, it is also worth noting that your light source can dramatically change the color/ look of both the ingredients and finished product. If at all possible, opt for natural lighting. Unfortunately, sunlight streaming through a window is something you just can’t get 24 hours a day. A way to combat this is by using lamps with different bulb wattages.

4. Hydrate when it is needed:
It’s time to learn a huge secret in the food photography industry.
It goes without saying that everyone can’t have a professional food stylist with them each time they shoot a food picture, but you can do the next best thing. It’s time to learn a huge secret in the food photography industry. Keep a small spray bottle filled with vegetable glycerin on hand. (Glycerin is simply an odorless, colorless, clear liquid that has a sweet taste…just be sure to only use a little bit to make sure the flavor of your food is not altered.) In addition to lightly misting your food, you can also use a medicine syringe to place a few drops on food or even take a paintbrush and paint it on.
Here are a couple of examples of when glycerin will come in handy.
- l If your meat looks a bit dry when photographed, a spray of glycerin will make it look juicier and more delectable.
- Seafood will look extra juicy with a touch of glycerin.
- Spray it on the outside of glasses to mimic condensation.
- You can even spray a little bit of glycerin on fruits and vegetables (remember, they look great in the foreground and background) to make them especially, shiny, clean, and fresh.
The truth is that glycerin can make even the stalest food suddenly look much more appealing, so be sure to always have some close by. Remember that a little bit of glycerin goes a long way. Don’t overdo it!

5. Always consider composition:
This is where the rule of thirds comes in handy.
One of the first rules you learn in photography is that you should never allow the subject of any photo to fall dead in the center of the frame unless there is a very good reason. Why? The answer is simple. When someone looks at a photo the brain automatically tries to discern an order or balance about it. When your subject is dead in the middle, they immediately focus on this and move right past it to the next photo. However, when the subject is slightly off balance, they will keep looking around the frame and come back to the subject several times to make sure they are not missing anything before they move on.
Instead of a center shot, try a shot with the food “bleeding” off one edge of the frame but not the other edge. You can also take a macro shot, which fills the entire frame with the subject. Another good idea is to add an appropriate prop, such as a fork or spoon, to bring a few nice angles into the frame.
Angles are also something to consider when it comes to composition. Incorporating angles into the composition of the photo adds “movement” that leads the eye to the subject. You can even crumble up a bit of the food in the photo. Don’t be afraid to be a little messy. A few crumbs can affect the composition of a shot and cause viewers to glance at the photo a little longer, while taking in all the details.
Using the tips above, you can get a gorgeous food shot every time. Then, post your picture before sitting down and enjoying your meal, while waiting on all the likes and compliments you’ll soon be getting.