ArtsAutosBooksBusinessEducationEntertainmentFamilyFashionFoodGamesGenderHealthHolidaysHomeHubPagesPersonal FinancePetsPoliticsReligionSportsTechnologyTravel

How to Draw a Realistic Face: The Basics

Updated on July 9, 2011

Drawing


Anyone can learn to draw. It is not the skill in the hands, but the skill in the eyes. Drawing the face requires honing your skills of observation. Once you know what proportions and shapes to pay attention to, your drawing skills will greatly improve. Before you go through this lesson, take a minute and sketch a face. You will want a record of your current skill level to compare it to your finished product after this lesson. My students were always amazed at how quickly they improved when they compared their before and after sketches.

The Basic Supplies

Materials

Take the time to obtain the materials that you need. It will make a difference in your finished product and you will be less frustrated during the process. You will need the following:

  • a good sketch pad
  • several drawing pencils with a variety of lead hardness; 2B and 3B are both good for general drawing; 4H and 2H are good for thin, light lines
  • hand held pencil sharpener
  • a kneaded eraser
  • tortillions
  • a handheld mirror
  • a piece of clean paper for a hand rest to protect your drawing


Materials

Tortillions, or smudge sticks are a very useful tool for drawing.
A tacklebox type art box is great for organizing and storing art supplies.

The Shape

I drew dark lines so they would show up for this picture.  Make your lines light.
I drew dark lines so they would show up for this picture. Make your lines light.
There are about 5 eye spaces across the middle of the face.  This only applies to a straight-on view.
There are about 5 eye spaces across the middle of the face. This only applies to a straight-on view.
Spaces 2 and 4 are where the eyes will be.

Start with a Shape


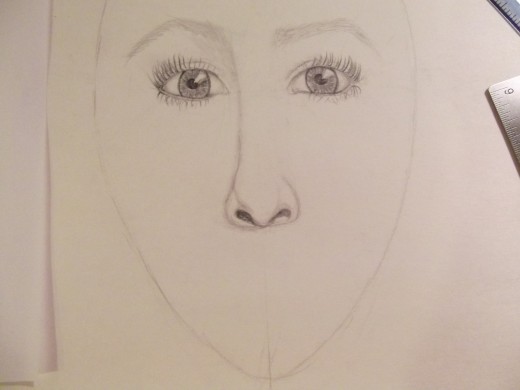
With a light touch, begin to draw the shape of the face. Think of the shape of an upside-down egg. Keep playing with the shape until it is a nice and even. Draw a light vertical line down the center of the face. Draw a light horizontal line across the middle of the face that intersects the first line.

The Eyes, Part One


The horizontal line is the space for the eyes. There are approximately five equal eye spaces across the width of the face. Divide line into five equal spaces, starting in the middle. The eyes are one eye width apart. Remember to use a light line.

Now erase spaces 1, 3, and 5. Spaces 2 and 4 will be the eyes. Draw an almond shape for each eye. Use your mirror to look at the shape of your tear duct and add that on your eye shape.

Draw the bottom eyelid. Again, take out the mirror and notice how the bottom eyelid starts in the outer corner and gets thinner toward the inner corner.

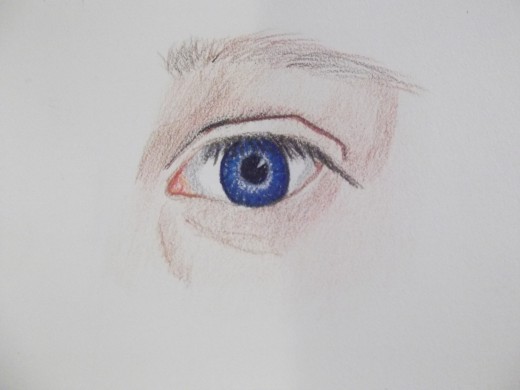
Put in the iris in each eye. Think of the iris as a ball with the top and bottom cut off. If you draw the full circle of the iris, then your person will look very surprised or very caffeinated!

As you draw the eyes, stop to compare the size and shape of both eyes.
The lower eyelid and iris.
Put in triangle shape for light reflection.
Radiating lines around the iris.

The Eyes, Part 2

Lightly add a pupil in each eye. At the top right of each pupil, draw a triangle that starts in the pupil and goes to the edge of the iris. This will be a light reflection. You can adjust the size of this later. Starting at the outside of the pupil, make radiating lines all the way around the iris. Darken the pupils, but make sure to leave the triangle space white. This will make your pupil look a little like a Pacman.

Remember to use the clean sheet of paper for a hand rest. The will prevent smudges on your portrait.

Give the eyeball form by shading the corners of the eyes. I use the tortillions for this part. Darken the line around the iris. Lightly draw in an arc for the eyelid.

Now step back and take a look. Does the light reflection area need adjusting? Does anything need adjusting?

The video demonstrates how to put in eyelashes.

Ready for eyelashes.

Eyelash Demonstrations

Eyebrows

Use a straight-edge to put in angles for the structure of the eyebrow.

Eyebrows

For the eyebrows you will want to keep in mind the gender that you are drawing. Male eyebrows tend to be heavier and closer to the eye, while female eyebrows are usually shaped, thinner and have more space between the eye and eyebrow.

Start by drawing three angles to place the eyebrow. Then put in a light line for the eyebrow shape. Using a finely sharpened pencil, place the individual hairs on the eyebrow in the direction of hair growth.

Use the straight-edge to align the nose width the corner of the eye.
Experiment with different shapes.

The Nose

About half-way between the eyes and the chin is where the bottom of the nose will be placed. Start by lightly sketching in the bottom line. Think of the line as the letter m that has been smushed flat and spread out. The flare of the nostrils should align with the inside corner of the eyes. To put in the shapes of the bulb of the nose and nostrils, use shading and not harsh lines.

The Mouth

Place the lip lines.
Get in the basic shape of the mouth and then refine it.

The Mouth

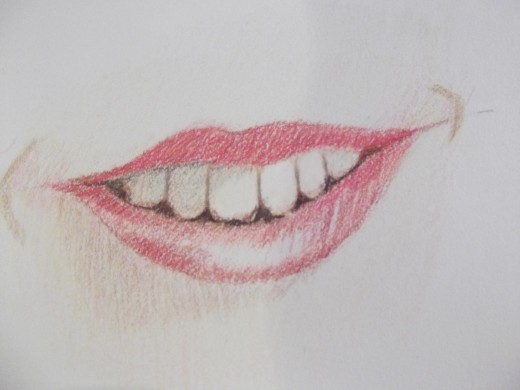
Draw in the two lines that come down from the nose to the top of the lips. The corners of the mouth will align with the center of the eyes if the face is not smiling. The lower lip will be a little thicker in the middle than the top lip. The lower lip will reflect more light, so the top lip will be slightly darker. The line for the top lip is a little longer than the bottom lip. I always start by drawing the indentation in the middle of the top lip. Once the shape is the way you like it then add shading and small lines that follow the curve of the lips.

For a mouth that is slightly open you will need to add in lines for teeth. Darken the lip lines that touch the teeth to add a shadow.

Evaluate the face and make changes as needed.  This face needs a fuller jaw and less pointed chin..
Evaluate the face and make changes as needed. This face needs a fuller jaw and less pointed chin..
I quickly put in hair to give the face a context.  My next step would be to add shading and highlights to the face structure, but that is beyond basics.
I quickly put in hair to give the face a context. My next step would be to add shading and highlights to the face structure, but that is beyond basics.

Finishing Touches

Now step back and look at the overall picture. Change and refine until it looks right to you. Depending on the hairstyle you choose, you may want to add ears. The top of the ears generally align with the eyes and the bottom of th ears are near the mouth.

I go in with a very dark pencil or black gel pen and add a dot of black in the tear ducts and add some black to the outer corner of the eyes. I darken the pupil, the black area in the mouth and nostrils. For female portraits, I will often darken the upper lash line.

While I enjoy drawing random faces to practice, I usually work from a photograph. Learning how to adjust the basic formula for proportions to a particular face takes practice. Also, with a photograph you do not need to guess about shading and form; simply follow the picture.

Compare your first sketch to the one you just completed. Do you see any improvement? Which areas would you like to improve? I would love to read comments about your experience.

Practice, Practice, Practice

Practice shading and highlights to add dimensions to your picture.

Practice, Practice, Practice

Don't be afraid to practice parts of the face separately. Drawing the face will become easier when you are comfortable with each part. Look through magazines and newspapers for interesting face pictures and practice. Once you are comfortable with the basics, you can start to experiment with highlighting and shading to give the face a more dimensional look.

Did This Help You?

Did the lesson help to improve your drawing skills?

See results
working

This website uses cookies

As a user in the EEA, your approval is needed on a few things. To provide a better website experience, hubpages.com uses cookies (and other similar technologies) and may collect, process, and share personal data. Please choose which areas of our service you consent to our doing so.

For more information on managing or withdrawing consents and how we handle data, visit our Privacy Policy at: https://corp.maven.io/privacy-policy

Show Details
Necessary
HubPages Device IDThis is used to identify particular browsers or devices when the access the service, and is used for security reasons.
LoginThis is necessary to sign in to the HubPages Service.
Google RecaptchaThis is used to prevent bots and spam. (Privacy Policy)
AkismetThis is used to detect comment spam. (Privacy Policy)
HubPages Google AnalyticsThis is used to provide data on traffic to our website, all personally identifyable data is anonymized. (Privacy Policy)
HubPages Traffic PixelThis is used to collect data on traffic to articles and other pages on our site. Unless you are signed in to a HubPages account, all personally identifiable information is anonymized.
Amazon Web ServicesThis is a cloud services platform that we used to host our service. (Privacy Policy)
CloudflareThis is a cloud CDN service that we use to efficiently deliver files required for our service to operate such as javascript, cascading style sheets, images, and videos. (Privacy Policy)
Google Hosted LibrariesJavascript software libraries such as jQuery are loaded at endpoints on the googleapis.com or gstatic.com domains, for performance and efficiency reasons. (Privacy Policy)
Features
Google Custom SearchThis is feature allows you to search the site. (Privacy Policy)
Google MapsSome articles have Google Maps embedded in them. (Privacy Policy)
Google ChartsThis is used to display charts and graphs on articles and the author center. (Privacy Policy)
Google AdSense Host APIThis service allows you to sign up for or associate a Google AdSense account with HubPages, so that you can earn money from ads on your articles. No data is shared unless you engage with this feature. (Privacy Policy)
Google YouTubeSome articles have YouTube videos embedded in them. (Privacy Policy)
VimeoSome articles have Vimeo videos embedded in them. (Privacy Policy)
PaypalThis is used for a registered author who enrolls in the HubPages Earnings program and requests to be paid via PayPal. No data is shared with Paypal unless you engage with this feature. (Privacy Policy)
Facebook LoginYou can use this to streamline signing up for, or signing in to your Hubpages account. No data is shared with Facebook unless you engage with this feature. (Privacy Policy)
MavenThis supports the Maven widget and search functionality. (Privacy Policy)
Marketing
Google AdSenseThis is an ad network. (Privacy Policy)
Google DoubleClickGoogle provides ad serving technology and runs an ad network. (Privacy Policy)
Index ExchangeThis is an ad network. (Privacy Policy)
SovrnThis is an ad network. (Privacy Policy)
Facebook AdsThis is an ad network. (Privacy Policy)
Amazon Unified Ad MarketplaceThis is an ad network. (Privacy Policy)
AppNexusThis is an ad network. (Privacy Policy)
OpenxThis is an ad network. (Privacy Policy)
Rubicon ProjectThis is an ad network. (Privacy Policy)
TripleLiftThis is an ad network. (Privacy Policy)
Say MediaWe partner with Say Media to deliver ad campaigns on our sites. (Privacy Policy)
Remarketing PixelsWe may use remarketing pixels from advertising networks such as Google AdWords, Bing Ads, and Facebook in order to advertise the HubPages Service to people that have visited our sites.
Conversion Tracking PixelsWe may use conversion tracking pixels from advertising networks such as Google AdWords, Bing Ads, and Facebook in order to identify when an advertisement has successfully resulted in the desired action, such as signing up for the HubPages Service or publishing an article on the HubPages Service.
Statistics
Author Google AnalyticsThis is used to provide traffic data and reports to the authors of articles on the HubPages Service. (Privacy Policy)
ComscoreComScore is a media measurement and analytics company providing marketing data and analytics to enterprises, media and advertising agencies, and publishers. Non-consent will result in ComScore only processing obfuscated personal data. (Privacy Policy)
Amazon Tracking PixelSome articles display amazon products as part of the Amazon Affiliate program, this pixel provides traffic statistics for those products (Privacy Policy)
ClickscoThis is a data management platform studying reader behavior (Privacy Policy)