- HubPages»
- Arts and Design»
- Crafts & Handiwork»
- Paper Creations
How to Make Your Own Wrapping Paper

Wrapping paper can be expensive and can't readily be reused – certainly not if children have torn it off! In most cases, paper with metallic surfaces cannot even be recycled.
Not surprisingly with the current financial climate and with growing awareness of green issues, many people want to find a cheaper or more eco option.
Besides, it’s fun to develop your own ideas. Children especially love to do this, and most of the ideas in this article are suitable for younger children to do with parents or teachers, or for older children to do alone.
This article covers ways of creating wrapping paper by printing or painting, with examples from each way. The ideas can easily be adapted for Christmas gifts or for birthdays or other occasions.
Wrapping paper made by print and easy painting techniques
Printing techniques
Printing is one of the easiest and most fun ways to create your own paper. This doesn’t need to be elaborate to be effective. In fact, as you can see from the examples in the photos, sometimes more is less, or less is more! Printing needn’t to be expensive either: a design using two or three colours is enough to create a striking wrapping paper.


Equipment you will need:
Paper
Brown wrapping paper and newsprint are both good for printing on. Newsprint is a blank version of the paper newspapers are made of, and you can buy in art shops or on Amazon. It is available in sheets that are a good size for wrapping paper, or in rolls. I prefer using rolls because they are easy to store. If the paper curls up again when you unroll it, just roll it the other way and it will lie much flatter.
Paint or ink
Depending which type of printing you choose you will need either poster or acrylic paint or ink.
Stamps
You can buy stamps or make your own. Some types of stamps are explained below.
Different types of printing stamps

Close up of a wooden and metal stamp.

Ready-made stamps:
Sponges
Sponges are a good way to get smaller children involved. Yes, it’s messy and yes the results aren’t perfect as far as technique goes, but as far as enthusiasm and delight goes small children’s designs are hard to beat.
Foam stamps
Foam stamps are a good next step up from sponges. As you can see in the photo there are many variations on these, from very simple to quite elaborate. You will find these in art shops, but you may also find some in Do-it-yourself stores. The fairy tale castle came from B & Q, a UK based DIY chain.The Halloween stamps came free with a children’s magazine, so it pays to take a look around!
For sponges or foam stamps you can use ordinary poster paint.
Rubber stamps
Rubber stamps are generally more detailed than either sponges for foam stamps. You will need to use an ink pad with them for the detail to show up. The rubber stamps in the photo are Christmas stamps.
Wooden stamps
Wooden stamps are the most detailed of all, and sometimes they a metal engraved printing surface. They need to be used with an ink pad.
Both rubber and wooden stamps are great for adding interest to a parcel after you have wrapped it, perhaps using the recipient’s initials for birthdays, or a Christmas design.
Making your own stamps
For making your own stamps, the simplest way I know of is:
Potato prints
Although I have seen instructions for potato printing using slices of potato, I find this to be messy and so prefer to simply cut potatoes in half. Especially if children are joining in, this gives something substantial to hold onto and you are less likely to get paint on your fingers. You can cut the potatoes along the width or length depending on your subject.
You can then use cookie cutters to cut a design or draw freehand to create your own design.
After experimenting with a variety of paints, I found acrylic paints to be the most successful when printing with potatoes.
Cutting out your design.


Instructions for preparing potatoes for printing:
- Cut the potato in half.
- Wipe it lightly with a kitchen paper towel or cloth to remove any excess moisture.
- To make a cookie cutter design:
- Push the cutter into the cut surface of the potato. You should push it no further than around 0.5 cm or ¼ of an inch.
- With a sharp knife, cut away a layer of potato to the edges of the cookie cutter. Remove the cutter.
- To make a freehand design:
- Draw the design onto the potato with a pen or score it lightly with a knife.
- Cut into the potato along the lines of your design. The cut should be approximately 0.5cm deep.
- Cut away the potato from the edges of your design, as shown in the photo.
Potato Printing in Pictures
Click thumbnail to view full-size


Instructions for printing with potatoes
- Paint a thin layer of acrylic paint onto the raised surface of your potato. (If you make it too thick the potato is liable to slide and smudge when you print.)
- Position the potato at the top of your paper and press firmly. You will probably need to reapply paint every second time you make a print, but test this out on a piece of scrap paper first as paints will vary and some may need renewing every time.
- Decide how far apart you want to make your shapes, and print a row along the top.
- Make another row of shapes below the first. How you arrange your design is up to you!
Tip: it is easier – and less messy – to work from top to bottom.
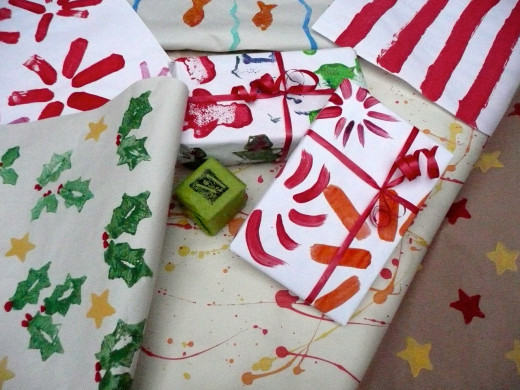
Look at the examples above right and below to get ideas for how you could arrange your designs.
- To make the holly design we printed the holly leaves in groups of 2. We added the berries with a paintbrush.
- To make the fish design we used a fish cookie cutter. The waves are off-cuts from the same potato. (That was a little bit messy.) First we printed the rows of fish, and then we added the waves, using complementary colors.
- To make the star design we first printed 4 rows of yellow stars. Next we printed the red stars, spacing them in the middle of the previous rows.
- To make the Halloween design we had fun adding a mixture of images and colors.

The dos and don'ts of splatter painting
Click thumbnail to view full-size

 join in!")


 join in!")

Easy painting techniques
Splatter technique
This is by far the fastest way to make your own wrapping paper and can be very effective too. One color takes at most 5 minutes to do, and so a three color design will take no more than 15 minutes. It can be messy though, so make sure you keep cats out of the way, unlike our one!
You will need:
- Paper
- Poster paint
- A soft bristled brush
- Old newspapers
I think it’s best to do this technique on the floor, and even better would be to do it outside. Wherever you choose to work, cover the area with old newspapers, and then lay your paper on top.
Tip: use a soft bristled brush because the paint splatters more effectively with this than with a firm brush.
- Mix poster paint with a little water so that it is slightly runnier than normal.
- Flick the paintbrush above the paper to create random splatters! If you use several colors you don’t need to wait for each to dry, but do use the lightest color first.
Depending on the colors you choose your paper could be suitable for Christmas or for birthdays.
Another easy painting idea suitable for making wrapping paper is a very simple flower design. You can see an example of this below and the instructions for doing this design are on my video article: Kids Painting Ideas and Techniques. When making this into wrapping paper, omit the seeds.
Finally, stripes are very striking! They are also easy to do: don't worry about rulers and measurements, energy and vibrancy are more than enough!
You could also try: Cheap Eco-Friendly Green Alternatives to Wrapping Paper
Some other easy ways with paint
Click thumbnail to view full-size
 stripes")

 stripes")
One final tip
You don't need to print or paint right to the edge of the paper, because the edges will be covered over once you wrap your parcels!


")

