ArtsAutosBooksBusinessEducationEntertainmentFamilyFashionFoodGamesGenderHealthHolidaysHomeHubPagesPersonal FinancePetsPoliticsReligionSportsTechnologyTravel

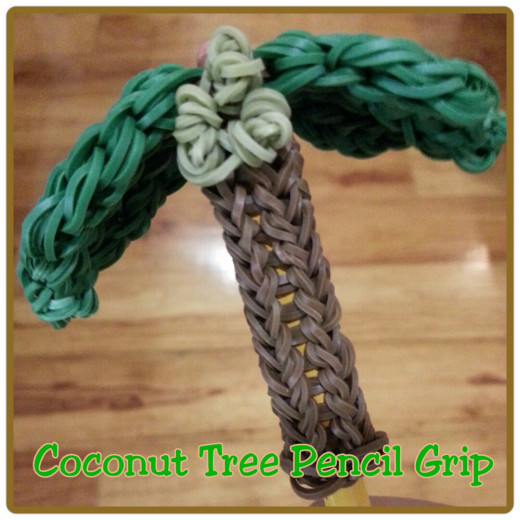
How to Make a Coconut Tree Pencil Grip Using the Rainbow Loom
Updated on August 5, 2014
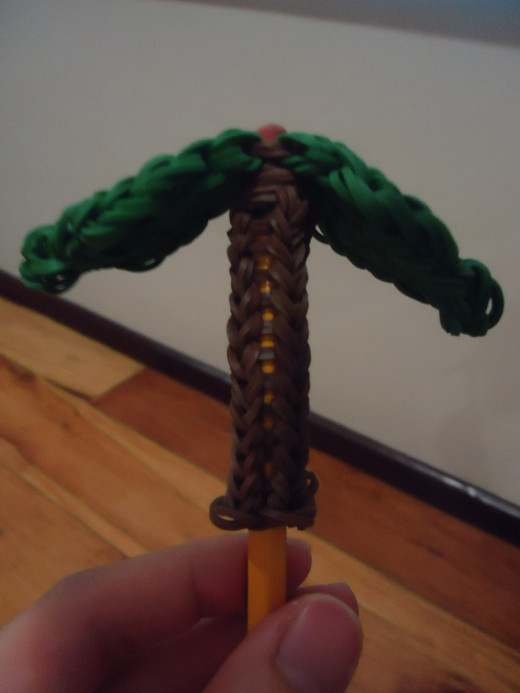
Coconut Tree Pencil Grip
Coconut Tree Pencil Grip | Source

I actually entered this design in a Facebook contest for pencil grips a while back, and saw a request to make a tutorial for it. I got inspired from a photo I saw on Pinterest for a Flower Tree Pencil Grip with flowers as the top and a brown pencil grip to represent the tree trunk. To make my own original design, I decided to make a Coconut Tree Pencil Grip, since coconut trees are abundant here in the Philippines and I had one right outside my window while I was making the tree.

This hub is a tutorial on how to make a Coconut Tree Pencil Grip. It is an original design using several ideas from YouTube and combining it together to make this pencil grip. You can also change the fruit if you want to make a different tree, since there are fruits available now from Made by Mommy that are off the loom and small enough to serve as your tree's fruits.

Materials

  • Rainbow Loom (or any other loom);
  • Hook (the one that comes with your loom or a crochet hook);
  • Rubber Band Colors: Brown, 2 Shades of Green (one dark, one light);
  • Total Rubber Bands Needed: 60+ (trunk) + 134 (2 leaves with 66 bands per leaf) + # of coconuts = 194++; and
  • Pencil or Pen to Hold Your Design.

How to Make a Coconut Tree Pencil Grip

Step 1: Make the Trunk

Make a Pencil Grip in Brown to represent the trunk of the tree. You can choose any pattern you want so long as you use the color Brown. I used the Brown from the Pink Camouflage pack from Rainbow Loom for this tutorial. I used the Rainbow Loom Pencil Grip from TheParentingChannel for my trunk, with the link down below:

You can choose to make the trunk as short or as long as you want, depending on the number of bands you have available on hand. I stopped at 15 rows since I just wanted to decorate my pen and not actually feel the bands while writing. Make sure to place the last row of the grip near the end (eraser part on a pencil) so the first row can serve as the base of the tree.

Here is what your tree should look like so far:
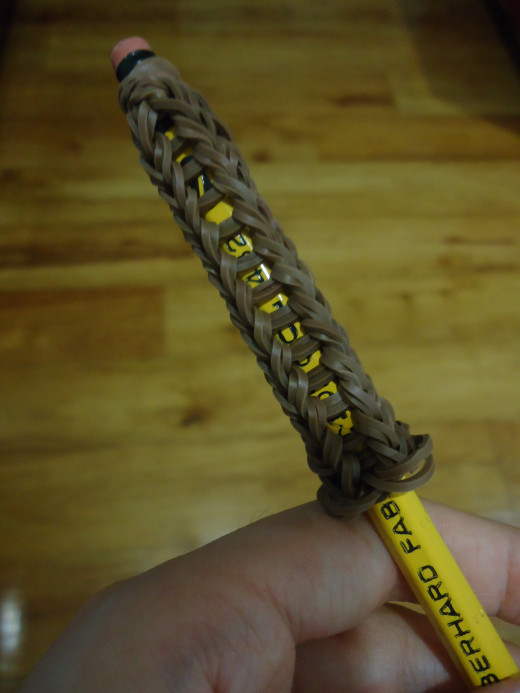
Coconut Tree Trunk with 15 Rows.
Coconut Tree Trunk with 15 Rows. | Source

Step 2: Make the Leaves

Make 2 Leaves in dark green. There are a lot more leaf patterns available on YouTube now than when I first made this project, so you have the option of using your favorite leaf pattern. But for this tutorial, I used Lovely Lovebird Designs' Rainbow Loom Big Leaf Charm. She actually used the leaves for her mobile, but for our purposes, we will just be adding a regular cap band at the end of the leaf. This cap band is going to be inserted into the pencil once we have finished all the leaves. Here is a link to her tutorial:

After making one leaf, use the same cap band you used on your second leaf to make sure that they are connected. You have the option to make as many leaves as you want on that same cap band. Originally, I made 3 leaves for this tree, but I found it too heavy to be of practical use, so I reduced it to 2. Here are some photos for this step:

Click thumbnail to view full-size
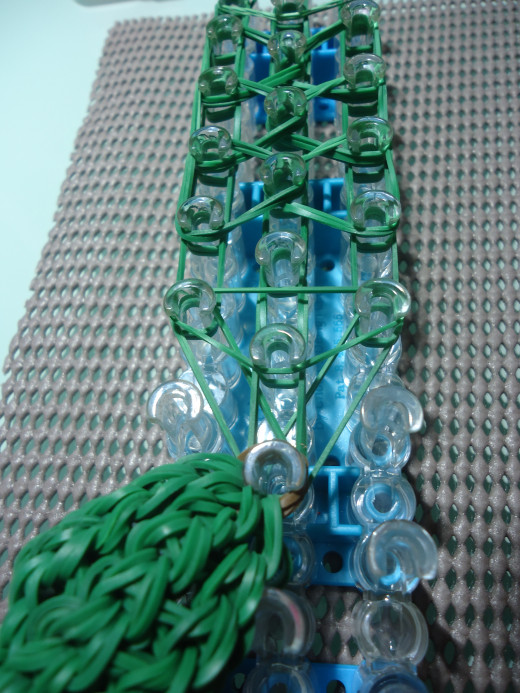
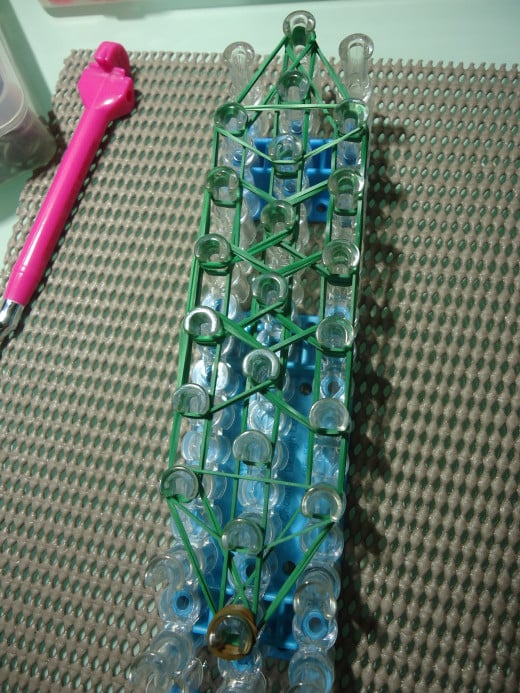
Here is what the loom should look like after laying out the bands as stated in the video. I used a brown cap band to make it blend in with the trunk once placed on the pencil.When you are making the second leaf, make sure to use the same cap band as the first leaf to ensure that both leaves are connected.Here is what the tree should look like now after inserting the cap bands on top of the trunk.
Here is what the loom should look like after laying out the bands as stated in the video. I used a brown cap band to make it blend in with the trunk once placed on the pencil.
Here is what the loom should look like after laying out the bands as stated in the video. I used a brown cap band to make it blend in with the trunk once placed on the pencil. | Source
When you are making the second leaf, make sure to use the same cap band as the first leaf to ensure that both leaves are connected.
When you are making the second leaf, make sure to use the same cap band as the first leaf to ensure that both leaves are connected. | Source
Here is what the tree should look like now after inserting the cap bands on top of the trunk.
Here is what the tree should look like now after inserting the cap bands on top of the trunk. | Source

Step 3: Add Coconuts

Since coconut trees can either have few or many coconuts at a time, you have the option to add as few or as many coconuts as you want. Just keep in mind that the coconuts should be near the leaves, so the space is limited. Here are the instructions for making them:

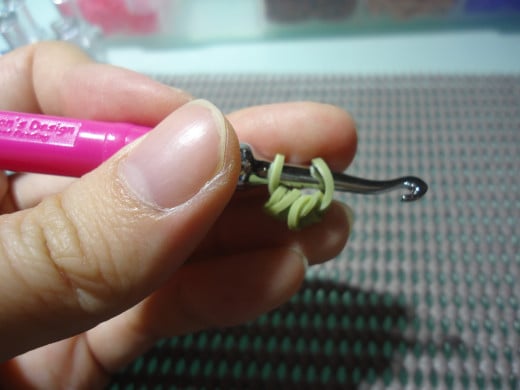
  • Twist 2 bands on the hook 4 times (you now have 2 coconuts on your hook) and pull a band through the fruits. Let go of the other end before going to the next step.
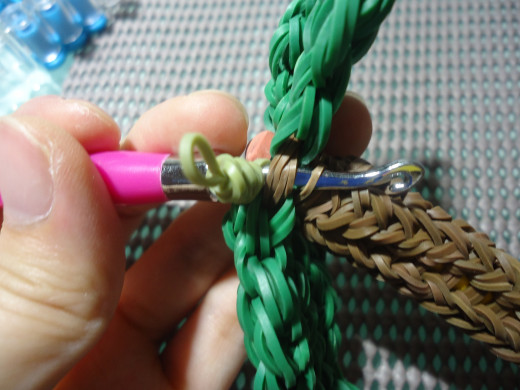
  • Insert your hook through any part of the trunk and the leaves' cap band and pull the band through the trunk to form a slip knot.
  • Repeat the steps to make more coconuts. You can hide the loose ends when adding more coconuts by inserting your hook through a part of the trunk and the loose ends before forming a new slip knot.

Here are some photos for this process:

Click thumbnail to view full-size
Coconuts on the hook before placing on the pencil grip.Insert your hook through the leaves' cap band as well as the trunk to join the two parts together.Pull the second loop through the first loop to form a slip knot, thus securing your coconut in place.When adding more coconuts, insert your hook through a loose end to hide them from plain sight. Continue making the slip knot as before. There are also other ways to hide them, so just do whatever method feels comfortable to you.
Coconuts on the hook before placing on the pencil grip.
Coconuts on the hook before placing on the pencil grip. | Source
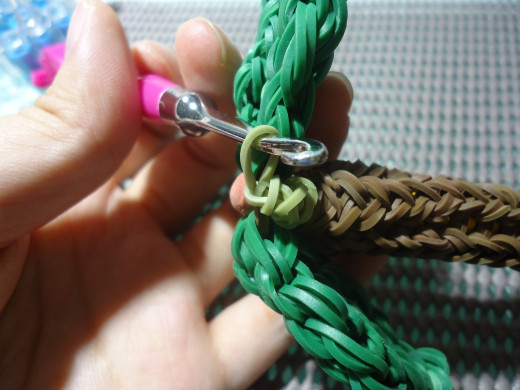
Insert your hook through the leaves' cap band as well as the trunk to join the two parts together.
Insert your hook through the leaves' cap band as well as the trunk to join the two parts together. | Source
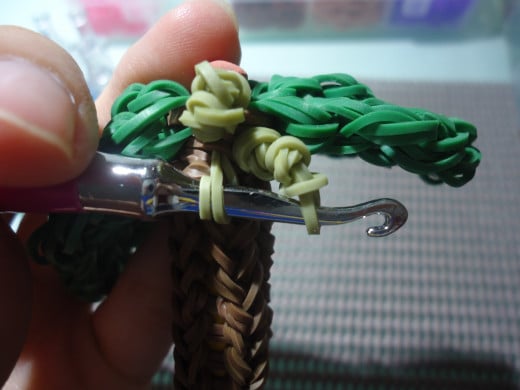
Pull the second loop through the first loop to form a slip knot, thus securing your coconut in place.
Pull the second loop through the first loop to form a slip knot, thus securing your coconut in place. | Source
When adding more coconuts, insert your hook through a loose end to hide them from plain sight. Continue making the slip knot as before. There are also other ways to hide them, so just do whatever method feels comfortable to you.
When adding more coconuts, insert your hook through a loose end to hide them from plain sight. Continue making the slip knot as before. There are also other ways to hide them, so just do whatever method feels comfortable to you. | Source

How to Make a Variation of the Coconut Tree

To make other fruit trees, just replace the coconuts with other fruits you want to use. I originally wanted to make a banana tree (since bananas also grow on trees), but there were no tutorials available then on how to make tiny bananas for the pencil grip tree. Now, Made by Mommy has come up with loomless fruits that you can also use for your Fruit Tree Pencil Grips. Here is a link to the loomless banana:

Use your imagination and create your own Fruit Salad Tree Pencil Grip by using different fruits and tying them via slip knots to the trunk. Have fun creating your own Coconut Tree Pencil Grip.

working

This website uses cookies

As a user in the EEA, your approval is needed on a few things. To provide a better website experience, hubpages.com uses cookies (and other similar technologies) and may collect, process, and share personal data. Please choose which areas of our service you consent to our doing so.

For more information on managing or withdrawing consents and how we handle data, visit our Privacy Policy at: https://corp.maven.io/privacy-policy

Show Details
Necessary
HubPages Device IDThis is used to identify particular browsers or devices when the access the service, and is used for security reasons.
LoginThis is necessary to sign in to the HubPages Service.
Google RecaptchaThis is used to prevent bots and spam. (Privacy Policy)
AkismetThis is used to detect comment spam. (Privacy Policy)
HubPages Google AnalyticsThis is used to provide data on traffic to our website, all personally identifyable data is anonymized. (Privacy Policy)
HubPages Traffic PixelThis is used to collect data on traffic to articles and other pages on our site. Unless you are signed in to a HubPages account, all personally identifiable information is anonymized.
Amazon Web ServicesThis is a cloud services platform that we used to host our service. (Privacy Policy)
CloudflareThis is a cloud CDN service that we use to efficiently deliver files required for our service to operate such as javascript, cascading style sheets, images, and videos. (Privacy Policy)
Google Hosted LibrariesJavascript software libraries such as jQuery are loaded at endpoints on the googleapis.com or gstatic.com domains, for performance and efficiency reasons. (Privacy Policy)
Features
Google Custom SearchThis is feature allows you to search the site. (Privacy Policy)
Google MapsSome articles have Google Maps embedded in them. (Privacy Policy)
Google ChartsThis is used to display charts and graphs on articles and the author center. (Privacy Policy)
Google AdSense Host APIThis service allows you to sign up for or associate a Google AdSense account with HubPages, so that you can earn money from ads on your articles. No data is shared unless you engage with this feature. (Privacy Policy)
Google YouTubeSome articles have YouTube videos embedded in them. (Privacy Policy)
VimeoSome articles have Vimeo videos embedded in them. (Privacy Policy)
PaypalThis is used for a registered author who enrolls in the HubPages Earnings program and requests to be paid via PayPal. No data is shared with Paypal unless you engage with this feature. (Privacy Policy)
Facebook LoginYou can use this to streamline signing up for, or signing in to your Hubpages account. No data is shared with Facebook unless you engage with this feature. (Privacy Policy)
MavenThis supports the Maven widget and search functionality. (Privacy Policy)
Marketing
Google AdSenseThis is an ad network. (Privacy Policy)
Google DoubleClickGoogle provides ad serving technology and runs an ad network. (Privacy Policy)
Index ExchangeThis is an ad network. (Privacy Policy)
SovrnThis is an ad network. (Privacy Policy)
Facebook AdsThis is an ad network. (Privacy Policy)
Amazon Unified Ad MarketplaceThis is an ad network. (Privacy Policy)
AppNexusThis is an ad network. (Privacy Policy)
OpenxThis is an ad network. (Privacy Policy)
Rubicon ProjectThis is an ad network. (Privacy Policy)
TripleLiftThis is an ad network. (Privacy Policy)
Say MediaWe partner with Say Media to deliver ad campaigns on our sites. (Privacy Policy)
Remarketing PixelsWe may use remarketing pixels from advertising networks such as Google AdWords, Bing Ads, and Facebook in order to advertise the HubPages Service to people that have visited our sites.
Conversion Tracking PixelsWe may use conversion tracking pixels from advertising networks such as Google AdWords, Bing Ads, and Facebook in order to identify when an advertisement has successfully resulted in the desired action, such as signing up for the HubPages Service or publishing an article on the HubPages Service.
Statistics
Author Google AnalyticsThis is used to provide traffic data and reports to the authors of articles on the HubPages Service. (Privacy Policy)
ComscoreComScore is a media measurement and analytics company providing marketing data and analytics to enterprises, media and advertising agencies, and publishers. Non-consent will result in ComScore only processing obfuscated personal data. (Privacy Policy)
Amazon Tracking PixelSome articles display amazon products as part of the Amazon Affiliate program, this pixel provides traffic statistics for those products (Privacy Policy)
ClickscoThis is a data management platform studying reader behavior (Privacy Policy)