- HubPages»
- Arts and Design»
- Drawing»
- Drawing Tutorials
Portrait Drawing for the Ultimate Beginner: Ears

Drawing the Ears
The overall shape of the ear is an oval/ellipse. Drawing the ear may be a bit challenging to some because of its many intricate parts, but with patience & persistence you can master the ear just as the other features. In this lesson we will focus on the front, side, & back views of the ear.

Take a moment to study and examine the ear before proceeding with the next portion of the lesson.
Below is a drawing of the front view of the ear. Take your time with this lesson & study the shapes.
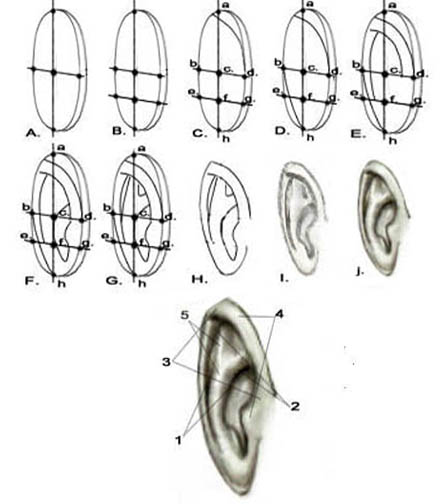
A. Start with drawing an oblong oval. Make the oval look slightly tilted by adding an extra curve close to the edge. It should resemble chip. Begin drawing your guidelines (half & half). The guidelines should also be tilted. Draw the points where indicated (these are very important).
B. Next, draw another guideline (with points) midway between the 1st horizontal line & the bottom of the oval.
C. Letter each of the points as indicated in the example. Draw a sharp curve from point d. to a little beyond point a.
D. Draw another slight curve from point b. to point h.
E. Now here is the challenge. Bear with me. Draw a slight curve starting between points c. & d., slightly pass the center vertical line (follow the same path as the curve in step C.) From the top of the curve you’ve just drawn, draw another slight curve to the line between e. & f.
F. Draw a letter C curve from between points c. & d. and f. & g. From there, make a loop down then upward against the center vertical line pass the center point also resembling a letter C, just larger.
G. Next, draw a L curve against the curve you drew in step E. Last, but not least, draw a slight curve right next to the second curve drawn in step E.
behind the L curve you’ve just drawn.
H. Whew! That was fun, right? Again, if you didn’t get it this time around it’s okay, just keep practicing. Now this step’s easy. Just erase all the points and guidelines.
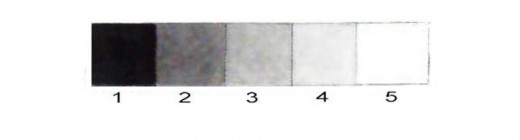
I. Shade in the tones of light & dark as indicated in the example.
J. Start blending & lifting tones where suitable.
Below is a drawing of the side view of the ear. This one is very similar to the one above. The only difference is the angle of the ear.
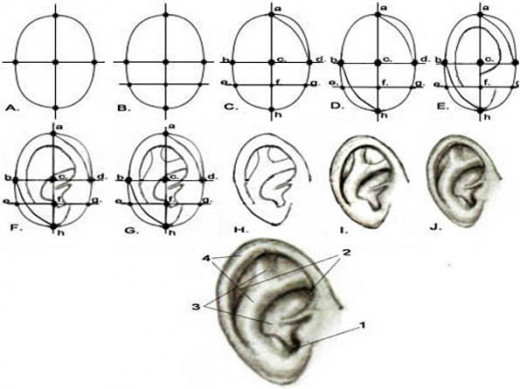
A. Start with drawing an oval. Begin drawing your guidelines; just as above in the last segment, draw points where indicated.
B. Next, draw another guideline (with points) midway between the horizontal line and the bottom of the oval.
C. Next, letter each of the points as indicated in the example. Draw a sharp curve from point d. to point a.
D. Draw another slight curve from point b. to point h.
E. Draw a slight curve starting between points c. & f., pass the center vertical line to between points e. & f., but closer to point e.
F. Starting from the space between points c. and f., closer to c., draw a line like the one shown in the example. This line is the concha. There is no specific formula to drawing this portion of the ear so it doesn’t have to be perfect. Really study the ear. This will be the key to improving your drawing skills of the ear.
G. Next, draw the remaining curves of the anti-helix.
H. Now erase all the points and guidelines.
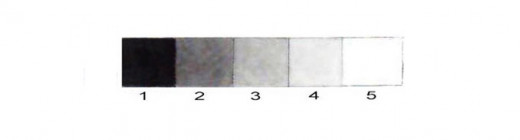
I. Shade in the tones of light & dark as indicated.
J. Start blending & lifting tones.
In the last part of the lesson we well draw the back of the ear. This one is not as challenging as the previous two. Let’s get started.


A. Start drawing a trapezoid, sideways.
B. Next, draw a rectangle through the trapezoid.
C. Erase the line from the rectangle inside the trapezoid.
D. Begin to round the edge of the trapezoid and draw a wavy shape inside the rectangle. It should resemble a pie.
E. Erase the guidelines then continue drawing the back of the ear. Now draw the cartilage extended from the ear.
F. Shade in the tones of light & dark
G. Start blending & smoothing.
♦ Key Points to Remember
-The front view of the ear starts with a tilted oval (think of a chip).- Think of a bowl or a pie when drawing the back of the ear, sideways.
-The ear has many intricate parts; study them, the more you do the easier it will be to draw.
- Have patience
- Don’t be hard on yourself & have fun!
- Keep practicing!


