How To Make A Cheap Recycled Kids Art Journal


A Cheap Recycled Art Journal For Kids (Or Yourself!)
I don't know about your kids, but my four year old has a love for creating things. We go through so many art and craft supplies here it's not funny, and that's with just one creative little kid.
Trying to keep up with the supplies was really starting to hit the hip pocket and I found myself looking for more economical options. Homemade glue and paint provided a couple of solutions but we were still going through paper and scrapbooks at an alarming rate.
Problem solved! He now has a super new recycled art journal to create in and it cost me well under $3 to put together. Better still - we can add and remove pages as much as we like :)
Read on for details on how to create your own art journal - it's super simple!

What Started All This
The last thing I wanted to do was stifle my son's creative endeavours, however in an effort to avoid buying yet more paper and scrapbooks for him to draw, cut, glue and collage on I started collecting suitable paper otherwise destined for the recycle bin. This included unwanted printer paper, flyers with blank backs and so forth. I'd just throw them in a box where he could grab what he needed.
One day he was busy with his paints and was having a few issues with the paper not being thick enough to hold the wet paint properly. Looking around for some suitable heavier material I noticed two frozen pizza boxes in the recycling bin. Cutting them down on the guillotine provided two square pieces of cardboard to paint on. It was a hit, so recycled cardboard boxes began being added to the box of craft paper.
The recycled paper and card system was working, but it did create a bit of an unorganised mess and our house was becoming cluttered with finished artwork.
I'd just picked up some binder rings to help keep archived pages from my Filofax organised and an idea struck me ... why not use the binder rings to hold his artwork together?
A little further thought and the idea to create a recycled art journal came about.
Step 1 - Get Your Tools Together

You don't need many tools for this project:
- Scissors, paper trimmer or guillotine to trim your paper or card. Scissors are really all you need for this, however I find the guillotine is brilliant when cutting cardboard.
- Holepunch - needs to punch a hole a little larger than the thickness of your binder rings. And yes, I found this out the hard way ;-)
- Binder rings - you'll need at least two. I purchased mine on eBay for around 30 cents each. They come in different sizes. The ones I've used here have an inner diameter of 39mm. Use a smaller ring if you'd like a thinner journal.
Step 2 - Collect Materials For Pages

You can use just about anything you like for your journal pages. For ours we collected a heap of empty boxes, used printer paper, old envelopes, old book pages, flyers, magazine pages and some scrapbook pages to add colour.
Step 3 - Trim Materials To Size

Use scissors, a paper trimmer or a guillotine to trim your materials to the size you want. We went with a totally random collection of page sizes and two larger pieces of card (cut from frozen pizza boxes) for the covers.
To trim your boxes, open them up and trim the top and bottom flaps off first. Then cut along each fold. Some boxes will yeild four good pieces of card, others with thinner sides will yield two. I also like to discard or trim any piece with glue, marks or tears. As our art journal is made up of all sizes and shapes of paper it doesn't really matter how you trim them.


Step 4 - Punch Your Holes

You'll need to work out where you want your holes to go. This will mostly likely be determined by the size of your smallest page. In the case of our journal, the blue envelopes were the smallest pieces so we started with them.
Punch your holes in the first page and then use this page as a template to mark where the holes need to go on the other pages. As long as the holes are the same distance apart it doesn't really matter how high or low you place them on the page. We tried to keep all of ours centred, but you could also come up with a cool staggered effect by starting at the top and moving down a little on each page.


Step 5 - Bind Your Pages

This is the fun part - threading your pages onto the binder rings. They can go in any order you can imagine! We mixed ours up quite a bit so that we had small pages and envelopes popping up between larger pages. We also added in some patterned scrapbook paper for a bit of colour.
Step 6 - All Finished!
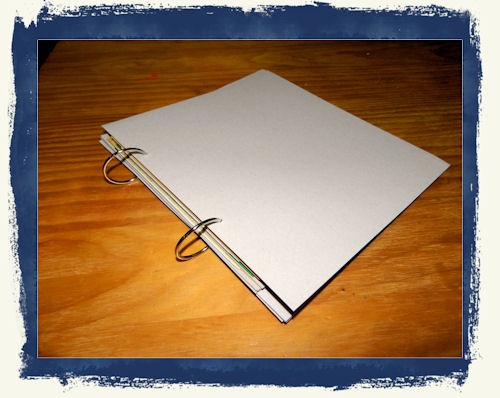
Time to admire your handiwork :) Although it doesn't have to finish here - the binder rings mean you can always add or change pages.
Those lovely blank covers you can see were the sides of the frozen pizza boxes. My son's just itching to decorate his front cover with a drawing!


Total Costs

This was a seriously cheap project. The only items I really spent any money on were the binder rings. These came in a pack of 10 on eBay for around $3, so it cost 60 cents for the two used in this project.
I already had the tools required for the project (scissors and holepunch), and the guillotine was not an essential requirement. If you didn't have these tools already, scissors and a holepunch can usually be picked up in the stationery section of your local store for a few dollars.
The small amount of scrapbook paper and envelopes we used would have cost less than $2 all up. We used clean envelopes, however these could easily have been carefully opened used ones (I will definitely do this next time - the postmarks and stamps will add extra interest to the journal!) All other materials were pulled from the recycle bin.
Total project materials cost (erring on the generous side): $2.60.
Bargain :)
New Pages We've Added To The Art Journal
Once we started looking at our recycling box a little differently, the ideas for new pages for the art journal just kept coming. The following photos show a few of the pages we've added.
Map Page

My son loves maps, so I knew we had to add a map page or two.
This page was created from a map we got at the local tourist information centre. We gave it a little accordion fold and added a washi tape tab to pull it out with. We also added some tape to the back to reinforce the punched holes.

Recycled Plastic Pocket

This pocket is made from the coloured plastic that came wrapped around a bunch of flowers.
We cut the plastic down to size, folded it and then used washi tape to tape up two edges. We also used an extra strip of washi tape on the spine to reinforce the punched holes.
Not Sure What To Put In Your New Art Journal?


This Lady Had The Same Genius Idea
I googled for further ideas on making this kind of art journal and came across this video on YouTube.
This lady had almost exactly the same idea and made a couple of cool junk journals from cereal boxes! Her journals differ from ours a little in that they have a uniform page material and size, plus she uses a drill to punch the holes all in one go.
There's just so many different ways you could do this project, and so many different styles of book you could create.
Here's another way to make an art journal
This video shows how to make a quick and easy art journal by stitching signatures (groups of pages) into a cover. It's much easier than it sounds - take a look!
I'd love to hear what kinds of recycled crafts others do, or any suggestions for other materials we could use as pages in our art journal.
© 2013 unstucktheory


