How to work with dried clay

Steps to attach clay pieces to one main sculpture or to attach two pieces of clay together
This article goes through the basic steps on how to join two pieces of clay together. This is either to join wet pieces of clay to semi-wet areas of a sculpture, or to join two hard pieces of clay together. It's a "sculpture 101" article for those sculpting for the first time.
Materials:
1. Spatula and small container
I haven't included clay in the list of materials you need to have to sculpt but clay is indeed the most important material you need to embark in this project! Asides the obvious (clay), you will need a plastic spatula either from your sculpting kit or a solid plastic spoon from the kitchen. Clay is a nontoxic material so any spoons, knives or forks can still be used in your kitchen after you've used them in your studio! You can also use bowls and cups from your kitchen for your projects. They make great mixing containers!
2. Slur--what it is and how to make it:
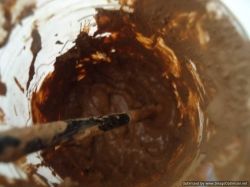
This step is for those who have never made slur for their sculptures. Slur is a sticky clay substance used as "glue" in sculpting. It bonds two pieces of clay together by removing air from the "joints." To make slur you need dry clay, a spatula, and water.
These are the steps to make slur:
1. Collect pieces of dry clay (of the type you are using the make your sculpture).
2. Crash all the pieces of dry clay with a spatula or a sculpting tool. Crash until clay turn to dust.
3. Add enough water to make a substance similar to chocolate mousse. Your slur is done!
3. Kitchen towels and plastic wrapper paper
Kitchen towels are important to damp your sculpture or maintain your sculpture wet during its making process. You can substitute kitchen towels for sponges but I find kitchen towels absorb and maintain more water for a longer time. The plastic wrapper is necessary to trap the moist given off by the kitchen towel inside the clay or sculpture.

5 easy steps to join two pieces of clay together or add a piece of clay to a whole sculpture:
1. Wet the area
These are the steps to joint to pieces of WET clay together (wet clay is elastic and soft to work with):
--Wet the ends of each piece of clay with water either using your fingers or a wet sponge.
--Press both pieces firmly until they become one unit.
To join two pieces of semi-dry clay is a bit trickier. If you try to join a wet piece of clay to a hard piece you will find the pieces will come apart, either when you let your sculpture dry or when you bake your sculpture. The first thing you need to do to join a wet piece of clay to a dry one is to score the endings. Scoring is Continue to step 2 to join wet to dry clay pieces or dry to dry clay pieces.

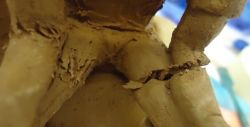
2. Score the pieces of clay you want to join.
Scoring, is a term used to describe the notion of "scratching" a piece of clay in order to join that piece with another part of your sculpture. Using a knife, spatula, or any other utensil, score grooves into the clay. Ideally, you need to cross the grooves for better adhesion.

3. Add slip to the pieces
Spread slip over the grooved pieces with a brush or with your fingers.

4. Join pieces together
Firmly press each piece together. This step is very important. If you don't press and put enough pressure in the joint you will end up with air pockets inside the joint and sculpture. Air pockets can lead to breakage. Breakage occurs when you fire your sculpture in the oven. This is so because the air trapped in your sculpture ruptures its way out of the clay.

5. Smooth the area
Remove excess slip and smooth area with your fingers or spatula. Remember to wrap the area with a wet clothe and plastic wrapper. If the area is left uncovered, the clay will dry up quicker than its surrounding areas, making your sculpture unstable--wet with dry joints will start separating!
Sculpting equipment:
This is a list of sculpting tools, from very basic to professional equipment.


Please feel free to share tricks or ways to work with clay. Your help is valuable!


")


