How To Replace Worn Brake Pads On Your Vehicle

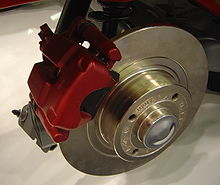
Front Disc Brake And Rotor Assembly

Front Disc Brake Pads

I am not a mechanic and do not claim to be one either. I do have a friend however who does not have to pretend to be a mechanic, and on the other hand has a god given talent when it comes to fixing just about anything. Anything that is, which is comprised of a conglomeration of nuts, bolts and other parts; that appear to operate under the influence, of some mechanical or other moving parts. I think you know by now where this story is heading, particularly if you own either an old or brand new automobile.
Before getting into his work, I couldn't help asking my buddy why he wanted to replace his brakes himself? He said with grin on his face as he shook his head and simply said-" I really don't feel like forking $150.00 or more out of my pocket if I don't have to?" And you know something, I had to tend to agree with him. Basically because of the fact that if you know how to do it yourself and can save a good amount, than why not tackle the job yourself.
When it comes to any kind of repairs on your car the tab may tend to get a bit expensive and in todays current economy; we all want to be a bit more frugal in whatever areas we can. Usually I like to educate my readers about topics which can assist them with medical topics and the sciences. However writing a Do-it-yourself piece is just as valuable in more ways than one, especially if it is going to save us all a few dollars out of pocket. Vehicle repairs are probably one of the most pricey mechanical repairs that we will experience sooner or later..
Worn vehicle parts like front disc brake pads is a good place to start.. This article is intended to share some of those previous learned tricks and tips, with you my readers, on how to replace your old brake pads. So sit back and fasten your seat belts as we take a ride and explore in more detail, one of the many parts of your automobile, the front disc brake pads. But before you begin this venture, it is always a good idea first to consult with a good friend first who is mechanically inclined, like the one I had mentioned in the beginning of this article.
On the other hand, If you are confident enough that you possess some mechanical ability - than by all means, go ahead and take a crack at it yourself. Try removing those old brake pads and reinstall the new ones. But remember before doing so, if you end up making a few costly mistakes along the way-in the long run, it just may cost you more to have your vehicle repaired, than it originally would have, if you were to have a local garage replace your brakes for you.
So where do you begin you may be asking? First of all you will need a few basic tools to start and finish the job. Most of us, especially us men may have the following tools that are needed. A ratchet wrench, preferably with a variety of sockets. Your sockets should include metric as well as the basic standard assortment. This is because most of the newer vehicles today do contain metric bolt and nut combinations.
Throw in a few open end wrenchs along with your socket wrench, maybe a good pair of pliers, a C-clamp, definitely a 2 ton hydraulic floor jack and yes, don't forget the elastic or rubber gloves and cardboard. Cardboard or a similar piece of material will prove useful, particularly when you are either laying or kneeling on the ground. I found this out the hard way when I watched a friend change front disc brakes on his 2008 Nissan Sentra.
After about ten minutes of kneeling on some crushed stones watching out of sheer curiosity as my buddy tackled this job. I got up with shorts on and found a nice assortment of different stones and rocks wedged into my knees. My knees looked like a geological display and yes-Ouchhh!! in more ways than one. So even if it is 90 degrees outdoors, make sure you don an old pair of jeans, before kneeling next to any vehicle for any reason, particularly if it is not on a paved surface. And believe me you will need those rubber gloves, because if you do not want to go through a couple of of lava soap bars, the gloves will prove more in there weight of gold. Working on any part of your car is not going to be a clean project. Expect to get very dirty and greasy and if you are a clean freak, than doing this type of work isn't for you, even if it will save you a few bucks.
Once you have the tools at hand, start with either the left front, or right front wheel. It doesn't matter. Just make sure that the emergency brake is engaged, and your steering wheel is turned all the way to one side. This will make it easier to gain access to the brake pads once they are exposed to you. After you have jacked one side of your vehicle up and have removed the lug nuts and corresponding tire, you will see a large circular object. This large cylindrical or circular object, is your rotor. Near the front of the rotor, you will see two brake pads, one pad facing you and the other pad on the opposite side or behind the rotor.
At times a mechanic will on occasion have to resurface your rotors, because you pads have been worn too thin. And when this happens and you depress your brakes, the pads metal surface is grinding into the rotors, basically because there is no ceramic padding left on the original pads. This you want to prevent, because new rotors can cost approximately $300.00 a piece. Something to keep in mind for the future. But for now lets not worry about it in this article. Next take your C-clamp as you are facing the exposed rotor and old brake pads. Close or fasten the clamp between the back pad and rotor, so yo can take your socket and take off the two bolts that hold the front facing pad off. There usually only two bolts that hold each brake pad onto your brake assembly. Two bolts on the facing pad and two on the backside. Once you have removed both of these pads, reverse the process and replace with the two new pads.
Brake pads come in fours, just in case you get confused. Two brake pads for one side of the car, and two for the opposite side or wheel. Replacement brake pads for your auto can be purchased for about $25.00 for the set, four in a box. This is an average price for most mid-sized cars. However I was told that purchasing these parts from a dealer online is just as reliable. Also when the time comes and you get the hang of the replacing your front brakes. You can think about going ahead and replacing the rear brakes, also called rear drum pads, or linings. These usually do not need replacing as often as your front brakes. The reason being is that the front brakes take the brunt of all of the braking during normal highway stops. Replacing front and rear brakes, may seem like a rather simple process, to many, but it is still far from the relatively simple process, of changing your cars oil for example. And than again for many, this too can be somewhat difficult to tackle and complete successfully.
One of the most popular sites is www.rockauto.com Also when you purchase brake pads online, try to go with Ray Bestos brand-these tend to be an all around good quality. When purchasing brake pads, try to make sure that they are the original ones made for your car. These will usually be ceramic, but the older semi-metallic pads are still used and also preferred by many. In addition, another thing to keep in mind, even if one side of your brake pads appears to be worn moreso than the other. It is a good rule of thumb to replace both sides, regardless of how thick or thin they look compared to the other side. Once you have finally removed the old and noticeably thin brake pads and put on the new ones. Put your tire back on with lug nuts, lower your vehicle and make sure the lug nuts are securely tightened. Repeat the process for the other side of your vehicle and than your ready to roll on down the highway.


")


