I wanted to do something different to my new ZX-14, without spending a lot of cash and would have more bang for the buck. I decided on stretching it out. I saw other bikes online, and it seemed to make a big difference in it's stance. The back tire was not all compacted into the rear of the bike.
Installing the swingarm extension kit on my 2009 Kawasaki ZX-14 was not that bad of a project. As in any bike or auto project, having the right tools, and patient is a key in the job turning out right.
The bike looks totally different with the 9" stretch, and handles the same. Actually it feels more comfortable and safer.
Difficulty Rating: 4 (1-10 scale, 10 the most difficult)
Tools Needed:
Front and Rear Motorcycle Stands
Motorcycle Lift or an auto floor jack, like used for autos
Metric sockets, wrenches, allen sets, etc. 32mm socket for axel nut.
Indian Motorcycle Online Portal - GeorgiaBagger.com Indian Motorcycle Portal for Product Reviews, Motorcycle Events, Indian Motorcycle Forum,Indian motorcycle classifieds, Indian Motorcycle Service Manuals, Indian motorcycle history, Indian Motorcycle Riders Group Registry,Indian Motorcycle News
Steps:
Remove Belly Pan.
Remove Chain Guard.
Lift and support your Kawasaki ZX-14 with front and rear stands.
Remove brake line from rear brake caliper. Make sure you do not get fluid on bike.
Remove brake caliper from brake hanger.
Remove rear axle nut with 32mm socket.
Axle should slide out with ease. You should not have to beat axle to remove. Support Tire with 2x4 or something so that wheel just does not drop.
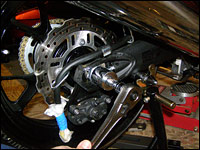
Slide brake hanger off while tire is being dropped and removed. Remove chain from around sprocket, and just let hang for now.
At this point the zx-14 rear tire is removed, rear brake line disconnected and hanging. Chain is also hanging.
Install new zx-14 swingarm extensions, tighten all the way, one side at a time. You should be able to distinguish the right side (brake) to the left side (chain). The right side should have a location for the brake hanger to adjust on.
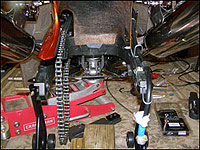
After both sides are tight to manufacturing specifications, Place some axle grease on the axle and slide it through the new extension chain adjuster block.
The axle should slide with ease. Once The Axel and tire are in place slide the tire back, with the chain adjust blocks moving, leaving about 3/4" - 1" for room to adjust the chain. You do not want the blocks up against rear of the extensions with no room to adjust. Tighten down the axel bolt a little to help maintain the position of the tire. (I just hand tighten it)
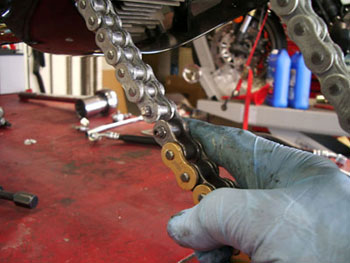
Once the tire and brake caliper and brake hanger are in place, cut the old chain by grinding down the edge of the rivets on one link. After they are grind down, use the chain braker tool to remove both rivets, followed by the link itself.
Install new master link connecting the top of the old chain to the new chain. Pull the bottom of the old chain, which leads the new chain around the top and front sprocket. .
Once the new chain is in place around the front sprocket, remove the old chain.
After the new chain is in place and aligned around the front and rear sprocket with 3/4" - 1" space from the adjuster blocks and the rear of the extension, cut the new chain. and install the new master link.
Adjust the rear tire to tighten the chain to manufacture specifications. You want to ensure both sides are equal in adjustment. Use the tick marks on the extensions as a guide, and also use a tape measure ensuring the same distance and in square. A way to check square, measure from center pivot arm bolt to center axle bolt. Also check your owners manual for chain slack.
Spin and rotate the tire by hand and from behind the bike, visually looking at the tire and spin to ensure alignment and no scrubbing.
Torq/tighten the rear axle bolt to manufacture specifications, install a new cotter pin.
Remove the old brake line completely, and install the new brake line and bleed the rear brakes.
You are done! Install belly pan and chain guard. lower the bike.
As a user in the EEA, your approval is needed on a few things. To provide a better website experience, hubpages.com uses cookies (and other similar technologies) and may collect, process, and share personal data. Please choose which areas of our service you consent to our doing so.
This is used to provide data on traffic to our website, all personally identifyable data is anonymized. (Privacy Policy)
HubPages Traffic Pixel
This is used to collect data on traffic to articles and other pages on our site. Unless you are signed in to a HubPages account, all personally identifiable information is anonymized.
Amazon Web Services
This is a cloud services platform that we used to host our service. (Privacy Policy)
Cloudflare
This is a cloud CDN service that we use to efficiently deliver files required for our service to operate such as javascript, cascading style sheets, images, and videos. (Privacy Policy)
Google Hosted Libraries
Javascript software libraries such as jQuery are loaded at endpoints on the googleapis.com or gstatic.com domains, for performance and efficiency reasons. (Privacy Policy)
Features
Google Custom Search
This is feature allows you to search the site. (Privacy Policy)
Google Maps
Some articles have Google Maps embedded in them. (Privacy Policy)
Google Charts
This is used to display charts and graphs on articles and the author center. (Privacy Policy)
Google AdSense Host API
This service allows you to sign up for or associate a Google AdSense account with HubPages, so that you can earn money from ads on your articles. No data is shared unless you engage with this feature. (Privacy Policy)
Google YouTube
Some articles have YouTube videos embedded in them. (Privacy Policy)
Vimeo
Some articles have Vimeo videos embedded in them. (Privacy Policy)
Paypal
This is used for a registered author who enrolls in the HubPages Earnings program and requests to be paid via PayPal. No data is shared with Paypal unless you engage with this feature. (Privacy Policy)
Facebook Login
You can use this to streamline signing up for, or signing in to your Hubpages account. No data is shared with Facebook unless you engage with this feature. (Privacy Policy)
Maven
This supports the Maven widget and search functionality. (Privacy Policy)
We partner with Say Media to deliver ad campaigns on our sites. (Privacy Policy)
Remarketing Pixels
We may use remarketing pixels from advertising networks such as Google AdWords, Bing Ads, and Facebook in order to advertise the HubPages Service to people that have visited our sites.
Conversion Tracking Pixels
We may use conversion tracking pixels from advertising networks such as Google AdWords, Bing Ads, and Facebook in order to identify when an advertisement has successfully resulted in the desired action, such as signing up for the HubPages Service or publishing an article on the HubPages Service.
Statistics
Author Google Analytics
This is used to provide traffic data and reports to the authors of articles on the HubPages Service. (Privacy Policy)
Comscore
ComScore is a media measurement and analytics company providing marketing data and analytics to enterprises, media and advertising agencies, and publishers. Non-consent will result in ComScore only processing obfuscated personal data. (Privacy Policy)
Amazon Tracking Pixel
Some articles display amazon products as part of the Amazon Affiliate program, this pixel provides traffic statistics for those products (Privacy Policy)
Clicksco
This is a data management platform studying reader behavior (Privacy Policy)