Fascinating Polar Lights, Mirages, Sun Dogs, Halos, Diamond Dust, Auroras And What Causes Them?

Some of the neatest things about the polar regions have to do with light. For example, the North and South Poles experience 24 hours of light or darkness for months at a time. Imagine not knowing if it was morning or night unless you looked at a clock! How does this happen?

Tilt In The Earth's Axis
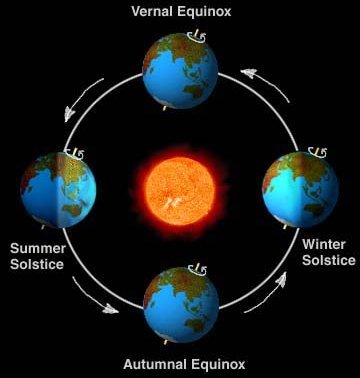
Like the other planets in our solar system, the earth travels around the sun, and spins on its axis. The earth’s axis isn’t perfectly straight up and down, though. It tilts a bit. So the poles are tilted toward or away from the sun during certain parts of the year.
Because the poles are on opposite ends of the earth, this means that when the North Pole and Arctic Circle are tilted toward the sun, the South Pole and Antarctic Circle are tilted away from the sun.

Winter Solstice and Summer Solstice
On December 21, the Northern Hemisphere has its winter solstice. This means that the North Pole is as far away from the sun as it can get. In the Northern Hemisphere, it is the day with the least amount of sunlight, but the Arctic Circle is so far north that the sun doesn’t reach it at all. This is winter in the Northern Hemisphere and summer in the Southern Hemisphere.
By June 21, the Northern Hemisphere’s summer solstice, the situation is reversed. The Antarctic Circle is dark and experiencing winter while the Arctic Circle is bright and enjoying summer.

Midnight Sun and Polar Night
During the Arctic’s summer, the sun moves down towards the horizon, but never sets. The result is what’s called the midnight sun. During this time, the sky has a constant, soft glow and colorful bands of light (like those in sunrises and sunsets) streak across the horizon. The same thing happens in the Antarctic during its summer.
When one polar region is experiencing the midnight sun, the other is experiencing what’s known as polar night. Polar night is when the sun stays below the horizon and there is constant darkness or dusk.
The poles don’t always experience either all sunlight or all darkness. As the earth spins and travels around the sun, different amounts of sunlight hit the polar regions. For instance, one day in winter the North Pole may have no light and then the next day, there will be a small period of time when there is sun. That means spring and summer are coming! Meanwhile, in the Antarctic Circle, the amount of darkness is increasing day by day.

The Equinoxes
Is there a time when the sun is shining on both poles equally?
Yes. This happens during the equinoxes. The equinoxes occur around March 20 and September 21. These are the days of the year when the sun is directly over the equator.The equator is the imaginary line that circles the middle of the earth and divides the Northern and Southern Hemispheres. On these days, the amount of sunlight and darkness (or day and night) are of equal length everywhere on Earth.

White Nights
Areas near the Arctic and Antarctic Circles experience white nights. This happens around the summer solstice when the sun stays at the horizon or a little below it. During this time, there is enough light to be outside and do normal activities during the night.
Some places that experience white nights celebrate the time. In St. Petersburg, Russia, for example, white nights happen around the time from June 11 through July 2 and are marked with a huge arts festival.
Mirage - what causes it?
White nights, polar nights, and midnight suns are not the only interesting phenomenon at the polar regions. There are several really cool things caused by cold air, bending light, ice crystals, and crashing atoms.
Imagine you are looking out over the Arctic ice and see an iceberg floating in the sky. Or maybe you’re exploring Antarctica and see a building that you know isn’t there. You’re probably seeing a mirage. A mirage is an optical illusion, a trick your eyes play on your brain, where things appear differently than they really are. Many people think mirages happen only in hot deserts.
But they are common at the poles, too. And there’s a very good reason for this: temperature inversions.
Temperature inversions are when air temperatures don’t follow the normal pattern. Normally, you expect the air to get colder the higher you go in altitude. But at the poles, the opposite is sometimes true. This is because the snow and ice cool the layer of air that’s close to the ground but not the layer of air that’s higher up.
The result is that the lower and upper air layers have different temperatures and therefore, densities. These different densities bend light so that it follows the earth’s curve instead of going straight. But our brains don’t care if the light was bent or not; it still thinks it was sent in straight lines.
This means we may see things floating in the sky, upside down, or smaller or bigger than they are. We can even see things that are very far away because the light can bend over the horizon.


Polar Halos
Halos are another interesting phenomenon you can see at the poles. Halos often look like rings of light or color that surround the sun and moon. They are caused by light being bent as it shines through cirrus clouds, which are composed of ice crystals.
Sun Dogs, Mock Suns and Diamond Dust
Sun dogs (sometimes called parhelia or mock suns) are patches of colored light that appear next to the sun. They are a kind of halo and often appear in pairs, one on either side of the sun.
Halos can also be formed by light shining through diamond dust. Diamond dust is the name of the water crystals in the air that are flash frozen by the extreme cold of the polar regions. Diamond dust, which is finer than snowflakes, floats in the air and sparkles like its name suggests.

Auroras, Aurora Types and what causes them?
The most famous light phenomenon at or near the poles are auroras. The aurora borealis, also known as the Northern Lights, and the aurora australis, known as the Southern Lights, are spectacular and colorful light shows put on by nature.
They have been described as ribbons of light, rippling curtains of colors, waterfalls of light and color, and crowns of light. And colorful is right! Auroras can have a wide range of colors, from an eerie green or neon pink to blue and red.

They have two basic formations: curtain and corona. A curtain aurora looks like a curtain in a breeze. A corona aurora has rays that move outward. Auroras also sometimes look like a ring or crown of light.
They occur 24 hours a day, but are most visible to us against the night sky. Auroras are caused by atoms colliding with the earth’s atmosphere. Solar wind is a stream of electrically charged atoms that are pushed through space when the sun’s atmosphere expands.
When these charged atoms hit the edge of earth’s atmosphere they transfer energy. This makes the atoms light up.

The reaction goes from atom to atom and this causes the rippling effect. What colors are produced depends on what kind of atoms collide or where in the atmosphere they hit. Oxygen atoms that hit lower in the atmosphere result in a yellow-green. This is the most common color in auroras. Oxygen atoms that hit higher in the atmosphere result in a rare, red color.
Nitrogen atoms cause the bluish light of auroras. Auroras can be seen at both poles and in countries just south of the Arctic Circle and sometimes in areas just north of the Antarctic Circle.
They are lovely to see, but the same charged particles that create them can cause problems with satellites, radio communications, and even electrical systems. This is one of the reasons why scientists study auroras. Scientists also study them to learn more about the earth’s atmosphere because it helps protect the planet.

- Salvage a tall glass, a pencil and some water.
- Fill the glass with water about two-thirds full.
- Place the pencil inside the middle of the glass and look at it from the front of the glass. Does the pencil appear straight?
- Move the pencil so it leans against the edge of the glass. Look at the pencil through the front of the glass again. Now, the pencil appears broken. This is because the water is bending the light. Neat, eh?
Did you know you can make bending lights at home? Two ways:
- Get a small, shallow, non-seethrough bowl; get a penny, some water and a friend to help you.
- Place the penny in the middle of the bowl. Stand above the bowl and look directly down at the penny.
- Slowly walk backwards. Keep your eye on the penny and keep walking backwards until you can’t see the penny at all.
- When you can’t see the penny, stop walking. Keep your head as still as you can.
- Have your friend hold the penny down with a finger and fill the bowl with water about two-thirds full. Now have the friend carefully move his or her finger off the penny. You should be able to see the penny even though your head and the penny didn’t move!
- Don’t keep the fun all to yourself. Switch places with your friend and let him or her try the experiment!
Did you know you can also make northern lights pictures at home?
Supplies: black construction paper, construction paper in any color (the same size as the black piece), colored chalk (several colors), cotton balls.
- Place your piece of black construction paper down on your work area. It should be turned
lengthwise. - Carefully tear the second piece of construction paper lengthwise Important: you don’t want a straight line! Tear your piece of paper so it looks like big and small waves or
mountains without pointy peaks. - Next, lay the torn piece of paper lengthwise on top of the black piece. You want the torn piece to be about one or two inches from the top of the black piece of paper.
- Take a piece of chalk and trace all along the torn edge. Pick up the torn piece of paper. Use a cotton ball to gently blend the chalk dust downward (about 1½ to 2 inches) on
the black piece of paper. - Place the torn edge of the torn piece of paper near where the chalk starts to fade. Lay it down and gently press along the torn edge.
- Use a different colored chalk piece to trace the torn edge. When you’re done, use the cotton ball to blend the color downward.
- Keep moving the torn piece of paper down the black piece of paper and tracing the edge of the torn paper as before. Use a different colored chalk piece each time.
- Leave a few inches of the black paper blank near the bottom. This blank space will be your sky’s horizon.
- When you have all the layers of color you’d like, use the cotton ball to gently blend the edges of colors together. Now, your picture should look like a curtain aurora with its rippling and blending colors!
Copyright 2011 Carmen Szentes. Please, don't copy.


")


