Teach Yourself Typing Without Looking at The Keyboard in 2 Days

Introduction
Typing without looking at the keyboard is also widely known as touch typing.
Because you don't have to hunt and peck the character you want to type, having this little (but very useful!) skill help you to save a lot of time on your computing and internet life.
And the good news is, touch typing is easy to learn. All we need is a little learning will and imagination (of the keyboard layout).
Enough for the introduction, let's type!:
Step 1
Get a keyboard which is not attached to your computer, and bring it to somewhere you feel convenient. A used, spoilt, old keyboard is ok, no need to buy a new one.
Step 2
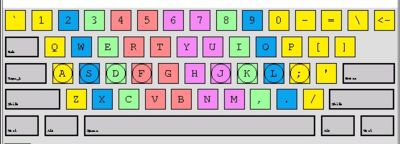
The firs thing you need to know is the initial placement of your finger in the keyboard. Usually in every keyboard there will be a little bump in [F] and [J] key, touch these two bump with your forefingers. [F] with your left forefinger, and [J] with your right forefinger. After that, place the rest of the finger in the following way:
Left hand:
Little finger [a], third finger [s], middle finger [d], forefinger [f ]
Right hand:
Forefinger [j], middle finger [k], third finger [l] , little finger [;]
Both thumb are on the space bar
From this point onwards, looking at the keyboard is prohibited
Step 3
Press one key at a time with one finger without moving other finger e.g. if you want to press [A] key, only press it with your left little finger and keep other finger remain at its initial place, and so on.
It is a little bit difficult at the beginning, but you will find it fun very soon.
Make yourself comfortable with the pressing of the each key. And, using your human touching sense, remember what key you are pressing. Peeping on keyboard is alright sometimes (the keyword used here is “peep” and “sometimes”, not “see” and “all the time”)
Step 4
Once you comfortable with every pressing of the key in step 2, see the touch typing finger zone on http://en.wikipedia.org/wiki/Image:Touch_Type_Finger_Zones.jpg.
The layout clearly shows you the zone of each finger. With the skill you conquer in the step 3 you can now explore the key in the top and the bottom of your initial finger placement (step 1).
Every time you press a key in the top or bottom, don’t forget to put your finger back to where it was so you will know the keyboard layout faster.
At this point you can start trying to type words too. And remember, when you press using one finger, the rest of the finger shouldn’t move far from its initial place.
Step 5
Bring keyboard around the house.
Yes, that’s right, bring your keyboard around the house. While you’re watching TV, type the word said by your favorite actor/actress. When you see an interesting advertisement slogan, when your mom nags on you, type it too.
Finally
It took around 1-2 days until you're comfortable with the keyboard.
In one week, you will get a decent typing speed, around 30-40 WPM (word per minute), you can test your typing speed on www.typingtest.com.
Increase your typing speed by keep typing (and not look at the keyboard). Get more exercise with the help of software like Mavis Beacon Teaches Typing, TypingMaster or TypingTutor.
And have fun with online typing games:
- Typing of the Dead (http://www.mobygames.com/game/typing-of-the-dead/)
- TypeRacer (http://play.typeracer.com)
- Word Shoot: Spell Fast or Die! (http://cognitivelabs.com/word_shoot.htm).
Keep the accuracy as your top priority, not the speed.
Happy typing.


