How to Take a Great Self Portrait Photo


Great Self Portrait Photography is Work!
All of us have some photos that by some happy circumstance are an awesome self-portrait. Self portraits when done well capture more than other photographs. They are both the model and the artist, combined into one.
It is easy to go on any social networking site, or any photography site and see examples of good and bad self portraits.
Before you grab your camera, think about what you want to achieve. What is your goal? Do you want to be sassy? Do you want to be silly? Is saucy or sexy the look that you want? Decide what you want to look like in your image.
Start looking through books and magazines, and in the ones where you like the look, tear the pages out and put them into a folder in real life, or create a folder on your computer and save images there.
Know Your Photographic Limits
Don't look at shots of models and high end photo shoots with an eye towards getting that same effect in a self portrait. It can be done, but in this simple tutorial, we are going to learn what to do in order to get a beautiful self portrait that does not require the use of friends and family for lighting, wardrobe, etc.
Here is what you need right now:
A camera
A mirror
Preferably a flash
Preferably a camera stand
A location
An Oufit
Makeup if you wear it
Let's get started (before you begin).
- Look at the device that you will be using to take your photo with. Hopefully, it is not a camera without a flash, you will need to have a mirror, and to know how your camera works. NO, we won't be doing the old trick of taking a photo in the mirror, but you will be using the mirror to make sure that your shot is good. Look at the book that came with your phone or camera, and read through the settings. If in doubt, scour the internet for specific information on your camera.
- Most cameras now have a timer on them. Practice taking photos with the timer, and notice how long it takes you to get to your position once you have set the camera up and crossed the room. Always allow a little extra time to move to your location so that you do not look hurried or winded. I would never advise using anything less than 10 seconds on the self timer as it takes 3 to get the camera in the correct position.
- Make sure that your camera battery is fully charged.

Setting Up Your Shot
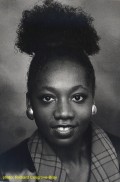
We are going to be using my example photo at the top. I wanted the light to come through very filtered, and I wanted the shadows from the blinds to come across my face. I determined that the best time to get this done was in the late afternoon, when I was getting the most filtered light in that room. Test shots of different light and rooms in the house made me decide on this one because of how rich the light was.
Look at the place where you want to take your photo and note the natural lighting that is available there.
I also wanted a blouse with a geometric pattern to play against the patterns of light from the window.
Finally, the opposite of green is pink, and I wanted even more of a contrast, so I opted for a pink head scarf.
When doing my makeup, I went for a look that was very natural, very soft, and very understated. I knew that the vibrant colors and patterns would steal the show, so the look that I went for was simply to make my face look gentle. If you look, you can see my eyeliner is actually not perfect. I had a phone call while setting up the shot, and was laughing very hard with someone. I decided to not change it, because touching up my face would bring a heavier cosmetic look to the frame that I was not looking for.
When I was testing my shot in different rooms, I was not in the outfit that I knew I was going to choose. I was merely looking for light at that point. In this photo, the room looked great, but the dimness meant that I would have to introduce other light to my image, which is what I did not want.

Decide if the Photo is You or You and Your Surroundings
A self portrait can contain you or you and your surroundings. In my example, the photo is about me, but it is also about the play of light.
If your photo is about you and your surroundings, both you and your surroundings should be framed so that the observer is able to see what you are trying to show them. Don't take a photo where the item, place, or object is right behind you. Show it off. Either you stand to the side and center what you are showing off, or center yourself and place what you are showing off to the side.
In the example photo, which is not a portrait, I snapped a photo of me and a movie poster. I made sure that you could see me and the poster, and I pulled in close for the effect that I was going for. Although it is a snapshot and I cut part of my face from the frame, the composition is still valid.
Applying Makeup
Before you take your portrait, decide on the look that you want. Practice the technique and application. Now go look at it in the light that you are going to take it. Take a few practice shots and save them.
When applying makeup, make sure that you write down the colors you use if you are not doing your portrait the same day. If you make a mistake, simply dip a cotton swap in makeup remover and gently dab at the spot. Don't swipe or smear your mistake. Dabbing and blotting are your best friend here.
Do use powder over the top as a finish so that the light bounces evenly off your face. A shiny spot can be a distraction.


Don't Be Afraid to Use Filters
There are filters and graphic settings on phone cameras and regular cameras that allow you to completely change the look of a photo. I amplified all of the color in this photo for a very "popped" look that grabs the viewers' attention. My eyes are green, but not that green in real life.
A filter can be a way to add some mystery or drama to your portrait.
In these two photos, you can see the original and the filter. I would advise you to always keep the original so that you can make changes.
In the first photo, the colors are there, you just don't experience them as brightly. In the second, everything is a wash of colors.
There are many different filters and effects, some changing light, others changing color. In the above photos of portrait versus snapshot, both were taken with a soft filter over the top, which adds a touch of nostalgia to the image.
Posing Do and Don'ts
You have decided to take the photo, and you have a great idea in mind. Something to think about is what to do with your hands. Some of the best self portraits, you would never know that they were taken by the person.
If you must take a photo holding your phone or camera, try to avoid the stretched out hand and arm. It is distracting to the shot, and it defeats the purpose of a self portrait and becomes a snap shot.
Some ways to hold your camera if you do not have a tripod, or if your phone does not have a stand involve propping your phone against something. Make sure that what you prop your camera against is sturdy. A poor choice would be a cheap paper cup. A good choice would be leaned against a full soda bottle or can. If the surface is slippery, place a towel or something under your camera.
If you have a tendency towards a double chin, don't lean your head down in your photos. Take the photo slightly above your eye level.
Make sure that you take test photos before so that you can see if any of your clothing becomes see through. I had a great idea for a very bright photo. A wardrobe change was needed when I discovered that you could completely see through my shirt when a flash was used.
The Background Does Matter
There are many examples on the internet of people with un-flushed commodes, animals procreating, accidental photo bombs and more in their photos. Especially funny are the ones where it is a portrait and not a snap shot. Take the time to check your background. Remove trash, litter, debris. Straighten out the background. People will notice.
If you are concerned, check and make sure that your clothing blends with the background. The image should come together like a painting, with all of the elements combining to present the best you.
In my above examples with the filter, I purposely did not crop so that you can see the clothes draped over the bed. Because of the brightness of the colors, you do not see them at first, but they should either be put away, or if it is after the photo or event, they should be cropped out.


Don't Say Cheese
Practice smiling. Do you ever smile the way that you do when you say the word cheese? No. No one does. Look in the mirror and practice your smile. When you get the one that you like the best, remember how your face feels. Practice over and over.
For children, get them to smile very hard and tight. I like to call it a monkey smile. Now teach them to relax their smile and give you a "real" smile.
When smiling, if you are tense, it shows in your smile. If you can't smile because of dental issues, now is a good time to call a dentist and make a care plan to get your smile to where it needs to be.
On the day of your portrait, make sure that you floss and brush your teeth. It really does show better in your portrait!
Use a Mirror
I use a small hand mirror with an adjustable base. I set it in front of me and line up the screen of the camera so that I can see it reflected in front of me.
After I am happy with the light and the image, I either hold the camera if that is the option I have, or I set the camera in the spot where the image is the best, set the timer and pose. Even if I think I have taken the perfect shot, I always take 20 shots at least, so that I can pick the best of the best.
Practice a Lot
Portraits are tricky and they are hard work. With a lot of time and practice, they are the most satisfying image, because you know that you did it!
Good luck and I look forward to hearing from you.
If this hub was helpful, don't forget to vote me up!
Thanks!
This content reflects the personal opinions of the author. It is accurate and true to the best of the author’s knowledge and should not be substituted for impartial fact or advice in legal, political, or personal matters.
© 2012 Dixie


")

")
