Home Brew Your Own Mead (Honey Wine)

Simple Ways to Brew Your Own Mead
Mead is an alcoholic wine based on honey that is the oldest form of fermented alcohol.
Today unfortunately mead is very hard to find in your average liquor store. I have only managed to find one shop that sells it so far. With patience it is fairly simple to brew your own mead from home.
Unlike many other types of fermented drink, mead is a very slow process. Ideally it should be at least 6 months before you drink your mead, but the longer the better. With patience you will be rewarded with a drink that few people ever taste.

Equipment you will need:
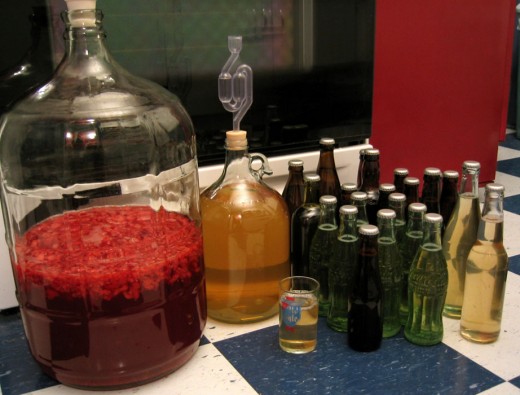
- Primary fermenting tub - airtight plastic container
- Air lock - attaches to fermenting tub to allow carbon dioxide to escape but not allow air in.
- Blender (if making fruit flavoured mead)
- Secondary fermenting tub - preferably a glass carboy so you can visually check on the mead. Glass carboys are scratch resistant and cannot harbour bacteria inside scratches like plastic can.
- Wooden spoon.
- Home brew equipment sterilising granules, or failing that bleach will do.
- Plastic tubing - for siphoning
- Bottles - start saving your wine bottles
Ingredients you will need:
- 7.5kg of honey, type of honey is up to your preference. It may be cheaper to find a bee keeper than supermarket honey, as you will be buying it in bulk.
- 20L of bottled water (or boil tap water to remove chlorine and other chemicals)
- wine yeast - bought from home brew supply store
- 1kg of frozen raspberries (optional) raspberry syrup is better though as the seeds in real raspberries can add a sour flavour

Directions
The mead I like is sweet mead, though there are many recipes for different honey to water ratio's. I like a 1 part honey to 2.5 parts water.
You can choose to make a straight mead or what is called a melomel. A melomel is mead with added fruits. You can also make spiced mead with spices such as cinnamon.
Step 1: Fill your fermenter up with water and wash all your equipment that will come into contact with the mead and sterilise it with the sterilising chemical bought from a home brew supplies store. Bleach is an alternative but I'm not going to recommend it right now. It is essential the brew remains sterile, both for the flavour of the mead and also food poisoning risks. We are going to be creating an environment perfect for bacterial growth (as we will be growing yeast) so any small germ at this stage will grow if not destroyed. Some people advise not even rinsing your equipment in water and washing the chemical off because tap water can contaminate, I don't like chemicals mixing with my mead so I'll take the risk.
Step 2:Add your plastic containers of honey to a sink full of hot water (still in the container, not poured out), this will soften the honey and make it much easier to dissolve. Some people advise boiling to honey to sterilise any wild yeast growing inside. I suggest not boiling as boiling destroys some of the flavours of honey. You can however if you want heat honey to near boiling for 10 minutes or so which should kill any impurities.
Step 3: Add half your water to your sterilised fermentation bucket. Pour in all your honey. Stir with wooden spoon until all dissolved. I choose to add only half the water at this stage as the length of the wooden spoon will not reach the bottom of the bucket if I put all the water in. I do not want to be reaching underwater with my bare hand while I stir as I don't want to risk my skin contaminating the water. Now add the rest of your water.
Step 4:If you would like to make a melomel or spiced mead, now is the time to add your additional ingredients. With fruits some people choose to add the fruits in chunks, such as orange slices. In my instance I chose raspberries and I blended them all.
Step 5: Take a small bowl of warm bottled or sterile water and pitch your yeast, if you have any 'yeast nutrient' add it now. This is a better method than just throwing it in as it allows you to stir it and fully hydrate the yeast, otherwise there is a chance it will clump when thrown in and you may lose some yeast. Wait 10 minutes to give the yeast a chance to come back to life and then add the yeast to the 'wort' and give it all one final stir. Wort is the name for the brew in its current form.
Step 6:Seal the fermenter lid tightly and attach the air lock. Wipe down the outside for any spilled honey to prevent ants from swarming. Store the fermenter in a location where it will be kept fairly warm. Within 12 hours you should notice the air lock starting to bubble. If it is not bubbling at all by this stage.... you have failed.
Step 7: Wait. Wait several weeks until the bubbles from the air lock stop bubbling.
Yeast will continue to multiply and build up a sediment on the bottom of the fermenter. In this time of waiting the pieces of blended fruit will hopefully settle on the bottom.
Step 8:Now that fermentation has stopped it is time to rack the mead to clarify the liquid from particles and sediments you do not want. Use a sterilised siphon tube and carefully transfer the mead to (preferably) a glass carboy. Stop siphoning once you reach the yucky stuff on the bottom of the fermenter. Try to minimise exposure to air, close any doors and windows in the room you are in to prevent gusts of wind bring in contaminants. You may need to rack several times to get the desired level of clarity.
Step 9: When the amount of time has elapsed to get your mead clear it is time to bottle. Same deal as with racking, make sure its sterile bottles.
Step 10: Wait again. From the time you started preferably at least 6 months but the longer the better.
Step 11: Enjoy your mead, cold or warm. preferably out of a human skull or some other Viking implement.
Buy mead online in Australia
- Honey Wines Australia
Online shop for buying mead in Australia

 Recipe")


