Rubik's Cube: Figure It Out Yourself
Most of us go to the internet to copy move-patterns in order to solve a Rubik’s Cube. We then go to our Cube and proudly solve it. But when someone asks, “Wow! How did you do that? You must be smart,” you reply, “I got it off the internet.”
All you know is that you turn the face this direction, then the left side that direction, and so on, until a solution magically appears. That’s all you know; you don’t know the logic of how you got there.
But now - with this Hub - you can learn the logic, and you can explain to people why a certain pattern works, and how it gets you the results you want.
So we begin by stating a few basic rules:
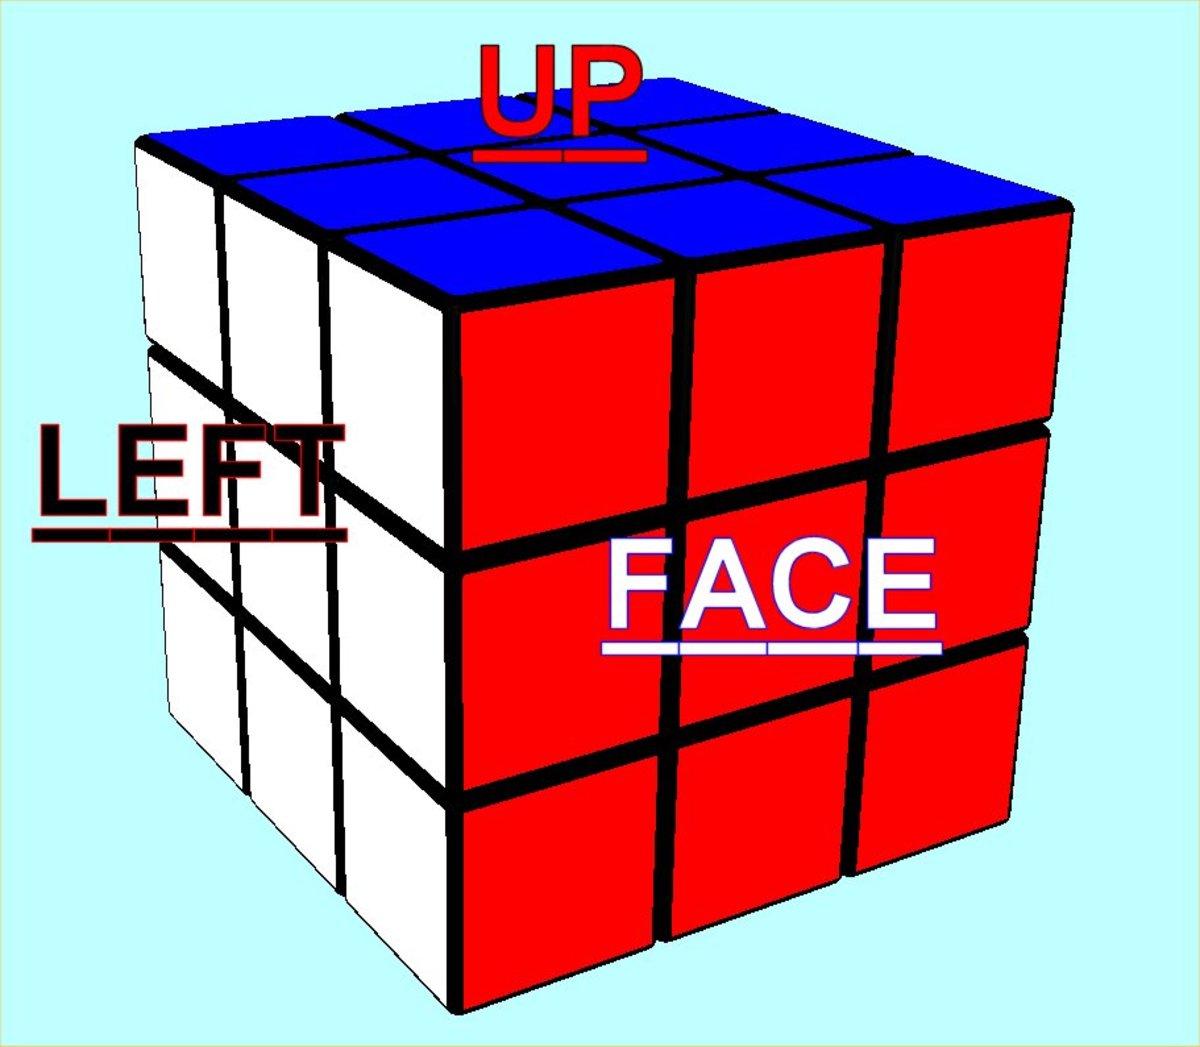
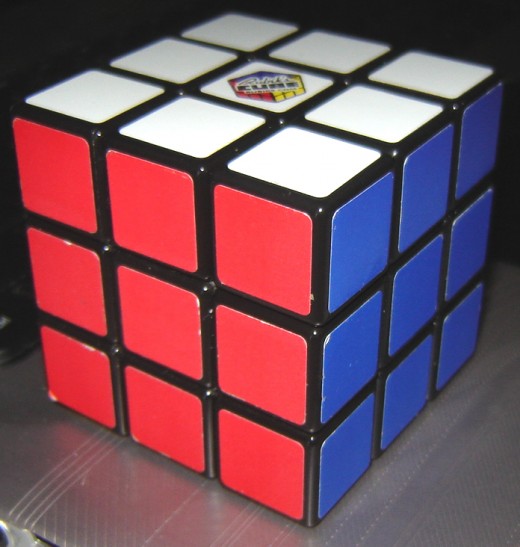
(I will be using the following terminology: Column is a vertical arrangement of pieces. Row is a horizontal arrangement of pieces. Face is the nine pieces looking at you. The top face are the nine pieces on top. The right face are the nine pieces on the right side of the cube, and so on. Moving the right face clockwise is the same as moving the right column upward. CW is clockwise, and CC is counter-clockwise.)
Rule Number 1: The center pieces always remain in the same position in relation to the pieces opposite them on the other side of the cube. They may rotate without the other side rotating, but they will never be at a ninety-degree angle from the opposite piece. Therefore, blue is always opposite green, red is opposite orange, and yellow is opposite white (at least on my cube).
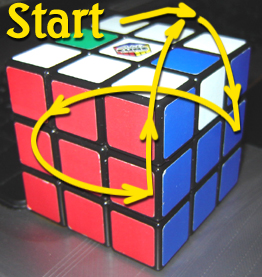
Rule Number 2: You can change which way a corner color faces by using only two faces. You can do it with three if you wish, but you can do it with only two. For example, suppose you have the upper-right corner piece with white on the top, red facing you, and blue to the right. You can put red on the top by pulling the right-most vertical column downward, the bottom row to the right, and then right column down again, two times. The red is now on top. Do this same pattern two more times, and the corner piece will be back to where you started from. Or, do the sequence (algorithm) backwards and the cube will go back to the original factory arrangement. As you repeat this exercise, watch the same color to see how it turns and comes out, until you’re used to it. The lateral movement of the bottom row is what changes the position of the colors.
Figure 1 shows this “algorithm."

Rule Number 3: You can move middle pieces (not necessarily the center
pieces) by moving the middle rows and columns. Sometimes you have to
move an outside column or row, but when you’re done, put the outside
row or column back where you found it, if it has a pattern you want to
keep.
This logically follows to Rule Number 4: The more colors
you get into place, the more you’ll have to use this rule: Do what you
have to do, but then put everything back where it was by doing your
algorithm backwards, or by making a certain face do a full 360 degree
turn. Examples of these middle-piece movements are shown in the
Appendix of this article. I put them there, so you can ignore them, if
you wish to figure out your own moves.
If you ever mess up or
don’t remember how to get back to the beginning, you can try your moves
on the internet: The following link is a place where you can try to
solve, and also where you can easily reset the cube:
http://www.learn4good.com/games/puzzle/rubik_cubic.htm
The
internet can also help you solve your cube so you can work with it
again. It will give you cheats and algorithms, but most likely it will
not give you a way to figure out your own moves.
So here is the
secret that will help you solve one by yourself: Get the cube in its
basic factory set-up arrangement, where there’s only one color per
side. Then, plan a specific algorithm. Write that sequence down on
paper. Start with simple ones. After you have decided on an algorithm
try it. Note where the colors had traveled from and where they are,
now. Copy the new set-up on a piece of paper. This way, if you ever see
that same pattern you’ll know what to do to fix it (you do the reverse
of the algorithm you copied to the paper).
Usually, the most
difficult patterns to get right are on the top layer, after you’ve
finished the first two. It’s usually quite easy to finish the first two
layers, and not much help is needed for that task. It’s finishing the
last layer without disturbing the first two layers that is difficult.
So strive to make changes to the cube where only pieces in the top
layer are affected. After a while, you’ll have a repertoir of moves
that perhaps may show up on your cube when randomly mixed up.
Here’s
an example of an algorithm that affect only the pieces of the top
layer: Suppose you have the white on top, and the red face toward you.
On my cube, that puts green on the left, and blue on the right. Now,
move the face clockwise. This puts the two left edge pieces that were
in the bottom two rows in the top row. In other words, we have a
green/red middle piece, and a green/red/yellow bottom piece. Now, look
at the right side (blue face) and move it clockwise. This puts three
red/white pieces in the top row. These three pieces were once in the
top row before we moved anything, so they can be interchanged, because
we’re only trying to preserve the bottom two original rows. However,
the two white/blue pieces that were originally in the top row are now
in the bottom two rows, so before we’re done with the algorithm, we
have to turn those back up to put them in the top row, again. This is
why rule number four exists: When you mess something up in order to
change something, go bacwards at some time again to fix it. Later,
we’ll be doing that. But for now, we’ll do one more move: Turn the cube
back so the original face is toward you, then look at the top, and move
the top face clockwise. The two red/green ones that were on the bottom
are still together, and we should be careful not to separate them,
unless we do a more complicated algorithm.
Now it’s time to go
backwards, and undo the turns that disturbed the bottom two layers:
Look at the right side again, and go counter-clockwise. This puts the
white/blue pieces back on top. Now, go backwards on the top level, and
move it counter-clockwise. This puts the red/green pieces in position
for lowering them into their proper place. So turn the face
counter-clockwise, and you’ve restored the bottom rows, while
re-arranging pieces in the top level. Note the changes in this
algorithm, because some day you may see this pattern, then you’ll know
how to solve it. And you’ll solve it by going backwards.
Try the
algorithm going backwards: Face clockwise, top clockwise, right
clockwise, top counter-clockwise, right counter-clockwise, and face
counter-clockwise. The cube is now solved.
Keep trying different
algorithms, until you get different results. Remember that moving the
centers and rotating rows 180 degrees eases the process of moving
center pieces, while moving faces will re-arrange corner pieces.
As
a further help, here’s a modification to rule number four: Sometimes, a
complete revolution is the same as going backwards. For example, try
this one, while noting the path of the left two bottom pieces: Left
face cc, top face cc , left face cw, top face cc, left face cc, top
face cc two times, left face cw. Notice that the those two pieces (on
my cube they are the green/red and green/red/yellow pieces) came to the
top, did a full circle, then got lowered back down into position.
Meanwhile, the upper corners changed in a certain way, which I'll explain later.
Whenever you
achieve a change where only the top pieces are affected, try one more
thing: Check to see if a corner piece has moved away from its base
colors. (I use the term “corner piece,” because in this example we
are basically moving corner pieces due to the fact that we’re only
moving faces, as specified in Rule Number 2 above.) If a corner piece
has not moved away from its proper original position, then you can
depend on it staying there during additional executions of that same
alogrithm. If no corner piece has stayed on its location, then turn the
top layer until you find one or more pieces that fit. In the algorithm
above, if you add one more operation to the end of the sequence, you'll find one corner piece didn't budge: turn the top layer two times, and you should see that the
top-right corner closest to you has been unchanged. You will also see
that the other three layers have not moved from the position they were
orignally sitting in. Therefore, this algorithm is good for changing the
color orientation of the other three corner pieces. It does not change
the place they’re sitting in. For example, the right-front corner will always
remain in the right-front position - with the same color orientation - after you do the algorithm, and if
you then twist the top row two more turns. If you come to this step from a
randomly mixed-up cube, then you have to first figure out a way to put
corner pieces on their right corners (not necessarily their right
color orientation, but their proper corner positions). Then, you can use this
algorithm to make the colors match.
Next, will come the middle
pieces. There are ways to fix the middle pieces without disturbing the
corner pieces, because you will be moving the middle rows and columns.
You may also have to move faces, but if you put them back where you
found them after you make a strategic change, things will work out.
So . . . the reason I’m not giving you
all the algorithms you need, is because you can get those from other
parts of the internet. There is a generous helping of those. But if
you’re the type that wants to be able to say that you figured the cube
out on your own, this Hub’s For You. Enjoy!
Appendix:
Since
you’re here in the Appx, this means you are looking for cheats. You
won’t mind, then, if I give you another hint: After you solve the first
two layers, it’s best to do the following in this order: Put the
corners where they go (on the corner where their side colors rest, but
not necessarily with matching colors). Then do the task of matching up the colors.
Thirdly, put the middle pieces where they go, matching the colors. Some
solvers put in the middle pieces first, then do the corners, but then
they have to go back to fix the middle pieces again. But it’s up to you.
Here’s
an example of moving a piece, then going backwards to fix the
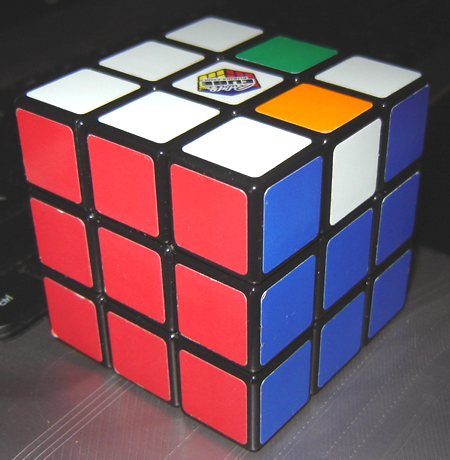
already-solved pieces and levels: Note in Figure 2 that the blue/white piece needs
to only flip around so that the blue is on the side, and the white is
on the top. Also the green/white piece needs the same treatment. This
algorithm will flip the blue/white piece, then will go backwards on the
moves in order to fix the green/white piece. The backwards movements
will do two things: fix the green piece, while putting back the disturbed pieces in the first two layers in their places.
First, let’s do a logical
run-through of the blue/white piece. I’ll describe the two pieces as
bw, and gw: (Follow the yellow arrows in Fig. 2 as I do this) If you move the right face cw, the bw piece will be away
from you, blue in the back. If you move the middle row to the right
three times, then the bw piece will be looking at you from the
right-most column, the white facing you. If you move the right column
upward (the right face clockwise), then the bw piece is on top again,
but now with the white on top, where it should be. Simple? Yes, but
you’ve now got orange and yellow on each side of this white top. Let’s
fix that by adding a few moves: Start by moving the right column
upwards again. You’ll want to move this column back down again right
away so the two corner pieces will be back where they belong on top,
but not before moving the bw piece out of the way. So move the middle row toward
its next step by moving it to the right. Now you can move the right
column back down, putting the two corners on top again. But don’t leave
it there, move it down one more time (pulling the two white corners toward you), so it can accept the bw piece
when it completes its horizontal journey. So move the middle row two
more times to the right, and bw piece will fall between the two white
corners. Now, move the right column upward, and the bw piece is
comfortably placed in its right position between the other two white
corners.
Now it’s time to do the algorithm backwards. But it
can’t be done exactly backwards unless you rotate the top face 180
degrees, which is the same as moving the top row either direction two
turns (You'll be undoing this rotation later). Now, you can truly go backwards: On the first move, you moved
the right column upwards. So going backwards, you need to now move it
down once, which will put the gw piece, along with its white neighbors, toward you. So do that.
Now you need to move the gw piece away
from the two corner pieces so that you can move the right column upwards
again. When you moved the bw piece away horizontally, you moved it to the back-left
corner. So the gw piece has to go to that same corner in order to be mirrored. Therefore move
the middle row two moves to the left. Next, move the right column up
two moves, so it will be ready to accept the gw piece. Move the gw
piece into position by moving the middle row to the left. Now, move the
right column down once. All that’s left is to undo the rotation you did
when rotated the top face 180 degrees to put the gw piece in the
right-top side. So do that 180 degree rotation, and the cube is solved!
If you were to record on paper the moves I described above, you would see that the last half of the algorithm is a reversal of the first half.
If
you wish, you can use this algorithm to solve this pattern. But to make
it your own, you can do the same sequence, but from another starting
point. For example, I started with the bw, which was on the right side
of my cube. You can do the same thing, but starting from the gw piece.
Just do mirrored movements. Or if you don’t want to do a mirrored
algorithm, you can do this (but let’s start with the blue piece, to
help you follow more easily): When I did the bw algorithm, I turned the
bw piece away from me by moving the rightmost column upwards. You can
move it downwards to pull it toward you, if you wish. Then you can move
the bw out of the way so you can put the white pieces on the other side
to accept the bw piece when it comes around. This means that when you
do the gw piece, then you have to begin the algorithm by pushing it
away from you. Alternatively (back to the bw piece again), when you
pull the bw piece toward you on the first move, you can move the bw out
of the way by not only moving it once horizontally, but twice. There’s no reason why
you can’t move it twice, putting it in the back-left position to await
the movement of the top white pieces so you can do the merge. But if
you do this, then when you do the gw piece, and you move it out from
the top white pieces, you have it stop right there in the left-back
position, as this is a reversal of what you did to the bw piece.
Here’s
another example of moving only the middle pieces, while not putting
back a face, but by rotating it 360 degrees: Prepare your solved cube
for this algorithm by moving the middle column upward, the top row
clockwise, the middle column downward, the top row 180 degrees, the
middle column upward, the top row clockwise, and the middle column
downward. You now have a cube that looks like Figure 3, with an
orange/white piece on the right side. The green piece at the back has
white that can’t be seen from here, and the middle white piece on the
top left is blue on the left side. These three pieces can be moved back
into position by reversing the algorithm you used to get this set-up:
The middle column goes up, the top goes counter-clockwise, the middle
goes back down, the top face moves 180 degrees, the middle column goes
up, the top face goes counter-clockwise, and the middle column, back
down. In this case, the top face had to be moved, but we put it back in
its position by having it rotate 360 degrees during the entire
algorithm. This is an exception to the rule that you have to do parts
of the algorithm backwards. In this case, you just moved the top face
in a circle until it arrived where it started from. When you’re
solving the cube from a randomly-mixed-up cube, you won’t necessarily
resolve the cube with this algorithm. But you’ll get within one step
(usually) of solving the cube.
There are other algorithms (or at
least one I know of) that can move only these three cubes (not
necessarily from the same direction). So if you want your own solution,
experiment doing this type of thing until you find your own.
Solutions On HubPages:
- Rubik's Cube 3x3 - Finding a Beginner's Solution
The "How To" of finding a beginner's solution for the Rubik's Cube 3x3...and other considerations


