How To Make A Valentine's Card I Love You Card

Make A Homemade Valentine's I Love You Card
This homemade Valentine's Day card is easy and fun to make for adults or for kids. Find out what materials you will need and then just follow the step by step instructions to create a unique card for that special someone. Kids will really enjoy making cards of their own to give out to their parents, family, and friends.
How To Make An I Love You Valentine’s Card
Nothing says "I Love You" like a homemade card on Valentine's Day. There are so many great gift ideas like flowers, candy, balloon bouquets, but there's just something special about a card someone took the time to make for you. Check out how easy it is to create this cute little greeting card. I know you will love making this card just as much as you would love to receive it from someone.
There's nothing new about giving Valentine's Day cards. We start out as children exchanging them in class, we make cards for our parents and grandparents, we send I love you cards to friends who live far away...sometimes these cards include a personal greeting, sometimes they contain a poem. These letters and poems can be as simple as "Be Mine" or you can write a touching letter that tells your true feelings to your loved one. Each is special in its own way, each is appreciated by the person you send it to.
Today many holiday greetings are sent using e-cards. And that's great too. I, however, still like to actually make my own cards to send to my family, my kids, and my grandchildren. I thought I would share just how I make these homemade cards with you. I used a heart as the front of my card, but you can put whatever shape you like there.
Gather All Your Card Making Supplies

So ready, set, go ... here's a list of the supplies you will need to create your special "I Love You" card to send to your very favorite person. Make a heart warming card to brighten up someone's Valentine's Day!
First, read through the directions, gather all the supplies you will need, and be sure to look at all the step by step pictures here so you will see exactly what you have to do to make your own card today.
Here Are The Craft Supplies You Need To Make A DIY Homemade Card
- Red Construction Paper or Cardstock
- White Construction Paper or Card Stock
- A Piece of Brown Cardboard - try to find some corrugated cardboard with that zigzag puffy lining - you will see what I mean in picture step 4.)
- A Wooden Skewer (I have lots of these in with my summer BBQ supplies - Kabob Sticks)
- Red Glitter
- White Craft Glue
- A Pair Of Scissors
- A Paint Brush
- A Cutting Instrument - like an X-ACTO Knife
- Hot Glue Gun And Glue Sticks
- Newspapers
Gather all your supplies together, re-read all the directions and then it's time to go to Step 1.
Step 1

- Step 1: Spread the newspaper over your work area so there's no mess for you to clean.
- Step 1A: Take your white cardstock or construction paper and make it twice as big as you would like your card to be. Cut it if that is necessary. Read the following steps to be sure you understand what you are doing at this point.
- Step 2: Fold your construction paper or cardstock sheet in half. This is how big your card is going to be.
- Step 3: Take the brown cardboard and cut out a medium size heart - measure it against your card to see just how big it should be. If you don't think you can cut a heart shape trace a heart onto the cardboard and cut it on the lines.
- Step 4: Stick the skewer in between the layers of corrugated cardboard and lift the skewer while pulling the upper layer of the cardboard. Do this gently until you have separated your heart. Why do this? You want that bumpy texture so it gives your homemade card a nice patterned look. I think that it looks great, if you don't like it just draw a plain heart don't worry about the pattern.
- Step 5: Apply some white glue onto the corrugated (bumpy) side of the cardboard heart using your paint brush. Be sure to spread the glue evenly and smoothly.
Step 2

Step 3

Step 4

Step 5

- Step 6: Sprinkle the red glitter over the corrugated heart shaped cardboard while the glue is still wet. Sprinkle generously and let it dry.
- Step 7: Let the glitter and glue dry for about an hour.
- Step 8: While the glue and glitter are drying cut out the letters I, Y, O and U from the red construction paper. You can trace a bubble letter on the paper and then cut it using the X-ACTO Knife or your craft scissors. The letter I will be places at the top of the card right above your heart - center it so the I is in the middle of your heart. The letters Y, O, U, will go at the bottom of the heart...once again, center your letters on the card. Make sure you like their placement before you glue them in place with the white craft glue.
- Step 9: You can cut out a small rectangular or circular piece of white paper to glue into the middle of your letter O. It might be easier to do the cut and paste method rather than having to cut out the center of the O. You decide how to do it. Hot glue or craft glue the spacer into the center of the O if you decided to do this step. If you did not decide to make your O this way you can ignore steps 9.
- Step 10: Cut a rectangle out of the red construction paper and glue it into the inside of your card to add some color to it.
Step 6

Step 7

Step 8

Step 9

Step 10

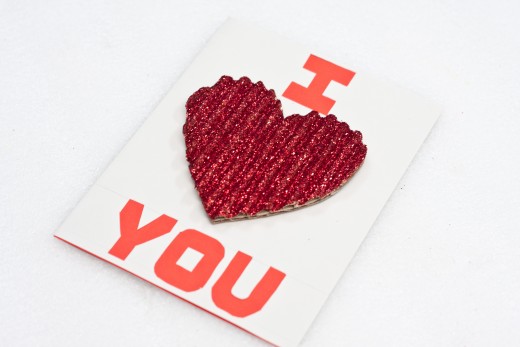
- Step 11: Place the glittered heart on the center of the front of the card. Play with it, place it where you think it looks the best, after all, this is your homemade card. It should be where you think it should be. I put my right in between the I and the YOU. When you figure out what you want to do with your heart, put some glue on the back of it and press it in place.
- Step 12: Write a personal note in the card - make it something sweet!
Step 11

Step 12

You Just Made Your Own Homemade Valentine's Day Card
Tada! ( my granddaughter says that when she finishes something!) You are done...how do you like the card you just made? This is worth the time since your special someone would definitely appreciate your effort on this. This is simple yet full of heart. This is much cheaper than the ones sold in the market and it would definitely save you a lot. You can add some designs that could personalize your Valentine card. Hope you liked it! Spread the love!
I hope you liked making a homemade Valentine's Day card of your own. I thought it was pretty simple to make and I had all those supplies in my house, so that made it super easy. Kids will find it fun to make a card like this. Be prepared to make a couple, kids are not going to stop at just one.