- HubPages»
- Technology»
- Internet & the Web»
- Web Page & Web Site Development
A Foolproof Guide and Steps to Build a Website with Drupal
Building a Website With Drupal
I thought I would write a tutorial that you can easily follow step-by-step to create and customize your own website with Drupal.
I'm going to show you how to build a website using Drupal that can accomplish virtually anything. The basic functionality we are going to implement is as follows.
I show you how to build a site that can accommodate...
... your blog,
... individual pages,
... forums,
... content structured in book format,
... a contact form,
... three different menus (primary / secondary horizontal, sidebar vertical)
... polls,
... a site-wide search feature,
... a taxonomy system (a system for organizing tags and categories in hierarchies)
Also, I show you how to administer and maintain the site and where to look for help to expand upon your knowledge.

Which blogging system are you most familiar with?

As I have said, building a website in Drupal is easy. All you need in the beginning is to follow my steps to put the thing together.
Step 1 - Hosting Service Provider supporting PHP5 and MySQL
You have to register with a hosting service provider. A free service provider is not acceptable for our purposes, because we need PHP5 support, MySQL support and Cpanel or InterWorx. There are many cheap solution available in the market.
You'll get your Cpanel username and password; the address of the ftp server and your username and password to the ftp server from your provider.
Step 2 - Download Drupal Content Management System
To see an example of what a Drupal website can do, go see Apple's site at www.apple.com.
Type into your browser: www.YOURDOMAINNAME.com/cpanel; Log in to Cpanel by using your username and password the service provider gave you.
Find Fantastico software wizard and click it. Choose 'Drupal' under the heading 'Content Management Systems'.
Click 'New Installation'. Choose your domain. Leave 'Install in Directory' box empty. Under 'Admin Access Data' enter a username and password (of your choosing) for the superuser you want to administer the site. Specify your email address and click 'Install Drupal'.
You are given the name of your MySQL database and username, so note this down. Click 'Finish Installation'.
Your superuser username and password will be confirmed. Enter the email address where you want to receive the details of your installation and click 'Send Email'.
You are done. Log out of Cpanel and visit your site.
Drupal welcomes you. Log in as the superuser.
Here we are at your shiny new website, but it does nothing yet. We need to implement a few features.
Step 3 - Creating a Blog in Drupal
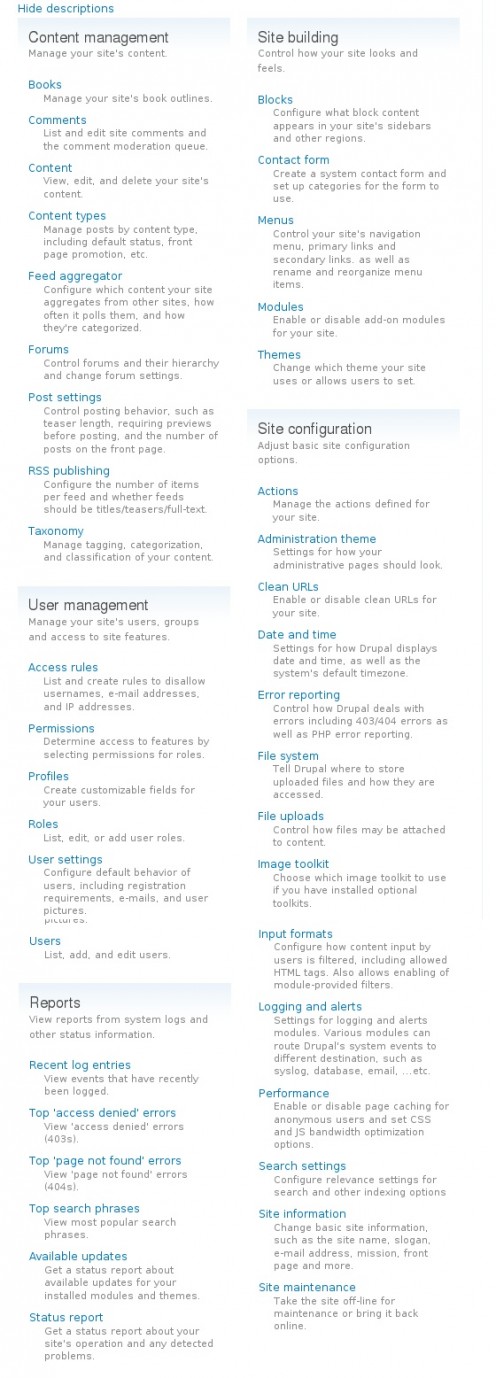
Click 'Administer - Site Building - Modules'. Check the boxes beside Aggregator, Blog, Book, Contact, Forum, Poll, Profile, Search, Upload. Click 'Save Configuartion'.
Let's write a blog entry. Click 'Create Content - Blog Entry'. Write the title and the body of your entry. Scroll down and click 'Publishing Options'. Here you can decide if you want your entry published (we do ), if you want your entry to appear on the first page (we don't so uncheck), if you want it to stick to the top (we don't, so leave unchecked). Now save.
You have your first blog entry that you can edit at any time. What you need is a menu item for the blog entry. Click 'Edit - Menu Settings', write 'blog' in 'Menu Link Title'. From the dropdown choose 'Primery Links' for primery horizontal, 'Secondary Links' for secondary horizontal, 'Navigation' for sidebar vertical. For now, let's leave it 'Primary Links' and save.
Now, you have your menu item up there and by clicking it, it takes you to this entry. But we don't want it to take us to this specific entry, we want a menu item that takes us to a page where all future entries are listed. So click 'Administer - Site Building - Menus - Primary Links' and delete the item.
Now, click 'Add Item' and specify the 'Path' as 'blog' and the 'Menu Link Title' also as 'blog'. Save. What we just did is we just created a menu item that leads us to www.YOURDOMAINNAME.com/blog, the page that contains all blog entries in Drupal.
- drupal.org | Community plumbing
Drupal.org is the community website of Drupal developers. Contributors provide new Drupal modules, themes and updates on a daily basis. One can enlist the help of the Drupal community concerning any question about the online content management system

Step 4 - Creating Pages in Drupal
Let's make a front page. Click 'Create Content - Page'. Write the title and body. Under menu settings write 'Home'. Choose the weight to be -50. This tells Drupal, no matter what, this page will appear first in the menu sequence. Save. Click 'Home' and take note of the homepage's address. It will be something like www.YOURDOMAINNAME.com/node/whatever. You now have the homepage and the menu item, but it doesn't appear as the first page yet. Go ahead and type www.YOURDOMAINNAME.com to see for yourself.
You need to click 'Administer - Site Configuration - Site Information'. Give your site a name, a slogan, specify your email address, then scroll down to 'Default Front Page' and type 'node/whatever'. Save configuration. Now type your domain name and behold your homepage.
You can make any number of pages in this manner and assign menu item to them in any of the menus.
Step 5 - Creating Forums in Drupal
Click 'Administer - Content Management - Forums'. Click 'Add Container', specify container name and description. Leave parent as root. Save. This is a container that will house your forums.
Now click 'Add Forum', specify forum name and description, choose your container name as root and save. Repeat this step as many times as you wish.
Now click 'Administer - Site Building - Menus - Navigation'. Click 'Add Item'. Specify name as 'forum', menu link title as 'Forums'. Save.
You have your Forums item appearing in navigation menu. You could've put it in primary links if you wanted. We can even change this at any time. Just click 'Administer - Site Building - Menus - Navigation' again. Find 'Forums' and click on 'Edit'. Change the parent item to primary links and save. Now click 'Forums' menu item and behold your first forum.
Step 6 - Setting Up a Contact Form In Drupal
Click 'administer - site building - menus - primary links'. Click 'add item' and specify path as 'contact', menu link title as 'Contect Us' and save.
Click on 'contect us' in the menu. The contact form has not been configured yet, so click on 'Add one or more categories'. Add the category 'feedback' and specify the email address of the recipient. Write an auto-reply like 'Gee, thanks for that one!' Save. Clock on 'contect us' to see your contact form.
Step 7 - Using Drupal Taxonomy ti Create Tags and Categories
you can build a taxonomy tree, which is a hierarchic structure for the tags you want to add to your blog, page or whatever posts. Click 'administer - content management - taxonomy'. Click 'add vocabulary'. Give it a name that will appear when you post a blog entry and choose the appropriate tags, give a description and a help line like 'please select multiple tags by holding down the Ctrl key'. Select the content type you want to use this taxonomy tree for, check 'multiple selection' and save.
Now click 'add items' beside the name of your vocabulary and add a tag (just term names). Save. Keep on adding till you're satisfied. You can choose the parent of each tag under advanced options to make a treelike structure.
Step 8 - Adding Content, Blocks, Permissions
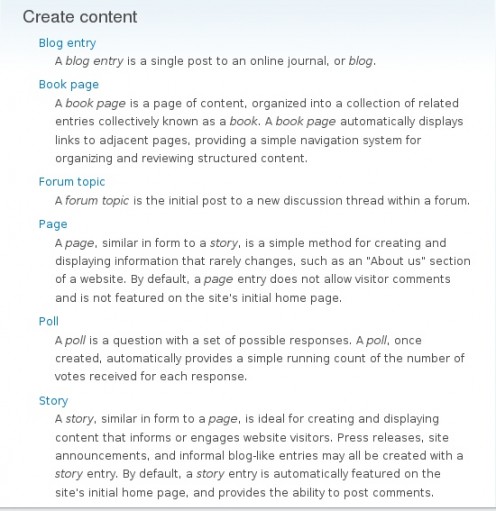
Now that we've covered the very basics and the site is functional, we can start adding content to it. You can add blog entries, pages, stories (another type of page), forum topic, polls by clicking 'create content' and the item you want. Let's just add a poll. Click 'Poll'. Write the question and the possible choices. Select duration and save.
Your site is made up of several sections including a left sitebar, a right sitebar, a content area, a header and a footer. Click 'administer - site building - blocks'. Here is where you decide what goes where. Scroll down to the disabled section and click the dropdown next to 'Most recent poll'. Select right sitebar and save blocks. Now your poll is on your right sidebar.
Registered users can vote. But we want to give everyone the chance to do it, so we'll graciously grant this right to unregistered users. Click 'administer - user management - permissions'. Scroll down to poll and check the boxes next to vote on polls for both anonymous and authenticated users. The former is the unregistered the latter is the registered user. You are the superuser and can do whatever you want. Now save. Log out and see if you can vote? Yes, you can. Log back in.
Now, when you were logged out you noticed that the 'contact us' menu item disappeared. Why? Because anonymous users are not allowed to see it. What are we doing? We go back to permissions, scroll down to cotact module and allow all visitors to access our contact form. Then we save. Log out. All is well. Log back in.
Step 9 - Using Themes to Customize the Looks
Now, you just realized you don't like how the site looks. Click 'administer - site building - themes'. Scroll down and select another theme. Check both enabled and default and save. Still don't like how it looks? There are host of themes available for download for free at drupal.org.
Open a new browser window and visit drupal.org. Click 'Themes'. Let's pick 1024px as it is recommended for our version of drupal 6x. Download and unpack it. Open an ftp software. For me it's Krusader for Linux, but for you it might be Total Commander for Windows. Find the ftp feature. For me it's under 'tools - new connection', for you ??? Use the ftp server name provided by your host. Sometimes it is ftp.YOURDOMAINNAME.com. Use the ftp username and pw also provided by your host. Once in, find and enter the themes directory. You need to copy the folder containing your new theme, in this case 1024px in here. You might be asked to reenter your pw in the process. When finished, disconnect and close the ftp software.
Go back to your site and find your new theme. Activate it. Well, this may not be the best theme we could choose so go back to the original one. At least you now know how to get your hands on a new looks.
Step 10 - Taking it further
Now you have a fully functional website that houses your blog, polls, forums, custom pages, whatever. There is much more to Drupal than this, virtually anything a website can accomplish. You can create a community like Hubpage, but for this to happen, you still have a long way to go.
One thing I can guarantee you. The community at Drupal.org will answer any questions you might have along the road. Also, the best book on Drupal for starters is Building Powerful And Robust Websites With Drupal 6, by David Mercer.
Good Luck!


