Preparing and Creating Smooth Slow Motion Footage

Intro
In this article, I will be explaining the basic and different ways of creating smooth slow motion video. There are two parts to this article: capturing the footage and slowing it down.
Before you can capture footage, you will will need:
- A camera that records at a speed of at least 60fps (frames per second), not 60i (interlaced).
- Software that can edit the speed of footage.
For this article, I used my GoPro Hero3: Black Edition. To edit, I used Final Cut Pro 7, but you can use any software that gives you the ability to slow footage down, such as iMovie or GoPro Studio 2.0.
I also want to say that this article is based on my experiences and the opinions expressed are my own. What I explain here works for me and may not work for you, but I've written this article to, hopefully, shed some light on slow motion footage.
1) Choosing a Frame Rate and Shutter Speed
As stated earlier, you need to be able to shoot at least 60 Full frames per second, not interlaced frames, to get a smooth slow motion look. The higher your FPS the slower you are able to make your footage without it looking choppy.
If you are shooting 60fps and have the ability to adjust the shutter speed, you can further increase the quality of your slow motion, but it's not necessary. Having a shutter speed of about 1/60th or 1/100th can add a little motion blur and make smoother transitions between each frame. If you're shooting at 100fps or more, having a slower shutter speed is no longer necessary.
If you are shooting a more natural scene, where there isn't a lot of fast motion, shooting at 60fps will achieve smooth quality slow motion. For example, the following video is of a guy walking through crowds of people. This footage was shot at 60fps, conformed to 30fps, and used as B-roll for a music cover video I produced. I will include it at the end of the article, if you are interested.
In a simple shot like this, I like how the slow motion is slightly noticeable, but it significantly changes the feel of the shot. It's slow enough that the brain notices the movements at that speed aren't natural, making it more interesting to watch.
Here is another video shot at 100fps and conformed to 30fps. I used a faster frame rate for this scene because the subject is break dancing. His movement is a lot quicker, so I compensated my increasing my frame rate. Slowing down 100fps to 30fps allows for specific details, such as the rotation or placement of his hands, to be observed by the viewers.
2) Slow Motion With Percents
Most, if not all, Non-Linear Editing software can do slow motion. There are also free Linear editors that have slow motion capabilities. As I mentioned earlier, I will be working in Final Cut Pro, but the things you need to consider are basically the same.
In Final Cut, to change the speed of a clip, you can Secondary Click (right click) on the clip in the timeline and select Change Speed. In other programs, such as GoPro Studio 2.0, you go into the advance settings of the clip and adjust the speed.
According to the video below by Waterlust, you can slow your footage down to a certain percent before it starts to get choppy. The percent you can slow the footage down is expressed in Waterlust's video as:
24 frames per second ÷ Footage frame per second = %
I have done the math for the typical FPS's:
- 24fps / 60fps = .4 = 40% real time
- 24fps / 100fps = .24 = 24% real time
- 24fps / 120fps = .2 = 20% real time
- 24fps / 240fps = .1 = 10% real time
IMPORTANT: Keep in mind that this doesn't work if the Frame Rate of your Sequence (Editing Timebase) is different from the Frame Rate of the footage you want to slow down. For example, if you're shooting 60fps, the timebase must also be 60fps. Also, if you are working in Final Cut, you want to make sure "Frame Blending" in the Change Speed menu is NOT checked.
If you are interested, I have provided Waterlust's video below. It gives further explanation and examples of the different speeds. I recommend watching it.
For the best results remember to capture your footage with the same Resolution, Frame Rate, and Compressor as your Sequence (Editing Timebase). For example, in the picture below, I have three clips and my sequence. My sequence's resolution is 1920x1080, frame rate is 29.97fps, and the compressor is H.264. The clip titled "Good Clip" matches these settings perfectly and will yield the best results in this timeline. "Bad Clip" has a different frame rate and will be choppy if it is slowed down. "Very Bad Clip" has a different resolution and frame rate. So, besides not being able to smoothly slow it down, it will not have the same visual quality.

Slow Motion By Conforming
Another way to do slow motion is to conform your clip through a program like Final Cut Pro, or if you use a GoPro, through GoPro Studio 2.0.
IMPORTANT: In Final Cut, before conforming, be sure to create a back up of the clip you are conforming, because it conforms the original file and cannot be undone.
To conform a clip in Final Cut (or similar editors), reference pictures are below.
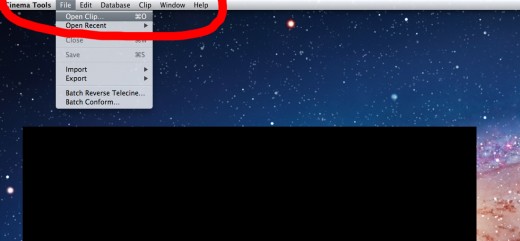
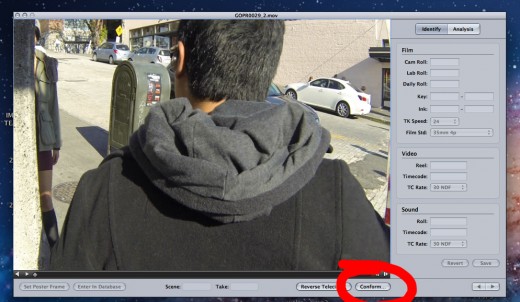
Secondary Click (right click) on the original clip file and select "Open in Cinema Tools" OR open Cinema Tools > Click on File > Click on Open Clip... Select your clip. Then on the bottom right, click on "Conform..." It will display the Frame Rate of the imported clip. Under that you can choose what frame rate you want to conform to. Then, if you are ready hit Conform. The original file is now conformed and ready to be used.


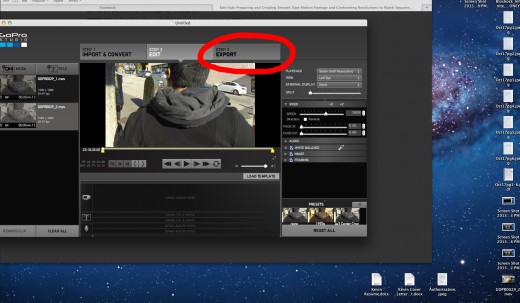
When conforming in GoPro Studio 2.0 (or similar editors), reference pictures to the right.
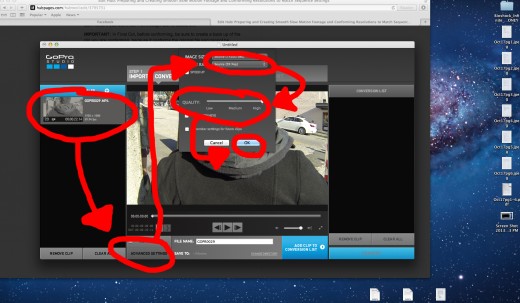
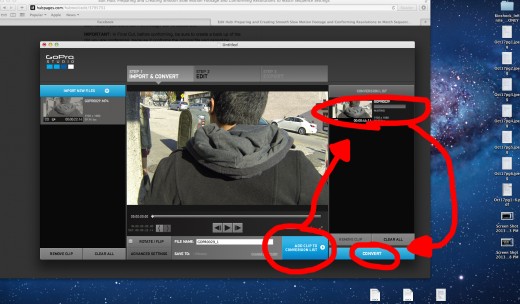
Open GoPro Studio 2.0, Click on Import New Files and select the footage you want to slow down. Select the imported clip and go into its Advance Settings. Select the frame rate you want to conform to, slide the Quality slider to high quality, and hit OK. Then click on "Add Clip to Conversion List". Click on "Convert" and wait for the convert button to turn into "Proceed to Step 2" and then click it. Make any adjustments you want, then click on "Export". Finally, name and save it to where you want.
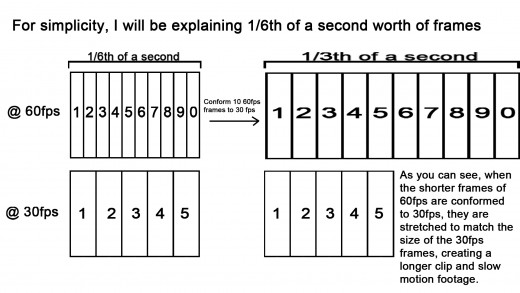
When you conform a clip, you change its frame rate to fit a slower frame rate. For example, in my fairly bad diagram below, you can see that the 60fps frames are stretched to fit into a 30fps sequence:
Using Percents Vs. Conforming
Conforming
When conforming, a lot of time goes into conforming your faster clips to slow motion, to fit the the Editing Timebase of your sequence. But, in my opinion, the quality from this precision is noticeably better than using percents and that is worth the extra time. Also, being able to conform and edit in a 24fps or 30fps timebase allows for the ability to achieve more of a "film" look, than if you stay in a 60fps (or faster) timebase.
Percents
When doing slow motion with percent, you save a lot of time when making a video. You are able to shoot all your footage in the same fast frame rate and continue on to editing without having to prep specific clips. The down side is the slow motion footage may be slightly more choppy because the frames don't fit as precisely into the sequence when you change the speed of a clip.
In Conclusion
This is the end of the article and I hope I was able to give some insight or different perspective to accomplishing a successful slow motion effect. Please feel free to leave any feedback on how to improve this or future articles I may write. Thank you for taking the time to read this!
P.S. Also, as I stated earlier, the video where I used slow motion B-roll is below. Notice how drastically the energy of the video shifts when going in and out of the slow motion scenes. This video was made in a 30fps timebase and the slow motion was conformed from 60fps.

")