- HubPages»
- Arts and Design»
- Crafts & Handiwork»
- Textiles»
- Textile Dyeing
How to Make Purses from Mens Neckties Part 2

Drafting a Basic Purse Pattern
** The following Hub instructions is written with permission from www.KariMeAway.com who so graciously allowed me to use her instructions from the very first purse kit i purchased from her company. I don't know if these kits are available anymore. I just purchase my frames and make my own purse now a days. The kit was a teaching tool for me to learn the process. Please take a minute to visit her web site for fine products and beautiful frames.
The most important suggestion I can make when learning how to make these purses is to make a "practice" purse first so that you can run through all the steps and get the hang of it. But above all be creative and have fun!!
Drafting a Basic Purse Pattern
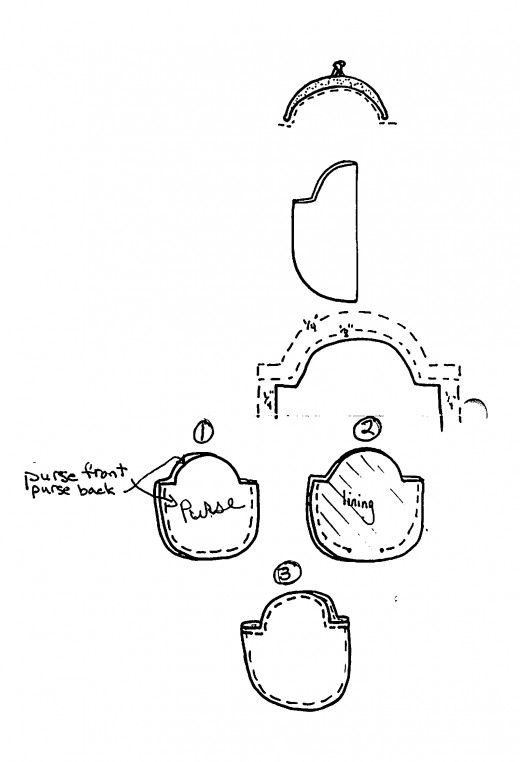
To draft a basic purse pattern, begin by laying the purse frame on a piece of paper and trace the inside of the edge of the frame ( see Fig 1) Decide what shape you want the bottom of the purse to be: rounded, triangular, scalloped etc.
Cut out the top edge of the pattern, Fold in half vertically and cut the bottom half of the pattern in the desired shape. By folding the pattern in half, yare are assured that the shape will be even on both sides.
Open the cut pattern and place up to the frame and see if you like the shape. If not, cut another and try again until you have the shape you like. ( I often draft master pattern shapes and use these as a guide for other purses).
Once you have your pattern, you will need to add 1/8" ease plus a 1/4" seam allowance to the top edge of the pattern only. ( You must add the ease or you will not be able to get anything in the purse, the fabric will be too taunt across the frame.)
To the bottom of the purse simply add 1/4" seam allowance.
Making the Purse - trim and clip seams as you work. Trace the purse pattern onto fabric and complete all embroidery or embellishments.
Cut 2 each of purse fabric and 2 of lining.
1. Lay right sides together, and baste stitch around the bottom half of the purse. Turn right side out and if you are happy with the shape, turn inside out again and stitch along the same seam line with a regular stitch.
2. Stitch lings right sides together, using a 1/4" seam allowance to begin, enlarging th eseam slightly as you stitch around the purse. Stop and leave a 2" opening to turn at the bottom of the lining. Begin stitching again ending with a 1/4" seam.
3. Turn the lining right side out and place inside the purse ( the purse is still wrong side out) Match top edges of the lining and the purse and stitch ** Baste first, then check, adjust if necessary. Turn purse right side out by pulling the lining out of the purse and pushing the purse fabric through opening in lining.
Whip stitch hope in lining closed and push lining into purse. Press seams flat.
Fig 1.
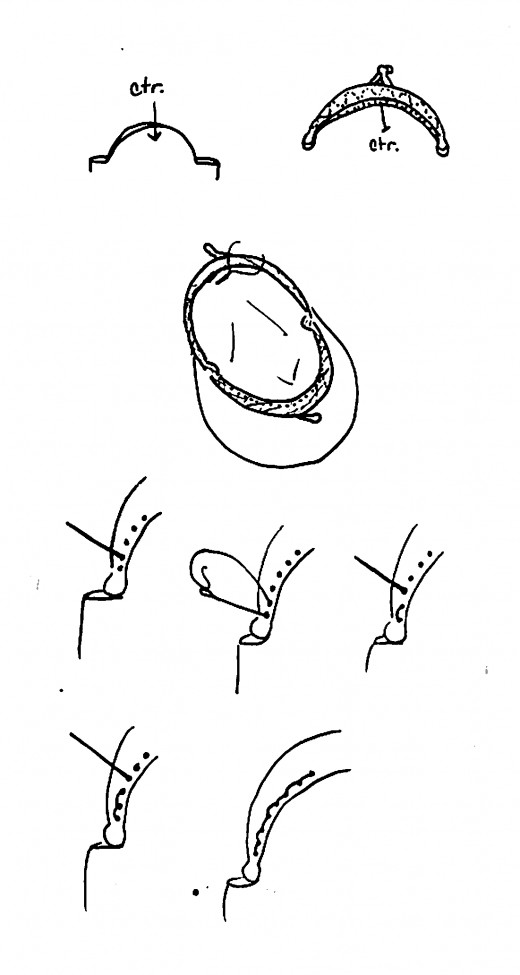
Attaching Your Purse to the Frame - Refer to Fig 2.
Fit the center of the top of the sewn purse and mark. With the frame closed, find the center hole in the purse frame and mark with a pin in the hole.
Open the fame and center the top edge of the sewn purse to the center of the wrong side of the frame.
Tack in place with a basting thread. ( the fabric of the lining should lay behind the frame and cover the sew holes) Double check to make sure the purse will fit the frame ( there should be some fabric to be eased in)
Thread a sewing needle with thread matching the purse or decorative thread. Make sure the thread is strong, double if needed. Knot the end. Beginning at the center hole stitch the purse onto the frame working one direction to the last side hole and then go back to the center and stitch the same way to the other last side hole easing in both directions as you go. Either stitch horizontally in and out of the holes or vertically, both methods will work. Tie and knot off ends of thread.
Fig 2.


")