- HubPages»
- Technology»
- Computers & Software»
- Computer Software»
- Digital Photography & Video
How To Correct Photos Using Adobe Photo Shop?

With the number of pictures that we take everyday, sooner or later we run into problems with hazy pictures, hot spots (the spots in the picture that are too bright), red eyes, backlights, over/under exposures or bad composition. However, thanks to modern day softwares - like Adobe Photoshop or Adobe Elements - the worst pictures can sometimes be saved from being deleted.
Let's take the most common mistakes in photography and see how they can be fixed one by one.
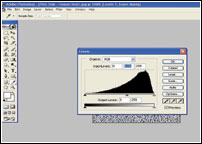
Fixing backlighted photos
Have you ever ended up with a photo which is too dark, for example, when the sun is behind the person in the photo or the sky is way too bright in a building's photograph making it appear darker? This is called backlighting and often causes problems in pictures. The Levels command can easily fix this discrepancy in your photos.
- Open Your Picture and Select Image - Adjustments - Levels.
- The levels dialogue box consists of a channel menu, a histogram, an input side bar and an output slider bar. The input slider bar is used to correct the brightness and contrast of images, while the output slider bar is used to set the tonal range of the image.
- Now without going too much into details, in the resulting palette, just carefully move the centre marker on the slide adjuster (LEFT) until the subject is light to suit your tastes. You may also compress the sliders slightly in from both the left and right.
- Since every picture is different, you'll need to see for yourself what works the best. However, the lighten shadows and the darken highlights sliders (the white and black arrows) are useful for adjusting the brightness of the light and dark areas in the picture, whilst the centre slider (the Midtone Contrast) is used to improve the picture's contrast.
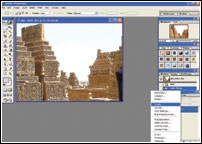
Too bright spots
I have a photo of a silver necklace, which has bright flash spots on it. How do I reduce the brightness without making the picture appear dull and grey? This is actually easier done than said.
- Choose Select > Colour Range.
- In the dialogue box that opens up, use the pull-down and set "Highlights" or set the fuzziness slider very low say at four or eight, depending on your picture. This should select only the brightest of the bright spots and you'll see dots sparkling.
- Create a New Adjustment Layer with Sub-menu Brightness/Contrast.
- To create an Adjustment Layer - Click the New Adjustment Layer button at the bottom of the Layers palette, and choose the layer type you want to create. Choose Layer > New Adjustment Layer, and choose an option from the submenu.
- Now move the output slider back towards the dark side and see if the image improves. You can also experiment with a ‘LEVELS' adjustment layer.
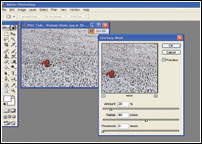
Photos in haze
If the pictures look hazy because of smoke or mist, you can easily fix this problem as well.
After opening your image in the editor, locate the Sharpen tools in the Filters and choose Unsharp Mask.
There are three settings here to work with:
Amount
determines how much to increase the contrast of pixels. We're working with subtle highlights here, so for most cases you won't want to boost this by more than 20-30 per cent.
Radius
is used to identify how many pixels around edges to sharpen. For sharpening contrast in the localised fashion we're working with here, a number between 40-70 seems to work well depending on the image, because you can really make the edges stand out.
Threshold
determines how far pixels must be from the surrounding area in order to be considered an edge. By leaving the threshold at 0 the entire image is sharpened. Increasing this number to anything greater than 0 seems to make the effect useless for what we're doing here.
What you will notice with this technique is that for example, the trees will have more edges to them or the doorway of your home will jump out a little more, whilst the original image was flat. It takes some experimentation to get it right, so don't give up on the first try.
Red eyes
When you use flash to take a picture, people or animals in the dark environment, your subjects can end up with red eyes. This effect is quite a common hitch and fixing it is not difficult.
- Open up the image with the red eyes in Photoshop.
- Press Ctrl + SpaceBar together and click on the image window to maximise the window to 150 per cent.
- Create a new, empty layer in your document. Click the New Layer button or New Layer Set button in the Layers palette.
- From the toolbox, select the paintbrush tool. Set the brush to a medium-soft edge and a size slightly larger than the problem eye area.
- Set your paint (foreground) colour to black by pressing the ‘Switch Foreground & Background' arrow or ‘X'.
- Whilst ensuring that the new layer is selected, click on each eye and paint over the eye reflections. You may need to click a few times with the paintbrush to cover the entire problem area.
- At this point the eye will look strange because there is no "glint" of light reflection in the eye. We will add the glint next.
- Create a new, empty layer above all other layers in your document. Click and hold and drag it to the top.
- Set your paintbrush to a very small, hard brush. Usually you should not need more than three to five pixels.
- Set your paint colour to white.
- Make note of where the glints should appear in the original photo and click once with the paintbrush directly over each eye glint in the original. Viola!
Blurred images
If you have a slightly out of focus image, than you may adjust the brightness and contrast to make it appear sharper. However, this technique won't work for a very blurred image. To sharpen that, you'll have to shoot the photo again.
- Open your image with File - Open.
- Select Image - Adjustments - Brightness / Contrast.
- Set Brightness to 20. Click preview to view the effect without closing the dialogue box.
- Set Contrast to 40.
- In most cases, setting the contrast to twice of the brightness values you entered will produce the best results.
- Click Ok.