How To Use 3M Automotive Acrylic Attachment Tape for Moldings and Rear Spoilers
Most car repairs or owners may want to add moldings or rear spoilers to their cars. In case you did not know, most cars use 3M automotive attachment tape of some sort. The tape is very strong and will seldom come off once the item is attached to the car. The 3M acrylic attachment tape is so strong it will keep a rear spoiler on the rear of the car in many cases. It will work on all 1991-94 Mercury Capri models for rear spoilers. This allows you to attach a new one without drilling new holes.
To Remove the Body Side Molding (BSM) or Trim from the Vehicle, do the following:
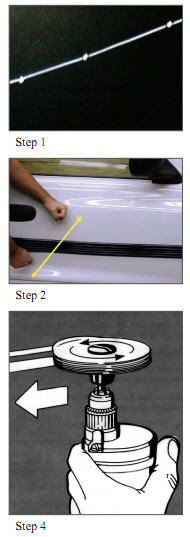
1. Use a piece of monofilament line and make several knots spaced about one inch apart.
2. Use the knotted rope or nylon line to saw through the tape and remove the trim without damaging it or the vehicle surface. (Use of gloves recommended). Carefully use a sawing motion as you lift free molding from the car.
To Remove the Tape/Residue from the Vehicle, do the following:
3. All tape/residue must be completely removed from the vehicle surface. Use a 3M™ Stripe-Off Wheel product to remove the tape/residue without damaging the vehicle surface.
4. The following technique is necessary for the removal wheel to work with the black 3M™Acrylic Plus Tapes: The wheel must rotate clockwise and be applied to the tape from right to left. Or, the wheel must be rotating into the tape to remove it without smearing.
5. After removal of the tape/residue with the wheel, use 3M™ Prep Solvent-70 as a cleaning wipe. Then wipe with isopropyl (rubbing) alcohol and dry with a clean, lint-free cloth.
Trim can be placed in a suitable container and 3M™ Citrus Base Cleaner sprayed to saturate the tape on the part. Allow the trim to soak in the 3M Citrus Base Cleaner for 12-24 hours with the tape side down in the cleaner. Then use a plastic squeegee to remove the softened tape/residue from the molding.
To use attachment tape to fasten molding or rear spoilers to cars, use the following general steps:
1. Prime the BSM/trim with 3M™ Automotive Adhesion Promoter (in the areas the tape will be applied).
2. Be careful not to drip or spill the primer on the BSM/trim face as it may damage the finish.
The use of the 3M™ Automotive Adhesion Promoter will assure an optimum bond due to the widespread use of low surface energy plastics by the automotive industry.
3. Apply the 3M™ Automotive Attachment Tape to the trim, being careful not to entrap air between the part and tape.Use a hard rubber roller or firm hand pressure to securely bond the tape to the trim.
4. Keep all contaminants (fingers, gloves, cloths, etc.) off the adhesive surface of the tape while applying it. Store the trim with the new tape applied in a clean area until it is re-applied to the vehicle.
5. Apply trim to a clean, dry vehicle (as previously described). Do not apply tape over old residue from former tapes.
6. Application temperatures below 60ºF should be avoided. It is important that the vehicle area not have any condensation on it where the molding or part is to be attached.
7. Apply trim with a rolling motion and with firm pressure to assure maximum tape contact with the vehicle, resulting in greater adhesion.
8. Use a hard rubber hand roller to roll the BSM/trim on the vehicle. Apply firm pressure while rolling to ensure complete adhesive wet-out and a good bond.
9. Check the edges of the trim to verify good tape adhesion. Re-roll the BSM/trim with more pressure if necessary.
- 3M Global Gateway Page
3M - Innovative Technology for a Changing World. Select a region to find product and company information relevant to you.


