Manage Your Receipts Online

If you are keeping track of your credit card purchases by saving receipts and comparing them to the total bill at the end of the month then I applaud you for practicing good financial management. That being said, I am writing this article to suggest a simpler, more efficient, and more "technological" way to keep track of all those receipts. Using any cell phone that can take pictures and send email (including the iPhone, Android phones, Blackberry, etc.), you can simply upload pictures of your receipts to a safe, secure photo storage host known as Picasa (which is run by Google). I am going to tell you why you would want to do this, and then show you how.
Why Store Receipts Online?
If you're like I was a few weeks ago, then you probably have an actual file folder (not an electronic folder!) stuffed into a file cabinet somewhere that is bursting full of receipts for every credit card purchase you have made within the last several statements. I keep these receipts so that when my credit card bill comes, I can verify that I actually did spend $30 on gas at Exon, three weeks ago (something I'd never remember if I didn't save the receipt). Doing this is a great practice financially because if anything mysterious shows up, you can instantly verify that it is, or isn't, someone who has stolen your card.
But I realized recently that that practice is getting old. I have way too many receipts, it's hard to find what I need when I need it, and eventually the receipts fade. So I have thought of a much better solution. I have begun storing my receipts online by taking a picture of them and uploading them to a photo hosting site known as Picasa. When I do this, the receipts are automatically organized by date, and finding them when I'm checking my statement (also online) is very easy. Plus, thanks to my GPS-enabled Android smartphone, all of my photos are geo-tagged. This means that when I take the image, the location of where I took it is embedded in the picture. When I am browsing my photos online and don't recognize where the receipt is from, I can instantly see a map of where the gas station, etc. was located.
The Online Photo Host
In order to start using this method, you're first going to need a photo hosting solution. I am using Picasa by Google, and absolutely love it because of its geo-tagging features, organizing by date, and integration with my phone. Sign up for free at http://picasaweb.google.com/. **Make sure that you use the same username and password for your Google account as you did when you set up your Android phone (if this applies). This will allow for seamless syncing later.
Once you sign up, you get 1 GB free of photo hosting. This should be plenty for pictures of receipts, but if you plan to use it for other photos, you may need to upgrade in the future. The first thing you need to do is create an album called "Receipts" or something similar. Do this by clicking "Upload."

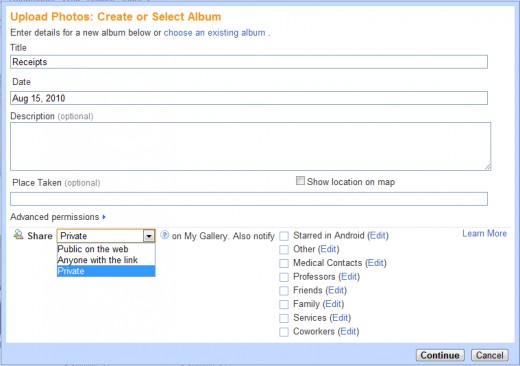
Next, click "create a new album."

Then, name the album, and change the privacy to Private. This is very important, or everyone on the internet will be able to see your receipts and personal information.
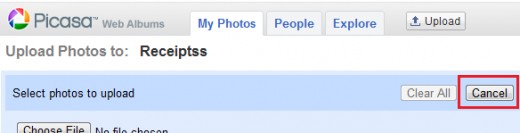
When you're finished, click "continue" and then, click "cancel" because you don't want to upload any photos.
Photographing Receipts
Now, you have set up the album. The next step is to begin photographing receipts whenever you are out. This is probably the hardest part, because it involves remembering to do it each time you get a receipt. But if you make a habit of photographing the receipt each time, before you leave the restaurant or gas station, it will eventually become a habit. Make sure that when you take the photo, the numbers are clearly shown. If it is a long receipt, the only important part is the total and the area where it says how much was charged to the card. On some phones, like most Android phones and the iPhone, there are intricate options for taking photos. I have found that the Macro Focus feature works best to clearly show the numbers.
If you want to keep the receipt in case you need to return an item, that is advisable, but for verifying your credit card bill, everything else will be done online, so feel free to put that receipt away.

Uploading The Photos
Once you take the photo, there are several ways that you can upload it to the album you created in Picasa. Once you upload it, you can delete it from your phone.
- On Android phones, view the picture in the gallery and click "More." Then click "Share" and choose "Picasa." Select the Receipts album, add an optional caption such as "date night dinner" and then click "upload." They will be uploaded to the album that you can view online. Make sure to enable the GPS before taking pictures if you want them to be geo-tagged.
- On the iPhone and all others, you have to email the pictures to your album. It's simple once you set this feature up within Picasa. Before you take the photos, follow this guide: http://www.shaneeubanks.com/general/how-to-send-iphone-photo-to-picasa/ that shows you how to create a private email for uploading.
Reviewing the Photos
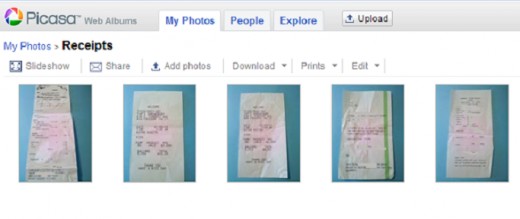
When your credit card statement comes, simply log in to your Picasa web albums using your Google account name and password. Then, browse to the Receipts album and there are all your photos, nicely organized by date.
This is a great way to manage your finances using services that are free, simple, and accessible anywhere. I am aware of several applications for smartphones that do exactly this, but I like how the features of Picasa and Android phones allow me to tie everything together. Plus, since Google runs Picasa, I am almost certain that the service won't be shut down, rendering my receipts missing.
Tags: financial management, receipt tagging, photos of receipts, uploading pictures of receipts, using smartphone take pictures of receipts, money management with smartphone, phone to track receipts, receipts and data, phone, android, iphone, blackberry, financial


