Oxygen Sensors: How to Test and Remove from Your Car


O2 sensor in a 1991-94 Mercury Capri and Others
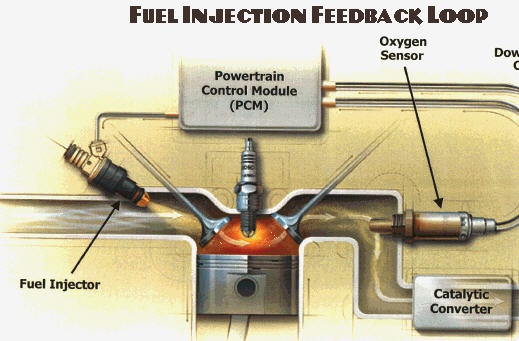
The O2, or oxygen sensor, plays an important role in your mis-80s to present car. They sniff the car exhaust and immediately report back to the car computer about the oxygen mixture content, The computer tries to compensate instantly for the perfect or best fuel\air mix. If the O2 sensor is bad, the computer has no clue how to adjust the fuel\air reading and basically remain open, as if the car is starting cold, usually a rich mixture. Uncontrolled, it is bad news for the car over a period of time and the car will simply run lousy. If the O2 sensor is functioning, yet is slow in reacting to the readings, generally, is wasteful and hurts performance. One can actually determine whether the car is lean or rich by looking at the spark plugs. If black and sooty, too rich; if whitish, too lean.
Testing the Sensor
Using a voltmeter, set it to 1 or 2 volts. Make sure the car is hot, run it around town until the engine is hot. Locate the sensor and follow the wire to the connector. Disconnect it. Attach the red test prong of the meter to the connector and wire that connects to the sensor. The black test prong is ground to metal. Turn on the engine. The meter will or should have readouts from .3 to .8 volts, it should not remain steady long at any one reading. If the meter is steady between a few numbers, that is an indication the sensor, while functioning, is getting old or clogged. Time to change it. If the meter is not responding, the sensor is bad.
On the 91-94 Mercury Capri
The sensor is easy to find on the exhaust, directly behind the radiator. It sticks out. However, getting to it requires one to remove the top heat shield, the turbo hoses (if it an XR2). Space is limited, causing issues. Now, use a slit socket, or called an O2 socket, so you can avoid cutting the wire (just in case you cannot remove the sensor). The problem presented is that the sensor is at an angle, enough to cause problems with anything for a tight fit. The only way is to use a rachet with a deep slit 7/8" socket.
With the sensor out, color will tell you things: a grey or reddish color indicates it is OK, black indicates an over rich mix, white indicates too lean or antifreeze is seeping into the cylinder.
Test Readings
A good sensor will have a range fluctuating between .2 and .8v. If the reading is .4 - .7v, it is perfect. If less than .2v, too lean mixture. If more than .7v, it is rich. The higher the #, the worse it is. The meter should fluctuate frequently during the test between the ranges, if say, the meter changes slowly between .7- .9, if works but is time to change, not only because of this but it is too rich.
How Often?
The rule is that for mid-80s to mid-90 cars, change every 50,000 miles, if you car is younger, 100,000 miles. The sensor can last longer or shorter, which is why you should test. If your engine light comes on, it may be the sensor going bad.


")


