Make Money or Save 2/3 OFF The Cost Of SOLAR - Build your own Solar Panels

This hub is short and packed w/info and links, to better acclimate you with the assembly of Solar Panels. We will talk about these 12 Products that you will need to construct your new panel (not including tools), Pre-tabbed cells or non-tabbed cells, Tabbing and Bus wire, Flux, solder,small gage wire, a diode, silicone caulk,sheet of glass{Lowe's},sheet of lexan, 1-5/8" Steel Stud screws and "U Channel" steel studs. All items can be found ebay or lowe's.
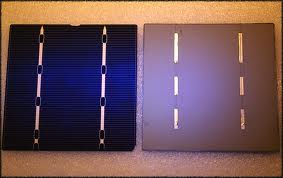
First the most important part The Solar Cells. There are lots of manufacturers of cells but the two types of cells you should consider first are Pre-tabbed cells or non-tabbed cells, I choose pre-tabbed, simply because letting some one else do part of the work saves time and in some cases money. I've searched a lot of places and found the best deals on eBay you can buy a kit with a lot of the things you'll need to complete our panel, just search for "solar cells" or "solar cell kit". Most panels are made of 36 to 72 cells. Each cell has a slightly different voltage so you'll need to test the voltage if each one, then add them together for your total of no more than 14.5-18 volts,(avg.cell wattage is 0.5 x 36 = 18 volts ) unless your charging more than one battery, in that case just 6 volts over the battery voltage is suitable for charging.
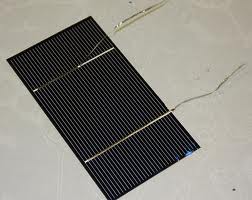
Now your ready to solder your cells together, set your soldering iron to a low setting and lay out the cells to be soldered face down (blue side down)(tabs are on the blue side) lay the cell under the tabs from the cell above. The cell above we will call cell 1, and so on . cell 1's tabs are to be soldered to the back of cell 2 where you see the squares fallow this Procter until you have the length then using your extra bus wire connect rows together in a parallel circuit to gain the panel width.
OK connect the 18 gage wire to the ends leaving a little extra solder at the connection points.
This is the part where you will do the hard work! Construction of the panel housing.
measure the total cells length and width add 3" to the length and width and cut the 4 pieces of U Channel to those lengths and then screw 3 sides together, caulk the two corners and the bottom of the U channel where the lexan will lay, now slide in the lexan and before the caulk dries but the last side of U channel in and screw in place. Caulk the last two corners and every thing in side like MAD. After every thing dries, drill a small hole for a wire to come out and a larger hole in the side of the U channel to attach the Diode then screw down tight with the diodes connection loop pointing out and the screw and nut on the in side.
The screw post of this diode is where the electric flows in (anode) and the loop at the top is where the electric comes out (cathode). diodes only allow electric to flow one way so that when its dark out side the solar panel doesn't drain your batteries (BAD).
Its now time to place your cells into the panel. Put a lot of dots of caulk all over the area you would like the cells to set and carefully place the cells directly after placing the caulk. Connect one wire to the diode screw post and the other wire out the smaller hole and now more caulk.
Final step caulk the top of the U channel and place the glass on top, let dry and your done.
Also I've posted a video i found on YouTube, visuals are helpful for me.
Please post any related questions, if I don't know I will find out!

Supplies
Pre-tabbed cells------------------------ http://cgi.ebay.com/100-3x6-Evergreen-Solar-Cells-kit-wires-flux-solder-B_W0QQitemZ110397532687QQcmdZViewItemQQptZLH_DefaultDomain_0?hash=item19b434aa0f&_trksid=p3286.c0.m14&_trkparms=65%3A12%7C66%3A2%7C39%3A1%7C72%3A1205%7C240%3A1309%7C301%3A1%7C293%3A1%7C294%3A50
or non-tabbed-------------------------- cells http://cgi.ebay.com/100-3x6-solar-cells-5v3-6a-this-is-the-end-of-these_W0QQitemZ250451785803QQcmdZViewItemQQptZLH_DefaultDomain_0?hash=item3a5016f84b&_trksid=p3286.c0.m14&_trkparms=65%3A12%7C66%3A2%7C39%3A1%7C72%3A1205%7C240%3A1308%7C301%3A1%7C293%3A1%7C294%3A50
Tabbing {Bus wire)----------------- http://cgi.ebay.com/20-FEET-TABBING-AND-8-FEET-BUS-WIRE-FOR-SOLAR-CELLS_W0QQitemZ130315106926QQcmdZViewItemQQptZLH_DefaultDomain_0?hash=item1e5762ba6e&_trksid=p3286.c0.m14&_trkparms=65%3A12%7C66%3A2%7C39%3A1%7C72%3A1205%7C240%3A1318%7C301%3A1%7C293%3A1%7C294%3A50
Flux --------------http://cgi.ebay.com/FLUX-PEN-FLUX-REMOVER-PEN-FOR-SOLAR-PANEL-CELLS-ASSY_W0QQitemZ390061697160QQcmdZViewItemQQptZLH_DefaultDomain_0?hash=item5ad17d2888&_trksid=p3286.c0.m14&_trkparms=65%3A12%7C66%3A2%7C39%3A1%7C72%3A1205%7C240%3A1318%7C301%3A0%7C293%3A1%7C294%3A50
solder--------------- http://cgi.ebay.com/Liquid-Solder-Flux-for-Solar-Panels-Cells_W0QQitemZ400039522619QQcmdZViewItemQQptZLH_DefaultDomain_0?hash=item5d2436b13b&_trksid=p3286.c0.m14&_trkparms=65%3A12%7C66%3A2%7C39%3A1%7C72%3A1205%7C240%3A1318%7C301%3A0%7C293%3A1%7C294%3A50
small gage wire------------------ http://cgi.ebay.com/New-Raptor-50-18-GA-Stereo-Install-Speaker-Wire-Cable_W0QQitemZ350216905415QQcmdZViewItemQQptZLH_DefaultDomain_0?hash=item518a8de2c7&_trksid=p3286.c0.m14&_trkparms=65%3A12%7C66%3A2%7C39%3A1%7C72%3A1205%7C240%3A1318%7C301%3A0%7C293%3A7%7C294%3A50
a diode-------------------- http://cgi.ebay.com/40-AMP-400-VOLT-BLOCKING-DIODE-WIND-GENERATOR-SOLAR_W0QQitemZ250436926899QQcmdZViewItemQQptZLH_DefaultDomain_0?hash=item3a4f343db3&_trksid=p3286.c0.m14&_trkparms=65%3A12%7C66%3A2%7C39%3A1%7C72%3A1205%7C240%3A1318%7C301%3A0%7C293%3A1%7C294%3A50
silicone caulk ------------------------LOWES
sheet of glass -----------------------LOWES
sheet of lexan -----------------------LOWES
1-5/8" Steel Stud screws ---------LOWES
"U Channel" steel studs ---------LOWES


