How to Stain Wood

Staining Wood
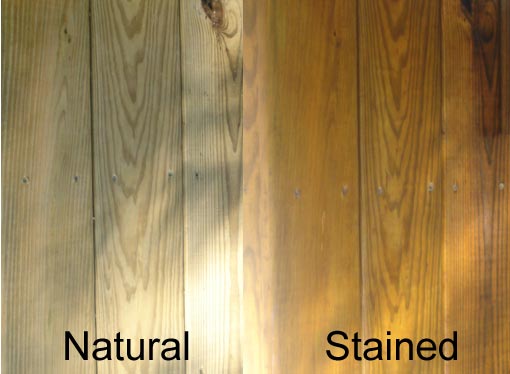
Wood stain is a great alternative to paint. It leaves the wood semi- natural, yet better blending it with your home decor. You can stain wood inside and outside the home to complement your home.
Once you've decided that you want to stain the wood inside, or outside, your home, you want to make sure that you select a stain color that sets the mood and tone of your house's decor.
If you want to create a distinctive look, apply a semi-transparent stain to the main object, and use a solid color as an accent.
To help you achieve the perfect finish for your wood, you may want to consider testing out the stain packets at the home improvement store. If you can't find the stain packets that you're looking for, then grab a color selector brochure to help make your color selection the right one.
Tip for color selection:
Not only do different wood types vary in color, texture, and absorbency, but so do different lots of the same lumber. Stain absorbency will also vary due to temperature and humidity. This will impact the final look of your color.
It is a good idea to do a color test on a hidden area to determine how quickly your specific wood will absorb and retain a particular stain color.

Wood Preparation
Clean and Restore
Surface preparation, especially with older, weathered wood, is critical for a beautiful, long-lasting finish. Cleaning the wood before staining allows for:
- Removal of dirt and contaminants for a truer color finish
- Better stain penetration into the wood for maximum durability
You may consider using a pressure washer to clean off the wood. Otherwise, you may want to purchase a cleaning product, such as a wood wash, wood cleaner, stain stripper, house wash, or a wood brightener.
Tests
Try these tips to help you determine if the wood is ready to be stained or if it needs more preparation:
Water Absorption Test
Pour a cup of water on a few horiontal surfaces of the wood. If the water is absorbed in less than 10 minutes, or if the surface color darkens, then it's time to stain.
Tape Peel Test
Use this test when staining older, weathered wood. Take a putty knife, or other sharp blade, cut a small "X" in two or three random spots on the surface. Cover the cuts with duct tape, press down firmly, and quickly pull it off.
If any flakes of old wood stain or wood fibers are stuck on the tape, then you must first sand the suface or apply a stain stripper to reveal a fresh layer of wood.
Protect and Beautify
Once the wood has been prepared with a cleaner and is free of dust, dirt, mildew, oil, and all other contaminants, it's time to apply a protective finish to the wood.
You can choose from clear sealants to solid color stains.
- Clear- A clear finish allows the wood to weather gray naturally.
- Toners- A slight hint of color that maintains or restores the natural beauty of wood; usually available in a few colors.
- Semi-Transparent- A subtle color that allows the natural grain and texture to show; available in several colors.
- Solid colors- A rich, opaque color that allows texture of the wood to show; available many different colors.


Applying Wood Stain
The following tips are key application techniques for staining wood and achieving the finish your want:
- Cover all surrounding areas, such as plants, shrubs, and bushes, with a tarp or dropcloth to prevent getting stain on landscaping.
- If you're using multiple stains or multiple cans, intermix all cans to assure perfect color uniformity.
- Stains and other products of the sort are for immediate use on wood (to include pressure-treated wood).
- Apply the stain with a high-quality brush, roller, paint pad, or spray equipment. If you are applying with a sprayer, be sure to backbrush to provide maximum stain penetration.
- To help avoid lap marks, stain only a few boards at a time, always keep the leading edge wet.
- Don't rush the job. A thin coat, versus a heavy application, will fully penetrate into the wood fibers ensuring a successful finish.
- Allow a full 24 hours of drying time.


 Outlet")
